• Skip to primary navigation
  • Skip to main content
  • Skip to primary sidebar
  • Skip to footer
Zesty South Indian Kitchen logo
  • Home
    • Privacy Policy
    • Disclosure
  • About
    • Contact Me
  • Recipe Index
    • Bakes
      • Bread
  • Work With Me
menu icon
go to homepage
  • Home
    • Privacy Policy
    • Disclosure
  • About
    • Contact Me
  • Recipe Index
    • Bakes
      • Bread
  • Work With Me
search icon
Homepage link
  • Home
    • Privacy Policy
    • Disclosure
  • About
    • Contact Me
  • Recipe Index
    • Bakes
      • Bread
  • Work With Me
×
Home

Immune Juice

Immune Juice

Dec 28, 2012 · 42 Comments

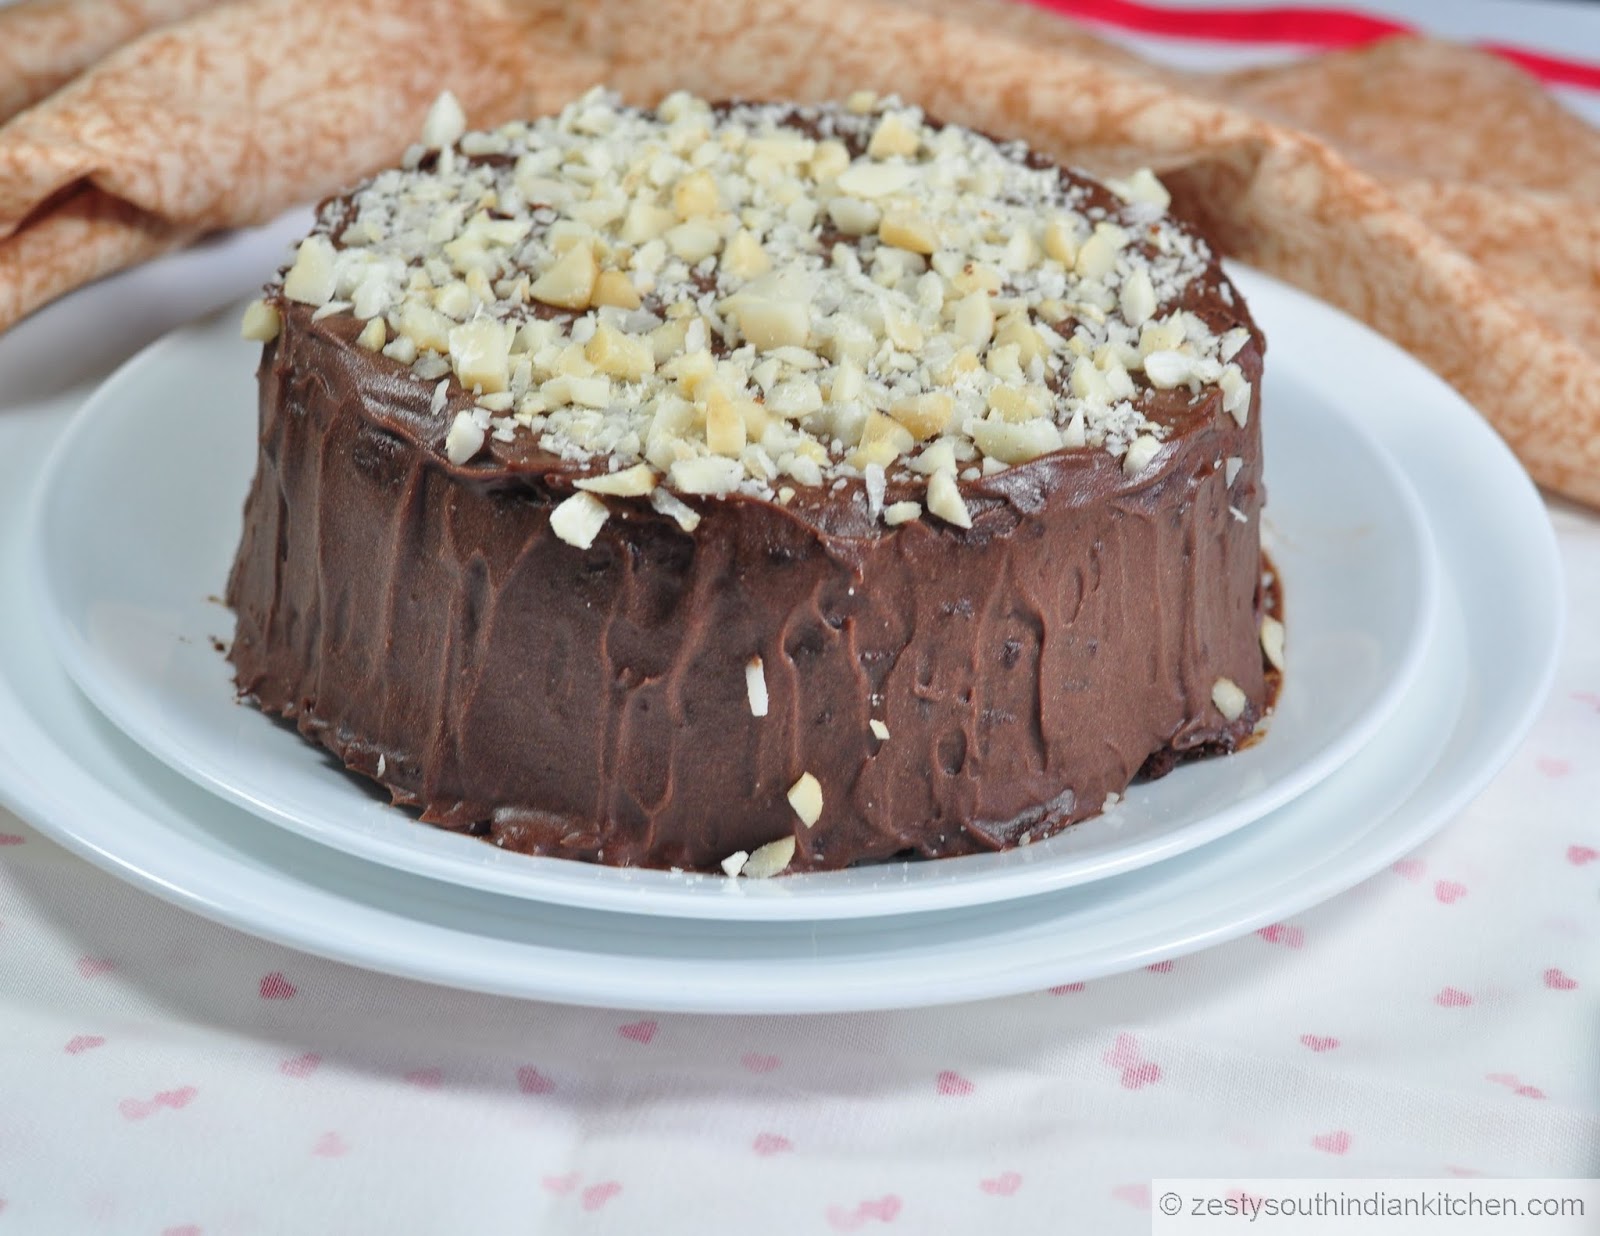
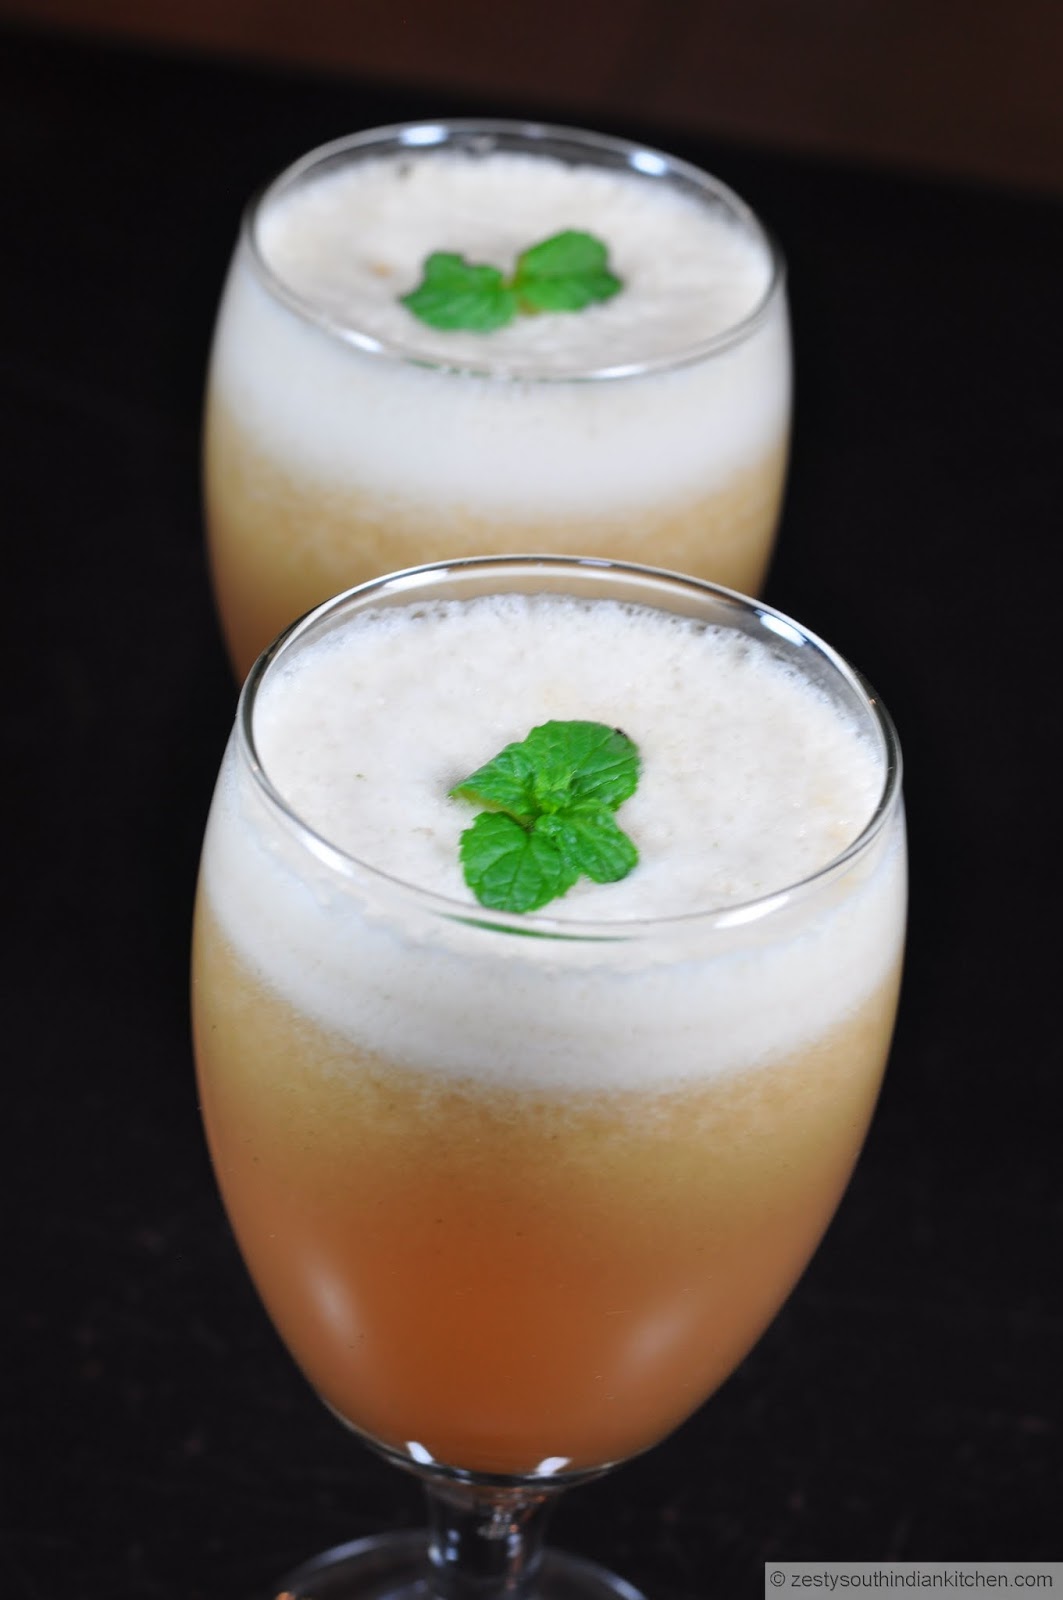
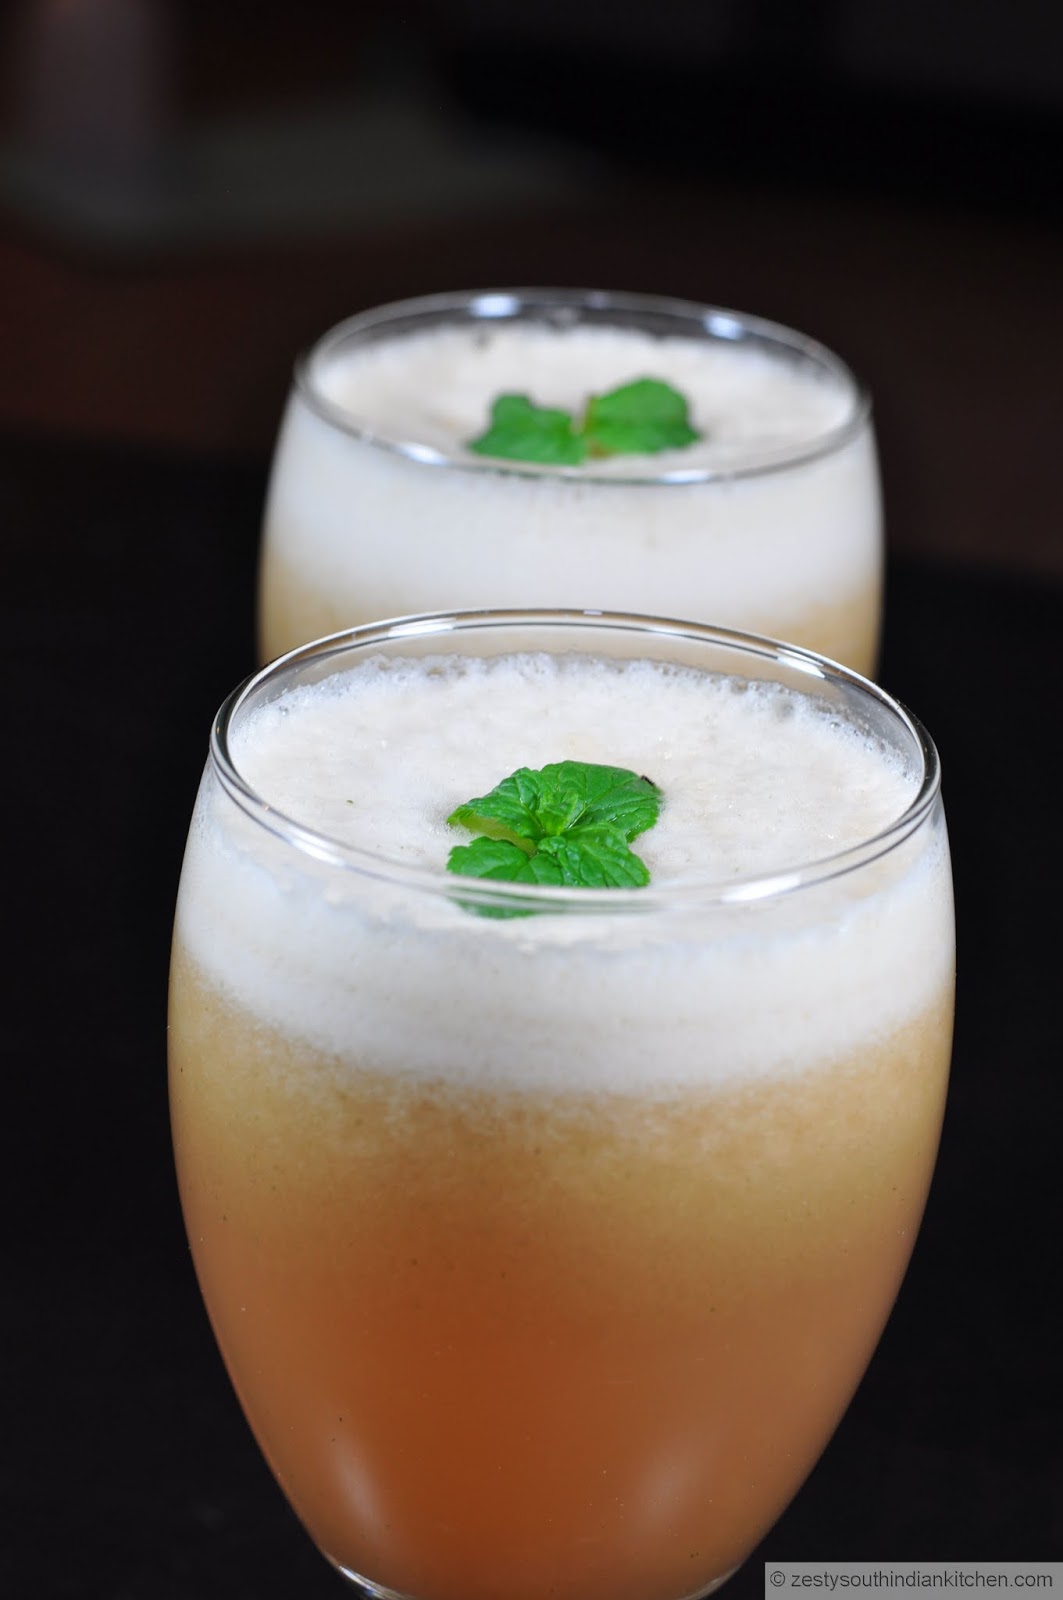
Delicious Immune juice made with veggies and fruits without any added sugar.

<img src="immune juice.jpg" alt="A juice that helps to increase immunity">

Hope everybody had a wonderful Christmas and enjoying the rest of holidays with fun. Waiting for New Year to starts with great enthusiasm. I don’t think I am keeping any resolution, usually my resolution will always remain a resolution and not even get one day will be executed.  With two kids, even finding some time to have a little exercise is not easy task.  How about you? Will you able to keep to as few of your New Year resolution. I admire those who keep and successfully finish New Year resolutions. Here is delicious Immune juice that helps boost the immunity  I finally made it.
<img src="immune juice.jpg" alt="A juice that helps to increase immunity">
 We   as family always believed that juice is only made with fruits and not with any vegetables. However one day my hubby me showed this article in Daily mail newspaper online version.
This newspaper is mainly about actors and actress, where they are vacationing or not vacationing. One good thing about that newspaper they give everything in elaborate detail.
In this article Kris Karr who was diagnosed with cancer ten years ago, controlled her cancer with diet. She has even written three cookbooks, and in this article, she has given a recipe for a Juice that builds immunity. I liked it as it require, green apple, romaine lettuce, cucumber, lemon and ginger. However my chef in me asked me to increase the flavor by adding little salt and black pepper.

Health Benefits of Immune juice

I know apple is rich in fiber and vitamins A, B and C and also fight against Rheumatism, read more from here, cucumber is rich in vitamin B, and is 95% water so it helps in hydrating the body, cucumber is also known to contain lariciresinol, pinoresinol, and secoisolariciresinol.
These three lignans have a strong history of research in connection with reducing risk of several cancer types, including breast cancer, ovarian cancer, uterine cancer and prostate cancer. Read more from here.  Lime is rich in vitamin C.  Ginger stimulates the digestive system and has for long been used as a natural treatment for colds.
<img src="immune juice.jpg" alt="A juice that helps to increase immunity">
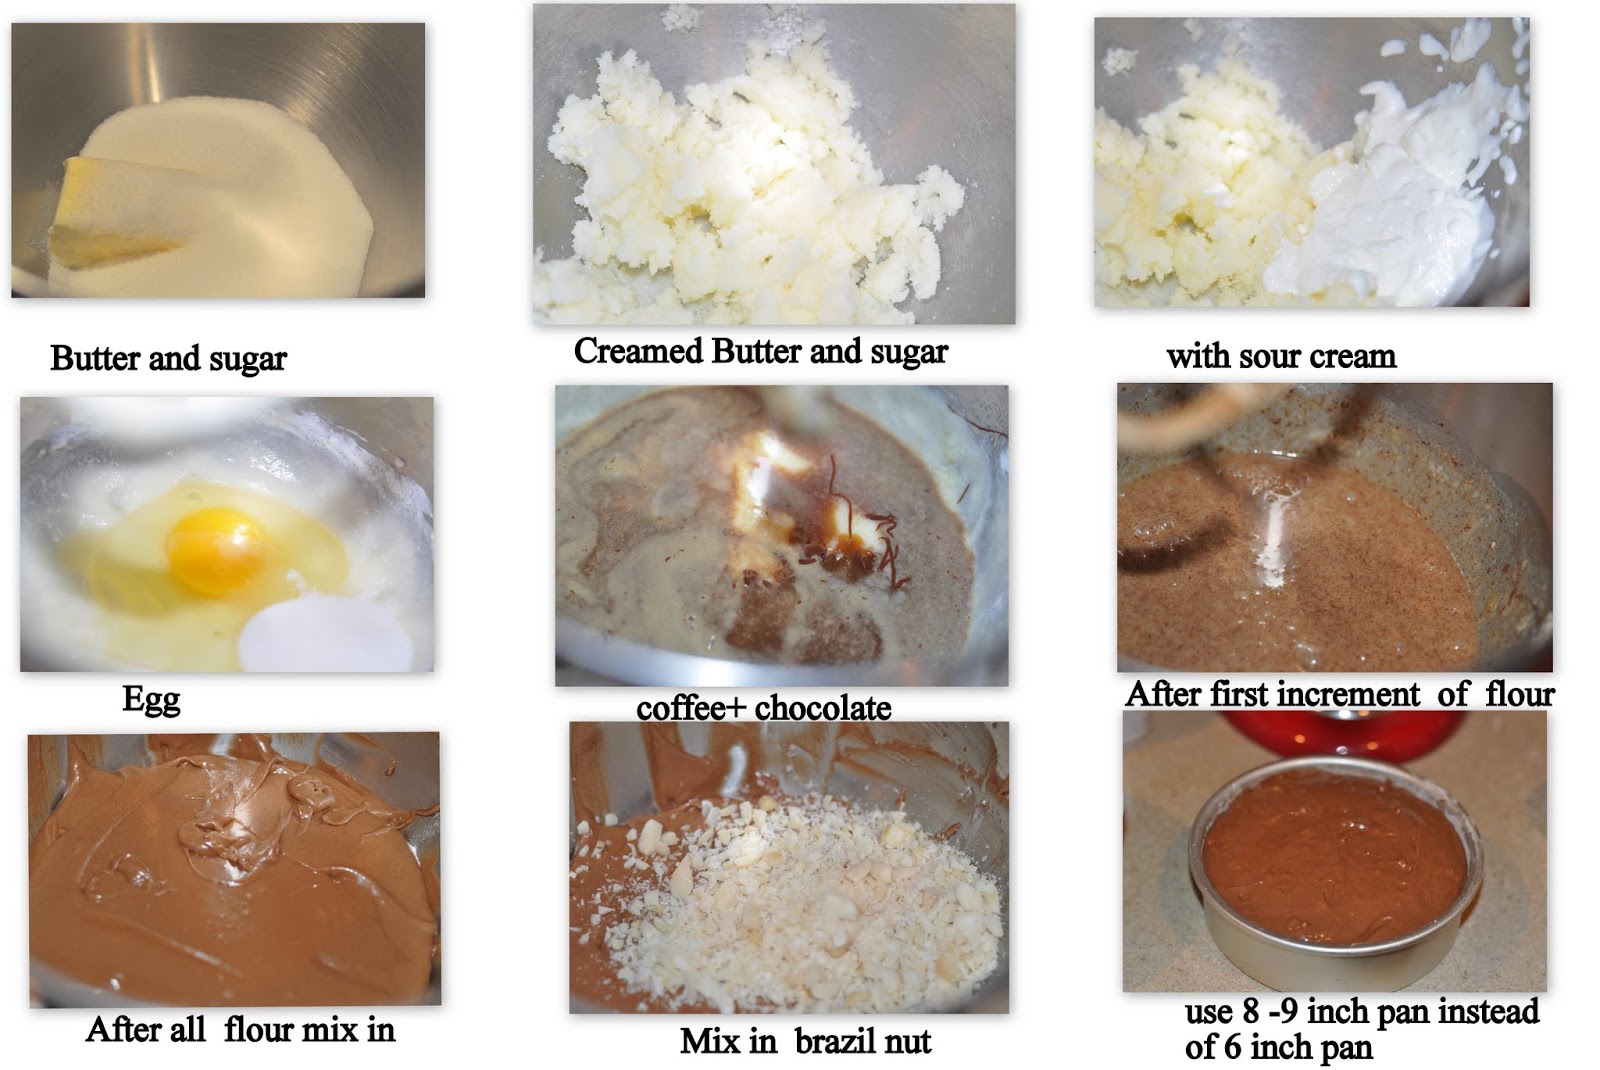
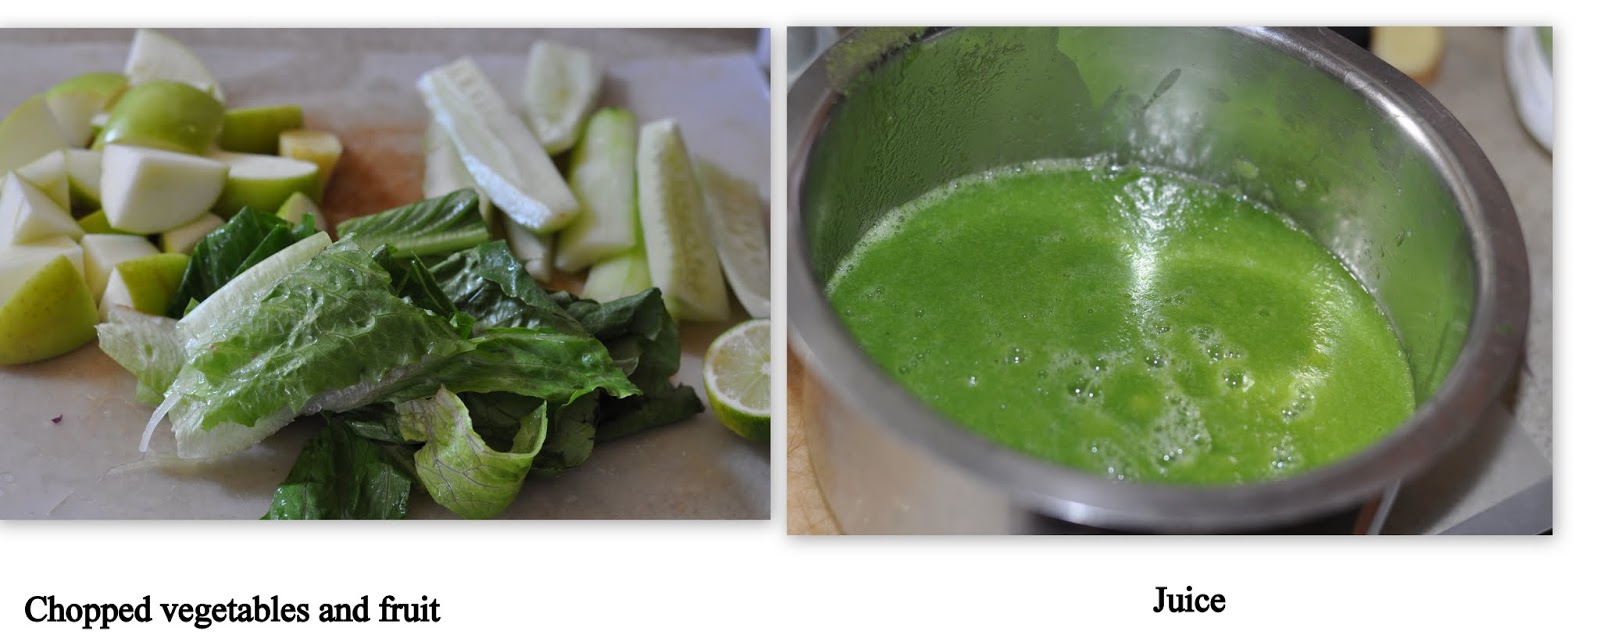
I washed and cleaned cucumber, I don’t like their peels, so peeled and de-seeded them, chopped the green apple, peeled ginger piece extracted lemon juice, added salt and pepper. Put it in the blender and started blender. I was waiting for 2-3 minutes nothing happening, blades are moving but no juice. Then I decided to add water. Once water had joined the ingredient list, I was able get juice. It was really thick juice; if you want you can increase the water.
 At first I did a taste test I liked it, then asked hubby who is inspiration behind this discovery of juice, to do a taste test. He told it is delicious. For my daughter I added a ½ teaspoon of sugar so she was also able enjoy the juice. Try it, it is delicious, it will change your perception of vegetables in juice.
<img src="immune juice.jpg" alt="A juice that helps to increase immunity">
Print Recipe
5 from 2 votes

IMMUNE JUICE: A JUICE THAT HELPS TO INCREASE IMMUNITY

Delicious Immune boosting juice made with fresh veggies no added sugar
Prep Time5 minutes mins
Total Time5 minutes mins
Course: Drinks
Cuisine: American
Keyword: Juice
Servings: 2
Calories: 81kcal
Author: Swathi ( Ambujom Saraswathy)

Equipment

  • Blender
  • KitchenAid® K400 blender

Ingredients

  • 1 green apples quartered
  • 1 cucumber
  • 1.5 cm piece ginger root
  • ½ lime peeled and quartered
  • 4 romaine lettuce leaves
  • ¼ teaspoon salt or to taste
  • ⅛ teaspoon black pepper
  • 1 cup Water

Instructions

  • Peel the skin of cucumber and deseed and chop it into big pieces.
  • Peel the skin of ginger and add all ingredients into a blender along with water. Blend it well for about 5 minutes or until you get a thick juice.

Notes

Enjoy with or without black pepper.
Adapted from here

Nutrition

Calories: 81kcal | Carbohydrates: 20g | Protein: 2g | Fat: 1g | Saturated Fat: 1g | Polyunsaturated Fat: 1g | Monounsaturated Fat: 1g | Sodium: 305mg | Potassium: 462mg | Fiber: 5g | Sugar: 12g | Vitamin A: 5044IU | Vitamin C: 16mg | Calcium: 55mg | Iron: 1mg
Tried this recipe?Mention @nidhinikhil or tag #zestysouthindiankitchenrecipes!

Detox., Featured, green vegetables, Healthy, Immune juice, juice

Fruit Cake /Plum cake/Kerala style

Dec 25, 2012 · 37 Comments

Delicious traditional Kerala Style rich fruit cake made with dry fruits and nuts soaked in rum. This is Christmas Tradition.<img src="plumcake.jpg" alt="richfruitcake/plumcake kerala style ">

 Wishing all my readers and Friends a Merry Christmas and Happy Holidays
Hope everybody joined the family and friends for this Christmas. Day before yesterday we went out for seeing Christmas lights in the nearby zoo. It was really fun, my daughter toughly enjoyed for about hour. Little one was fine till the lights visit, and he started crying while the way back home.
Here on the Christmas Eve, even the climate is really good at around 79 °F and forecasters are predicting that we are going to get a rainy Christmas, while the majority of the country is going to get snowy Christmas. We are going to enjoy the weather, when it is good. How about you guys?
In India it is already Christmas day.  Christmas in India mainly people going to church and enjoying the best home cooked food, and would celebrate the birth of Jesus Christ. Here also within in a few hours it is going to be Christmas and everybody would be ready to unwrap the Christmas presents and enjoy the delicious food.
<img src="plumcake.jpg" alt="richfruitcake/plumcake kerala style ">
Every year I try to make a Christmas delicacy from my home town, like plum cake/Rich fruit cake, Acchappam/ Kerala style Rosette cookies and Kuzhulappam/Rice flour cannoli.  I have finished cake till now. I need to make some rosette style cookies and cannoli. I think I will finish it by the end of the year.
However I made Finnish Christmas bread Joulimmpu, gingerbread cookies, chocolate brazil nut cookies and fruit cake ice box cookies.
For making the plum cake I used my new bundt pan gifted by my hubby. I added less alcohol and use more dry fruits, like, fruit cake mix, currants, dates, cranberries, apricots, nuts like, cashew, almond, Brazil nuts. I thought of using pistachio however drop the idea after seeing lots of chopped nuts in the end. This time I used Rum and increased baking powder and added baking soda. Soaked the dry fruits in ½ cup water and ½ cup Plantation rum for about 5 days and made this cake. It is delicious and soft. If you are looking for the hard fruit cake that is used for throwing, this is not the one.  I changed this fruit cake from the earlier version that is why I am writing it as one recipe. Here comes the recipe.
First grab the ingredients from pantry, chop the dry fruits and soak them in rum and water mix for 5 days.

 On the day of baking smear the nuts with almond  extract  and set aside.
 Make caramel syrup.

Sift the flour with baking powder, baking soda, salt and spices and set aside.
Separate egg whites and yolks and beat egg white and set aside.
Cream butter, sugar and add vanilla extract, egg yolks, orange juice and caramel syrup and combine everything. Then gradually add flour and mix everything. To this add dry fruits and nuts and finally fold in egg whites.
Transfer the batter to prepared cake tin and bake for about 1 hour at 350F.
Once cake is done allow to cool in the cake tin for about 45 minutes.

<img src="plumcake.jpg" alt="richfruitcake/plumcake kerala style ">

Then slice and enjoy.
<img src="plumcake.jpg" alt="richfruitcake/plumcake kerala style ">
Print Recipe
5 from 40 votes

Plum cake/ Rich Fruit Cake

Delicious traditional rum soaked dry fruit and nut cake made during Christmas in Kerala, India.
Prep Time2 hours hrs
Cook Time1 hour hr
Soaking time5 days d
Total Time5 days d 3 hours hrs
Course: Dessert
Cuisine: Indian, Kerala
Keyword: Plum cake /fruit cake
Servings: 15
Calories: 369kcal
Author: Swathi (Ambujom Saraswathy)

Ingredients

  • Soaking
  • 1 cup Assorted dry fruits cake mix strawberry, papaya, kiwi and pineapple (finely chopped)
  • ⅓ cup Raisins
  • ⅓ cup Cranberries
  • ½ cup Dates chopped finely
  • ½ cup Dry apricot 9 no chopped finely
  • ¼ cup Dry Mango 5 no chopped finely
  • ½ cup Rum : ½ cup I used Plantation Rum
  • 3 ¾ cup Total dry fruit and ; fruit cake mix:
  • I used  2 ¾ cup of this mixture for the cake
  • Nuts smeared with almond essence
  • ¼ cup Almond Chopped finely
  • ¼ cup Cashew Chopped finely
  • ¼ cup Brazil nut chopped
  • ⅛ teaspoon Almond extract
  • Batter
  • 2 cup All purpose flour
  • 15 tablespoon Butter less than 1 tablespoon from 2 sticks
  • 1 ⅓ cup Granulated sugar
  • ¼ teaspoon Salt
  • 3 Egg yolk at room temperature
  • 3 Egg whites at room temperature
  • 1 teaspoon Baking powder
  • ½ teaspoon Baking Soda
  • ⅓ cup Orange juice
  • 1 teaspoon Vanilla extract
  • Caramel syrup
  • ¼ cup Granulated sugar: ¼ cup
  • ½ cup + 1 tablespoon Water
  • ¼ teaspoon Lemon juice
  • Spice powder
  • 1 teaspoon Caraway Seeds ground
  • ¼ teaspoon Ground nutmeg
  • ½ teaspoon Ground Cinnamon
  • ¼ teaspoon Ground cloves
  • ½ teaspoon Ground cardamom
  • ¼ teaspoon ground ginger
  • ¼ teaspoon ground allspice

Instructions

  • Chop all the dry fruits including nuts into small pieces and soak them in Rum for at least one day advance. I soaked for them for 5 days. Smear the nuts with almond essence and keep it aside.
  • To make caramel syrup take ¼ cup sugar and 1 tablespoon water in heavy bottom pan and heat it until sugar melts and change cherry brown color. Add few drops of lemon juice to prevent crystallization of sugar. It took about 7 minutes for me. Transfer the pan with sugar to kitchen sink and immediately add ½ cup of cold water (Be careful with this step, otherwise serious burn can results) for easy cleaning. Keep aside and add only cold caramel syrup to batter.
  • Preheat the oven to 350 degrees F. Butter the bottom of a10 inch Bundt pan  then butter and flour the pan.
  • Sift together flour, salt, baking powder , baking soda and spice powder in a bowl and keep aside.
  • Separate egg whites and yolk. In a bowl beat egg whites using a hand mixer until you get white peaks and keep aside.
  • In an electric mixer, beat the butter and sugar together on medium speed, until everything mix well and incorporated. Add egg yolk one at a time to sugar butter mixture and mix well. Then add vanilla extract , orange juice and caramel syrup (½ cup) mix everything and combined well. Add slowly flour-salt-baking soda and baking powder -spice powder mix in small quantities and incorporate everything. Scrape down the sides of bowl once at twice. Stop the mixer and fold egg whites gently until no white streaks visible.
  • Finally drain the soaked fruits and add nuts and 2 tablespoon of all purpose flour and mix well. And fold in fruits and nuts into the batter.
  • Pour the batter into the prepared pans and smoothen the tops with a spatula. Bake for 1 hour or until skewer comes out clean.
  • Cool the cake in pan for 15 minutes and later invert them and cool completely for 45 minutes. Keep cake one or two days before serving.

Notes

Modified from my earlier recipe
Variations:
If you don’t want alcohol, use orange juice or apple juice.

Nutrition

Calories: 369kcal | Carbohydrates: 49g | Protein: 5g | Fat: 16g | Saturated Fat: 8g | Cholesterol: 69mg | Sodium: 190mg | Potassium: 225mg | Fiber: 2g | Sugar: 30g | Vitamin A: 984IU | Vitamin C: 4mg | Calcium: 40mg | Iron: 2mg
Tried this recipe?Mention @nidhinikhil or tag #zestysouthindiankitchenrecipes!

Pin it for later


Bakes, Cakes, Fruitcake mix, Kerala style Cake, Plum cake, Rich fruit cake

Easy Gingerbread Cutout Cookies

Dec 21, 2012 · 42 Comments

Easy Gingerbread cutout  cookies,  simple homemade gingerbread man , Gingerbread women and  Gingerbread snowflakes cookies are made with homemade dough  bursting with flavors
Easy Gingerbread Cutout gingerbread man and gingerbread woman
If you are looking for simple and easy gingerbread cutout cookies you can make at home then this is one. Not only delicious but also easy to put together.

Story behind Gingerbread Man

I like the fairy tale story behind the gingerbread man. Story goes like this” there was an old lady who baked ginger the bread man and wanted to eat with her husband. But after baking, the ginger bread man jumped right out of the baking tin and started to run.
Rhyming this Run, run as fast as you can; you can't catch me, I'm the Gingerbread Man. Then he came across a pig, cow, and horse,  all of them wanted to eat gingerbread man. He escaped from all, singing the rhyme. However at one point he reached a river, and he wants to cross the river.
One clever fox offered to help the gingerbread man to cross the river. However after crossing the river, the fox also eats the ginger bread man. He couldn’t escape from Fox singing his rhyme.  You can read this story from here

How to make ginger bread cut out cookies?

It is easy to put together  you need following ingredients to make this ginger bread  cut out cookies.
All purpose flour, egg, butter, baking soda, spices . You can use store-bought gingerbread spice mix too. Use your favorite cookies cutters to make gingerbread cookies, and used the entire array of cookie cutter available in my hand to make ginger bread man and woman, snowflakes and stars.

You need  royal icing to  decorate the cookies.
Here is my art work on the cookies.
You need to left alone in corner of my kitchen for icing to dry.
Easy Gingerbread man and women cutout cookies
Finally I redid some yesterday and created this easy gingerbread cutout of  gingerbread man and woman, snowflakes and stars. Still there is room for lots of improvement.

Points to remember while making easy gingerbread cutout cookies : 

Make sure to freeze the dough before you make cutout . As the dough tend to be really soft.
Also once dried well try to add frosting. You can use store-bought as well as homemade . If you are buying store-bought frosting you may need to dilute and so that it is workable.
Easy Gingerbread snowflakes Cutout Cookies
My  easy gingerbread  cut out cookies are adaptation of two recipes, one from Joy of Baking and other from simply recipes. I used increased spices from Joy of baking recipe and added black pepper from simply recipe to get some kick; it took me three day to finish. First day I made dough and second day I cut out and made cookies and third day I did icing. My daughter helped me in rolling the dough. It is delicious not tooth breaking ginger bread cookies. But firm enough to hold the icing.
Easy Gingerbread star Cutout Cookies

 Instructions  to make  easy Gingerbread  cutout Cookie Dough

In bowl mix flour, spices, salt, baking soda and set aside. Cream butter and sugar and egg and mix everything once again.
To this add molasses and mix everything. Then gradually add flour and spice mixture in three additions to form smooth dough.
Cover with plastic wrap and set aside for chilling for about few hours to overnight.
Easy gingerbread cutout cookie dough
Next day transfer the dough to well floured table and spread it into ¼ inch thick sheet, cut various shapes using your cookie cutter.
Chill the cut cookies until you ready to bake. Preheat oven to 350F and bake the chilled cut cookies for about 12 minutes.
Easy Gingerbread Cutout Cookies
Let cookies allow cooling in the cooling rack for about 1 hour. While prepare royal icing.
Transfer the icing into piping bag fitted with decorative tip. Start working with your imaginations.
Enjoy as much you want.
Easy gingerbread cutout cookies

If you like this  Easy gingerbread cutout cookies then  you will like this too
Sourdough gingerbread muffins
Guinness stout Gingerbread Cake
Spicy Granola Gingerbread Cookies
Gingerbread

Print Recipe
5 from 2 votes

Easy gingerbread cutout cookies

Easy Gingerbread cutout  cookies,  simple homemade gingerbread man , Gingerbread women and  Gingerbread snowflakes cookies are made with homemade dough  bursting with flavors . 
Prep Time20 minutes mins
Cook Time8 minutes mins
Total Time28 minutes mins
Course: Dessert
Cuisine: American
Keyword: Gingerbead Man,, Gingerbread cookies, Gingerbread women
Servings: 6
Calories: 440kcal
Author: Swathi (Ambujom Saraswathy)

Ingredients

  • 1 ½ cup All purpose flour
  • ¼   teaspoon salt
  • ¼ +⅛ teaspoon Baking soda
  • 1 ½ teaspoon ground ginger
  • ¾ teaspoon ground cinnamon
  • ¼ teaspoon ground nutmeg
  • ¼ teaspoon ground cloves
  • ⅛ teaspoon  black pepper
  • ¼ cup   butter room temperature
  • ¼ cup  white sugar
  • ⅓ cup  molasses
  • 1 large egg
  • Royal Icing
  • 2 cup confectioners’ sugar
  • 1 tablespoon Meringue powder
  • 4 tablespoon Water
  • 2-3 drops rose water.

Instructions

  • In a large bowl, sift or whisk together the flour, salt, baking soda, and spices.
  • In the bowl of your electric mixer, with the paddle attachment, (or with a hand mixer) beat the butter and sugar until light and fluffy. Add the egg and molasses and beat until well combined. Gradually add the flour mixture beating until incorporated.   Combine everything to form smooth dough.
  • Wrap the Dough in a plastic wrap and refrigerate until firm (at least two hours or even overnight). Preheat oven to 350 degrees F (177 degrees C) and place rack in center of oven. Line 2 baking sheets with parchment paper.
  • On a lightly floured surface transfer and roll out the dough to a thickness of about ¼ inch sheet. Use a gingerbread cutter to cut out the cookies.  With an offset spatula lift the cookies onto the baking sheet, placing about 1 inch (2.5 cm) apart. If you are hanging the cookies or using as gift tags, make a hole at the top of the cookies with a straw or end of a wooden skewer. (If cookies are a little soft, place the baking sheet (with the cookies) in the fridge for about 10 minutes. This will prevent the cookies from losing their shape.)
  • Bake for about 8 - 12 minutes depending on the size of the cookies. They are done when they are firm and the edges are just beginning to brown. Remove the cookies from the oven and cool on the baking sheet for about 1 minute, then transfer to a wire rack to cool completely. If you want you can press raisins, currants, or candies into the dough for eyes and buttons while the cookies are still warm. Otherwise, confectioners frosting can be used to decorate the cookies. Store it in an airtight container.
  • Royal Icing: In an electric mixer (or with a hand mixer), mix powdered sugar, meringue powder and water and rose water to from frosting consistency of your choice. Tint frosting with food color, if desired. Place the frosting in a pastry bag fitted with a decorative tip and decorate the gingerbread men as desired.

Notes

Variations: You can skip black pepper if you want and add spices of your choice.

Nutrition

Calories: 440kcal | Carbohydrates: 87g | Protein: 5g | Fat: 9g | Saturated Fat: 2g | Cholesterol: 27mg | Sodium: 226mg | Potassium: 332mg | Fiber: 1g | Sugar: 62g | Vitamin A: 378IU | Calcium: 53mg | Iron: 3mg
Tried this recipe?Mention @nidhinikhil or tag #zestysouthindiankitchenrecipes!

Christmas recipes, Cookies, Gingerbread man, woman

Mexican wedding cookies/ Snowball cookies

Dec 18, 2012 · 45 Comments

Mexican Wedding cookies /snow ball cookies delicious nutty cookies that are rolled in powdered sugar. Traditionally made during christmas and weddings.
Can I tell you a secret, I miss snowy Christmas. I was born and grew up in a part of world where winter means really just a cool weather that’s all. Snow is only mentioned in the stories and songs. Then in Japan where I stayed, it snowed for a few a days in February. After moving to Sweden I experienced what is snowy Christmas. The white light reflects from the snow when there is no sun, and is beautiful. After coming to US, I stayed in two states where snow is prominent. Currently I am in a part of Texas where snow is an occasional visitor. I am happy, as on one end as it helps my plant and tree can survive through the year, but I can’t help missing that white snow. To compensate this I made this snowy white Mexican Wedding cookies/ snow ball cookies.
As Christmas is near, I have started baking few cookies, and yesterday I made this Mexican wedding cookies/ Snow ball cookies/ Russian tea cakes/Polvorón/Butter balls. Whatever you call them they are delicious and melt in mouth.  These are famous cookies that made during the Christmas. According to wisegeek these cookies originated in medieval Arab world, and spread to Europe, and along with Spain invasion it comes to Mexico. In Mexico, the cookies are handed out to guests at weddings and other celebrations. In Mexico it is called Boscochitos, and served during wedding and other functions. It is usually made in round or crescent shape.  It has a powdered sugar coating and makes it looks like a snow ball. I was planning to make them with pecans; however I don’t have pecans in my hand, so decided to use almonds.  I found this recipe  at King Arthur flour baking center’s blog and also in Craft YouTube video. For these cookies, the almonds were first blanched and then toasted.
I ground into powder along with ½ tablespoon of powdered sugar to prevent them from getting into nut butter. Then this ground almonds was mixed with All-purpose flour and powdered sugar along with butter. Reduce the butter amount from the original recipe.  I used vanilla extract and almond extract to get an extra flavor.  However after mixing everything the dough was still powdery, hence added 2 ½ tablespoon of water to bring together into a stiff dough. I spooned 1 teaspoon of dough into balls and baked at 325 °F for about 15 minutes or until sides are starting to brown. I allowed them to cool in the baking sheet for about 10 minutes and then coated with powdered sugar. It is better to cool the cookies very well and then coat with sugar, otherwise sugar will starts melting.  You can do two or three coating of powdered sugar/confectioners’ sugar so that you will get exact snow ball cookies.
These are delicious melt in mouth taste like shortbread. Try it if you have some almond, pecans, and walnuts in your hand. Here comes the recipe.
Line baking sheet with parchment paper if needed. I bought a cookie sheet that doesn’t need any pre working I like that part. Preheat oven to 325F.
Blanch and toast the almonds and set aside.  Powder almond with confectioners’ sugar to prevent them from become almond butter. Cream butter and sugar add vanilla extract, almond extract and salt. To this add ground almond and all purpose flour combine well to form stiff dough. I used less butter so needed 2 ½ tablespoons water to make it stiff dough.
Scoop 1 teaspoon dough and make ball and place it cookie sheet about 1 inch apart. Bake them for about 15-20 minutes or until the bottom part is slightly brown and sides start to get brown.
Once the cookies are cooled rolled them in confectioners’ sugar, do two to three times to make exact snowy white in color.
Enjoy as much you wish.
Print Recipe
5 from 12 votes

Mexican Wedding Cookies /Snow Ball Cookies

Mexican Wedding cookies /snow ball cookies delicious nutty cookies that are rolled in powdered sugar.
Prep Time20 minutes mins
Cook Time20 minutes mins
Total Time40 minutes mins
Course: Dessert
Cuisine: Mexican
Keyword: Mexican Wedding cookies, Snow ball cookies
Servings: 12 no
Calories: 97kcal

Ingredients

  • Dough
  • ¼ cup  unsalted butter*
  • ¼ cup confectioners' sugar/Powdered Sugar
  • ¾ teaspoons vanilla extract
  • ⅛ teaspoon almond extract optional
  • ⅛   teaspoon salt.
  • ¼ +⅛ cup almond flour or ¾ cup blanched almonds finely ground
  • 1 ⅛ cup King Arthur Unbleached All-Purpose Flour
  • 2 ½ tablespoon of water
  • * you can increase the amount of butter to ½ cup then no need of water
  • Coating
  • ¼ cup confectioners' sugar

Instructions

  • Preheat the oven to 325°F. Lightly grease (or line with parchment)  one  baking sheets
  • In a large bowl, beat together the butter, sugar, vanilla extract, almond extract, and salt.
  • Beat in the almond flour, then the all-purpose flour. Add  water  if needed to form a stiff dough.
  • Scoop chestnut-sized (1") pieces of dough, and roll them into balls. A level teaspoon cookie scoop will give you just the right amount of dough. Place the balls on the prepared baking sheets, leaving 1" between them.
  • Bake the cookies for 15 to 20 minutes, until they feel set on top: and some of them are MAYBE beginning to barely brown around the edges.
  • While the cookies are baking, put the topping sugar in a shallow bowl.
  • Remove the cookies from the oven and transfer them, 5 or 6 at a time, to the bowl. Roll them in the sugar to coat, and then transfer them to a rack to cool.
  • When the cookies are cool, roll them in the sugar again; they should be thoroughly coated and snowy white.
  • Store airtight at room temperature.

Notes

Variations:
You can use pecans, walnuts or any nut of your choice instead of  Almond.

Nutrition

Calories: 97kcal | Carbohydrates: 14g | Protein: 1g | Fat: 4g | Saturated Fat: 2g | Cholesterol: 10mg | Sodium: 25mg | Potassium: 13mg | Fiber: 1g | Sugar: 5g | Vitamin A: 118IU | Calcium: 3mg | Iron: 1mg
Tried this recipe?Mention @nidhinikhil or tag #zestysouthindiankitchenrecipes!


Favorite recipes: Christmas Recipes  hosted here. 


Christmas recipes, Cookies

A Day of Remembrance...........

Dec 17, 2012 · 11 Comments

Dear Friends, fellow bloggers

I am one of the blogger who is taking part in observing silence for the innocent victims who lost their lives on Friday’s shooting rampage at Connecticut.  Like you we cried as the news reports come in. As a mother of two, it is really hard for me to imagine about how somebody can hurt those innocent 6 and 7 years old. Who supposed to be laughing at their Christmas gifts wrapped under the Christmas tree and long waited holidays? In the time of happiness we are mourning for the loss of these tiny angels.
Their life was cut short, their dreams were crushed. Those late night kisses and wonderful smiles when you pick them and light sadness when you drop them in the school is going to be missed forever to that little angel’s parents. Also to those moms, wife, grandmas, friends who lost their lives doing their duties as teachers and staff of Sandy Hook Elementary school.
We know that no words, no gifts, no act of service will ever take away the pain, but we, as bloggers and also parents collectively want those affected by this to know how close to our hearts they are
We love you; we pray for you, we are so heartbroken for your loss.

To honor the memory of the lives cut short, we choose to step away from our blogs and computers today to celebrate the gift of life and those we love the most, our children, families, good friends and community. We’re holding our kids little tightly, reaching out to neighbors and giving thanks for the moments we have together. Thank you for stopping by today, we hope you will join us in remembering, praying and gathering close. We wish you and your families a safe and blessed holiday.

Uncategorized

Chocolate Brazil Nut Cake for Baking Partners Challenge 5

Dec 15, 2012 · 49 Comments


A pair of festivity is in our house, and we are gearing for baking of cakes, and cookies.   For “Baking Partners” group we decided to bake a cake for this month’s challenge. Suja of Kitchen Corner Try It and  Archana of Tangy Minds suggested recipes for this month challenge. I selected the recipe for Chocolate Brazil nut cake. However recipe is less flour and needs 6 eggs. My heart beat increased seeing so many eggs in the recipe, but I liked the idea of using Brazil nuts in the recipe, and that is new nut for us.

We as a family love to explore the new tastes, whether it is in a dish, fruit or vegetables, we are in.  I was in search of brazil nut, usually I get nuts are from Whole Foods and Fiesta local grocery store. While doing grocery shopping at Fiesta, I saw Brazil nut, it is not that cheap, and 1 pound cost about 14 dollars. At first I was planning to buy hazelnut, and then thought if I can get Brazil nut why I am going for substitute. So bought a half a pound of brazil nut, and came home like somebody who had won a great foot ball match. Unfortunately Texans lost their last game with New England Patriots.  Hope they will win the next game against the Colts.
 Somebody told me that Brazil nut looks and taste like jack fruit seeds. No they are not like jack fruit seeds, they are more fatty, where as jack fruit seeds are more starchy in taste.

Brazil nuts are found only in the Amazon forest. It is full of protein, fats and essential nutrients.  It is one of tallest trees at about 50 meters and lives for about 500-700 years. During the flowering season each tree bears about 300 fruit pod which is similar to coconut. Even after falling from the tree these fruit pods won’t break and they need the help of caviomorph rodents to break the fruit and helps in the pollination of this plant.  Each fruit contain from 10-25 seeds and is covered in thick shell arranged in orange like fashion.  Each seed weigh about 2g and has sweet nut flavor. Read more from here. Like any other nuts brazilnuts have health benefits too, it is high in calories, rich in vitamin E, selenium and mono-saturated fatty acids like palmitoleic acid and oleic acid.

 Since I did not want all the eggs in the cake, I was in search of recipes which use more chocolate and less egg. I found this Texas sheet cake recipe however it used only cocoa powder. I want to use chocolate. So included both cocoa powder and chocolate and increased the amount of flour. I found that sour cream is used to substitute eggs so I used sour cream. If you add coffee, then chocolate flavor is intense. I used cinnamon, and that too enhance the chocolate flavor. After mixing everything, I thought it is enough to use 6 inch cake pan, and I was wrong, for this you need   9 inch cake pan.  However I was clever enough keep the cake pan in baking sheet to prevent the over flowing of my cake. It was good idea.  After 15 minutes of baking my cake started forming lava and filled in the baking sheet. However the loss of filling was minimal so I was able to rescue the cake.
Once baked my daughter got a taste of the cake she came back and told me it is good. Then comes frosting part, my hubby told me don’t use too much sugar, then I won’t eat it.  I want to use original frosting from the one which Suja had suggested. Frosting is simple but it uses honey.  I made sugarless frosting. Only used semi-sweet chocolate chips sprinkle Brazil nut in the top. It is delicious cake, my daughter finished the last piece without even let me to take a major bite. Thus I found a best chocolate cake recipe I ever ate.
Brazil nut combines well with chocolate to form a delicious combo. You can say it is best, it will beat almond, hazelnut or any other nuts combo.  I can’t stop eating this combo, so made chocolate brazil nut cookies, that too delicious.  Thanks Suja for introducing me to a wonderful combo.
Make sure to visit to see how the other members of this group whipped up their cake.
At gather you ingredients both for cake and frosting
Preheat oven to 350F and butter and flour and line the pan with parchment paper and set aside.
Toast the brazil nut, remove the skin, yes it is pain in the butt do it is worth it. Chop into fine pieces and set aside.  Mix instant coffee with water. Sift the flour, cinnamon, salt and baking soda and set aside. Melt chocolate and set aside. 
Cream butter and sugar then add sour cream and mix again, the add egg, vanilla and melted chocolate and combine everything well. Gradually add flour in 3 additions, and finally fold in the chopped Brazil nuts.
Reduce the oven temperature to 325 F and bake the cake for about 1 hour and set aside for cooling for 10 minutes. 
In the mean time make frosting, heat whip cream and bring to boil and add chocolate and set aside. While cream butter and add chocolate whip cream mixture and beat until it become smooth and glossy.
Using spatula, frost the cake and sprinkle brazil nuts.
Enjoy the cake. Trust me they are delicious, you can stop eating them. 
   You want a slice
 Chocolate Brazil nut Cake

Print recipe from here 
Cake recipe adapted from here and Frosting from here                               
Prep Time    20 minutes
Cook Time    60 minutes
Serves    6 - 8
Ingredients:
               1 cup  All purpose flour
               1 cup sugar
               2 tablespoon Cocoa powder
               ¼ cup sour cream
               2 ounce of semisweet chocolate chips
               5 tablespoon  butter
               1 large egg
               1 tablespoon Instant Coffee powder
               ¼ teaspoon salt
              ½  teaspoon vanilla extract
               ¼ teaspoon cinnamon
               ½ teaspoon baking soda
               ¼  cup  brazil nuts chopped
               ½ cup warm water
                    
          Frosting
                2 tablespoon butter
                2 ounce semisweet chocolate chips
                 ¼ cup  + 1 tablespoon heavy cream
                 ¼ cup chopped brazil nuts
                             
Steps:
·         Preheat oven to 350F. . Toast nuts in a shallow baking pan in the oven for 10 minutes. Transfer nuts into large strainer. Rub nuts against the strainer with a towel and remove most of the skin and keep aside. Reduce the oven temperature to 325F.
·         Melt chocolate in double boiler or heatproof medium bowl over hot, not simmering, water over low heat, stirring occasionally until smooth, remove and set aside to cool.
·         Butter 9”x3” pan, line base with parchment paper and grease and flour the sides of the pan
·         Dissolve the instant coffee in warm water and set aside.
·         Sift the flour with cocoa powder, salt, baking soda, cinnamon and set aside.
·         Cream butter and sugar and beat until smooth and fluffy. Add sour cream, mix everything then add egg and combine well.  Stir in the melted chocolate, coffee and vanilla extract.
·         Gradually add flour-cocoa powder-salt mixture into the chocolate mixture, repeat folding in batches until batter is blended.
·         Gently fold in the Brazil nuts and set aside.
·         Transfer batter into prepared pans and bake for 60 minutes or till the tooth pick inserted in the center comes out clean.
·         Cool in pan on a rack for 10 minutes. Using a spatula go around the cake gently and invert onto a cake rack and allow cooling completely.
Frosting
·         Bring cream to a full boil in a small saucepan remove from heat and immediately add the chopped chocolate. Stir quickly till the chocolate is melted and the mixture is smooth. Cool to room temperature. Whip this at high speed till it thickens and becomes pale. Cream butter in a medium bowl until it is soft and smooth, gradually add the chocolate mixture and beat well.
·         Using a long spatula spread frosting evenly on the side and top of the cake. Fill the center with chopped Brazil nuts.

Brazil nuts, Cake, Chocolate

Bread sticks: Pizza hut Copy cat Style

Dec 14, 2012 · 36 Comments


 I love Pizza hut style bread sticks a lot, whenever we got out we buy them.   So I choose this pizza hut style bread sticks recipe as we as a family loves this in whole.
Other than pizza, I love Pizza Hut bread sticks.  Whether it is from Pizza Hut or from Olive Garden, bread sticks are my favorite. Here in a super Target, there is pizza hut store, and whenever we shop at Target, our shopping cart will stand still in front of Pizza Hut store. We would buy bread sticks, and usually enjoy it with the sauce at the store itself as there is place to sit.  If you ask me which pizza you like, I will say I like it from Papa John’s, but breadsticks has to be from Pizza Hut.
I was planning to make breadsticks for a long time, and I have made it twice. But photography session could take place only the second time. It is delicious. I can’t say it is exactly like the one from Pizza Hut. But love to say they are close to it. If I can discover Pizza Hut’s trade secret, then it will be something. It is easy to put together. You need to wait for a single doubling time, and that is the best part of it.
I have made it with both dry milk powder as well as milk; I got the recipe from here. While digging further more into recipe, I came across these informative comments on the recipe. One thing you must have is dry parmesan cheese, spices like marjoram and basil, and also flavors like onion powder, garlic powder.
I didn’t make homemade marinara, but used store-bought one. Next time I am planning to make a homemade version. If you have any preference to oil, make garlic infused olive oil or even plain olive oil and salt and dip them and eat.
If you have All-purpose flour/Maida, dry milk powder, yeast and salt, water and little sugar mix everything and let yeast takeover from here. It will take about 2 hours to double in volume. Once it is doubled score the dough using a pizza cutter. This helps for easy removal of each breadsticks after it is baked.   If you don’t have dry milk powder in your hand, it is no problem, try it with milk, I did that version too, only points to note is reduce the amount of water in that case.
It is crispy on the outside and soft inside, and when you dig in the marinara, it will bring it to another level. So try it. I will say you can get good delicious soft bread sticks, did you make it to close to Pizza Hut version, that is up to your personal choice, I will say it is close but not the same. Here comes the recipe. I am giving only pictorial here.
 For breadsticks seasoning.
When it ready it will be looking like this dip it in marinara or your favorite dipping sauce and enjoy.
 Print recipe from here 
 

Snacks., Yeast Bread

Joululimppu/ Finnish Christmas Bread

Dec 11, 2012 · 52 Comments

Delicious Joululimppu/ Finnish Christmas bread made with rye flour, spices and molasses excellent breakfast bread.

 I started my Christmas baking with   breads that I was longing to make for a long time. Earlier I had made Stollen, famous Christmas bread from Germany, now I am starting to fill the world’s Christmas bread list.
 
You can’t go to any store and order that, as you need a bread from another country, so what better way, than to explore it, from your kitchen. That is what I am doing.
 
 I visited Finland while staying in Stockholm, Sweden. I and a few of my friends took the ferry from Stockholm in the evening and reached   Helsinki, Finland the next morning.
It was a fun filled trip, my first trip in a ferry, and I loved watching the sunset from the dock and the also sun rise. I also visited few places like Helsinki Cathedral , National museum  etc, and was back the next morning in Stockholm.   It was short trip but a sweet one.


 I was planning to try Finnish flat bread Rieska for long time, but I will do it after my Christmas baking session is over. 
Finnish cuisine includes a lot whole meals like rye, barley, oats, and also berries like blueberries, lingonberries, cloudberries, and sea buckthorn, along with fish and poultry.  They will try to include rye, barley, oats on their cookies, bread, crackers etc.


Rye is most liked flour in our family, my hubby, princess and even my little 8 teeth wonder man likes rye bread. When I was searching recipes for Swedish limpa bread, I got recipe of Joululimpuu from this site.
I thought, I will wait until Christmas to make this recipe. This is a delicious rye bread, but I didn’t have dark syrup in my hand, so substituted with molasses, dried bitter orange peel got substituted with orange zest. I also added some orange juice which is not in the original recipe. I had learn from King Arthur flour baking site, that if you use whole wheat adding orange juice will reduce the bitterness of whole wheat.
 
The spice used in this bread is fennel seed and caraway seeds added to the molasses and boiled so that the intense flavor of spices diffuses into the molasses. I learnt that technique with this bread.
 
I Used melted butter to make is tastier. It is difficult to imagine a Finnish recipe without buttermilk or milk.
 
So this bread contains buttermilk as one ingredient. Finally bread is brushed with molasses and water syrup in between baking which gives intense color to bread
 
I sliced the bread after a very hard wait and slathered them with butter, and when I took a bite, I knew that this is bread I was looking for, for a long time.
 
It is so delicious, that my hubby has given the opinion that this is best rye bread he has ever tasted.
 
If you like nuttiness and chewiness of rye and season’s flavor of molasses, fennel and caraway seeds, then go for this yummy bread. 
It won’t disappointment your taste buds. Try this traditional Christmas bread of Finland for your Christmas table.
 

Ingredients  for making   Joululimppu

 Weigh the  dry ingredients, make spice mixture, extract orange juice, buttermilk.

Instructions 

Mix in with flours to form a sticky smooth dough and set aside for fermentation for about 90 minutes.
 
Once dough  is doubled in volume transfer and make a round boule and set aside for second fermentation of about 45 minutes. In between pre-heat oven  to 400 F. Bake it for about 20 minutes and brush with syrup and complete baking.
 
 Remove bread from oven when it has internal temperature 190F and set aside for cool completely.
 
Once cooled well  slice and serve with butter. 
 
                                                                     
 Variations 
  • Add dried orange peel to the dough make it more delicious Joululimppu /Finnish Christmas bread. 
Print Recipe
5 from 3 votes

Joululimppu/ Finnish Christmas Bread

Delicious Joululimppu/ Finnish Christmas bread made with rye flour, spices and molasses excellent breakfast bread.
Prep Time20 minutes mins
Cook Time20 minutes mins
2 hours hrs 30 minutes mins
Total Time3 hours hrs 10 minutes mins
Course: Breakfast, Brunch
Cuisine: Finnish
Keyword: Christmas bread recipes, Finnish Christmas Bread, Joululimppu
Servings: 12 servings
Calories: 189kcal

Ingredients

  • 1 ½ cup 203g Rye flour
  • 2 cup 300g Whole wheat flour
  • 3 tablespoon 67g Molasses
  • 1 teaspoon 2g fennel seeds
  • ½ teaspoon caraway seeds
  • ½ tablespoon orange zest
  • 1 cup buttermilk I made using 1 cup of milk + 1 tablespoon of vinegar set aside for 5 minutes
  • 3 teaspoon Instant yeast
  • ½ teaspoon Salt
  • 56 g/4 tablespoon melted butter
  • Juice of 1 orange
  • ¼ cup water
  • For brushing
  • 1 tablespoon molasses extra
  • 100 ml water

Instructions

  • In a microwave safe bowl add molasses, spices and orange zest heat it for about 30 seconds and high heat and set aside.
  • Extract the orange juice and set aside.
  • In a bowl of kitchenaid stand mixer weigh, both flours, instant yeast, salt and set aside.
  • Add the molasses spice mixture, buttermilk, orange juice and water into the flour and with paddle attachment mix everything to form a sticky dough.
  • Replace dough attachment and knead once the dough  for about 10 minutes or using hand 15 minutes to smooth but not sticky dough and set aside.
  • Transfer the dough into well greased container and cover and set aside for doubling for about 90 minutes.
  • After 60 minutes, punch down the dough and set aside for another 30 minutes of doubling .
  • Once the dough is doubled transfer the dough to table and shape it into a tight ball, and transfer to baking sheet lined with parchment paper for second rise of about 40 minutes. Make sure to prick the dough all over with fork.
  • At end of second baking time preheat oven to 400F and  bake the bread for about 20 minutes.
  • While bread is baking  make syrup using one tablespoon of molasses and water and set aside.
  • Remove the bread from the oven and brush them with syrup and continue to bake for about 20 minutes or until the bread register the internal temperature of 190 F.
  • Let the bread cool in the baking sheet for about 5 minutes and after 5 minutes transfer to cooling rack and allow to cool the bread completely before slicing.
  • Enjoy the bread with butter.
  • Variations:
  • If you can catch hold of dried orange peel that is better

Nutrition

Calories: 189kcal | Carbohydrates: 31g | Protein: 6g | Fat: 5g | Saturated Fat: 3g | Polyunsaturated Fat: 1g | Monounsaturated Fat: 1g | Trans Fat: 0.2g | Cholesterol: 12mg | Sodium: 153mg | Potassium: 279mg | Fiber: 5g | Sugar: 6g | Vitamin A: 153IU | Vitamin C: 0.4mg | Calcium: 52mg | Iron: 1mg
Tried this recipe?Mention @nidhinikhil or tag #zestysouthindiankitchenrecipes!

Finland, Rye bread, Yeast Bread

Lefse/Norwegian Potato Flatbread

Dec 8, 2012 · 37 Comments

Delicious lefse/Norwegian potato flatbread made with mashed potato, cream, butter and flour.<img src="lefse.jpg" alt="lefse/Norwegian Potato Flatbread">

Christmas is here, I have done most of the shopping; now I need to kick start my Christmas baking. I have a starter problem; always I plan for something, but end up doing nothing or doing something else. I have only a few cookies and cakes in my list to bake, but lot of breads in my list. You know I am bread enthusiastic, and I search for some recipes and come to know about other recipes in the mean time. I fall in love easily with all kinds of breads. Smell of warm bread is so intoxicating that it is like booze to me. I can find whole new bread recipes every day. So my bread baking quest will goes on. Here is the delicious Lefse/ Norwegian potato flatbread.
I stayed in Sweden, and visited Denmark and Finland, but have not visited Norway. I was planning to make a trip to Norway, but couldn’t during my stay in Sweden. My friends told me Norway is expensive, even Norwegians who live in the towns bordering Sweden comes to Sweden to do their shopping. Norway is called the land of Midnight Sun. In late May to July you can feel 20 hours of sunlight. I felt similar in Sweden during the summer months, where sun doesn’t want to leave you until 10 o’clock in the night. You have to go to bed with two curtains. But in November months it is like that sun doesn’t want to visit us, dark, dull days. Due to gloominess in the nature, our mood will be gloomy. But when it starts snowing, it brightens everything, and bring that magical wonderland feeling.
<img src="lefse.jpg" alt="lefse/Norwegian Potato Flatbread">
One afternoon during my usual grazing of pinterest, I came to know about this flatbread, Lefse. It is potato flat bread, similar to our India aloo paratha, however, for lefse they are using All-purpose flour /Maida, but not the wheat flour. Just like most dishes, lefse varies from place to place in Norway, thinner and thick version is available, thinner one they like to eat it will butter, cinnamon and sugar and rolled up like a cigar, where as the thicker versions they serve with coffee as cake. If you want read more about lefse take a look at here.  In Fargo, North Dakota there is Lefse festival in August, where as in Fosston, Minnesota Lefse fest is in November as these regions have huge populations of Scandinavian-Americans.
India has chapathi/roti as its flatbread, where as Norway has lefse.  In the famous book ‘ The Last Word on Lefse’ by Gary Legwold (1992) he describes a time in Norway when women will be traveling to house to house and spending few days to make a year supply of lefse for the house hold.  From morning to evening in open fire, they make a lot so even fishermen can carry them during the voyages.  If you are Indian you will go for chapathi, Mexican you will be going for Tortilla, then if you are Norwegian you going for lefse.
Even though they looks like chapathi /roti,  techniques of making Lefse is different, they even have special rollers (Square cut rolling pins)  and cloth to make  Lefse and transfer to stove using a stick. I followed the technique whatever I acquired during my reading various recipes.  The earlier versions of Lefse did not have potato, but only flour, and much later came the use of potato to make Lefse, you want read history read  from here.
If you want to make Lefse you need to plan ahead, usually a challenge for me, but I succeeded.
 The first step is to boil potatoes, and remove the skin and mash it. Then add whipping cream, butter and salt and mix everything and set aside for overnight in the refrigerator.
 The next morning, mix in flour and make smooth dough. Then divide the dough into small balls, and spread the dough into thin round, and cook it in skillet.
 It only takes one minute to cook each side or until you see brown spots on both sides.
When I finished making the first one, my princess grabbed that from the plate and did a taste test, she nodded the head and told me it is delicious. Then hubby did the taste test and told me it was delicious. The marriage between potato, cream, butter and flour makes it awesome. Try it if you like chapathi, tortilla, or pita, then Lefse is going to steal your heart. It did with us.
Traditionally it is served with loads of butter and sugar; we like to eat with our spicy curry.
<img src="lefse.jpg" alt="lefse/Norwegian Potato Flatbread">

Print Recipe
No ratings yet

Lefse/Norwegian Potato Flatbread

Lefse/Norwegian Potato flatbread made with potato, cream, butter.
Prep Time35 minutes mins
Cook Time12 minutes mins
Overnight refrigeration12 hours hrs
Total Time12 hours hrs 47 minutes mins
Course: Main Course
Cuisine: Norwegian
Keyword: Lefse
Servings: 6 serving
Calories: 183kcal

Ingredients

  • 1  ⅓ cup  Boiled mashed potato   about 2-3 medium potatoes
  • 1 tablespoon Butter
  • 3 tablespoon  Heavy Cream
  • ½   teaspoon salt or to taste
  • 1 ½   cup All purpose flour + extra flour for making the lefse

Instructions

  • Boil potatoes in a pressure cooker for about 25 minutes, once it is cooled down remove the skin
  • and  mash them using a potato ricer or hand and set aside.
  • While warm add butter and cream and mix everything and set aside for about overnight in refrigerator.
  • When  you are ready to make the lefse, mix flour with potato-cream-butter-mixture and knead well to form a smooth dough
  • Divide the dough into 12 equal  rounds.
  • Coat each dough  rounds into flour and spread them into thin round of about 5 inch diameter.
  • Heat skillet and transfer the spread dough into skillet carefully.  Cook the one side until you see bubbles on the top,
  • Flip the other side and cook for another minute. When lefse is done, you will see brown spots all over .
  • Continue to make the lefse until you finish the entire dough. You will able to make 12 lefse from this recipe.
  • Cover the lefse with a cloth  while you are making the  rest of it to prevent drying of the lefse.
  • Once it is finished, roll  spread each of them with butter, cinnamon and sugar and roll them into
  • a long tube.
  • I served with spicy curry.

Notes

You can serve lefse with jam of your choice. 


Nutrition

Calories: 183kcal | Carbohydrates: 30g | Protein: 5g | Fat: 5g | Saturated Fat: 3g | Cholesterol: 15mg | Sodium: 219mg | Potassium: 226mg | Fiber: 2g | Sugar: 1g | Vitamin A: 169IU | Vitamin C: 5mg | Calcium: 24mg | Iron: 3mg
Tried this recipe?Mention @nidhinikhil or tag #zestysouthindiankitchenrecipes!

Pin it for later

Featured, Flatbread, Norway

Gluten free Buckwheat Crepe/ Pancake/Galettes/ Blini : Diabetic Friendly

Dec 4, 2012 · 34 Comments


Buckwheat, I learnt about them when I had soba noodle in Japan. In fact, buckwheat flour/ Kuttu ki atta is commonly used during certain festival (Navaratri, Ekadashi, Janamashthami, and Maha Shivaratri), as part of fasting diet in northern India. When people in North India skip eating rice, wheat, lentils etc, they substitute the diet with gluten free flour like amaranth flour, buckwheat flour etc.  I had not heard about them. India is a huge country with its diverse food culture that varies from states to states. 
Nowadays I am in quest of finding new flours and incorporating them in diet. Most of the time my mission won’t reach completion, and still I am struggling to make flat bread with sorghum. For the time being I have dropped that idea and moving on with my new flours. One good thing is poor hubby will support me in all these culinary experiments.
Buckwheat has more protein than rice, wheat, millet or corn and it is high in amino acids like lysine and arginine which is not present in other cereal crops. Due to this presence of amino acids it one of cholesterol-lowering food resulting in lowering blood sugar (and thus helping diabetics) and control of obesity, it can also help in our heart health by lowering hypertension/high blood pressure.  It also contains phytonutrient like Lignans, which are known to protect against heart diseases. Read more from here
 Do you know that there is a buckwheat festival in Preston County, West Virginia during the summer months? West Virginia is another place where I first stayed and worked in USA. I love that green hilly mountains areas, and you can’t drive the car without making sharp turns and lots of time, visibility  is only about 1 mile, after that you need to make turns. My driving instructor told me if you learned driving here in the roads of West Virginia, you can drive anywhere in the world. 
Buckwheat groats/ seeds are used as porridge in Eastern Europe, In Japan it is consumed as soba noodles. In Russia it is used to make pancakes/blini. In France it is used to make crepes called Galettes. Buckwheat flour has strong earthy taste. It also belongs to the group of food that you need to develop an acquired taste according to me.  Either you love or you hate it. My hubby found that buckwheat pancakes are tastier when you consume with maple syrup, or jam than the savory version.
I bought buckwheat flour from Whole Foods at first, but then came to know that it is one you can see it as kuttu ki atta in Indian store. Latter ones were cheaper than  from Whole Foods. After buying it, I was in intense search of recipes, but most was for blinis, or of a mix with All-purpose flour. I love to work with yeast, so I found recipe here and here.
I liked the idea of adding sour cream to buckwheat flour, but not yet ready to add sour cream and yeast along with buckwheat so used only buckwheat flour, sugar and yeast for fermentation overnight in the refrigerator and next morning added sour cream, egg and milk to make this pancake. They are delicious if eat with maple syrup.  I think sweet side of this pancake makes it more appealing than the savory side.  So if you are willing to try buckwheat flour, make this pancakes they make great breakfast.
Here goes the recipe. 
 In a Tupperware mix buckwheat flour and sugar and yeast and mix with   1 ½ cup warm water and let yeast do its job. Refrigerate the dough  for overnight.
 The next morning, mix in with milk, salt, ghee and egg yolk. Whip the egg white into soft peaks and fold in to form a loose crepe/pancake batter.
When your skillet is hot just brush with ghee. Add ¼ cup batter to form a circle.  Cook for 1 minute one side and flip the other side and cook for another minute or until it develop brown spots on both sides.
Remove from the fire enjoy with maple syrup still they are warm.           
                                                           Print Recipe from here

Gluten Free Buckwheat Pancake/Crepe

Adapted  from  here and here
Prep Time 20 minutes + overnight for fermentation
Cook Time    15 minutes
Serves    12 no


Ingredients:
Day before making

1 ½ cup Buckwheat Flour
1 ½ teaspoon instant yeast   
1 ½ teaspoon sugar
1 ½  cup  warm Water

  • Mix everything in a plastic container and set aside with lid closed for overnight fermentation in Refrigerator.


On the Day of Making  Crepe
           1 cup  warm milk     ( I used 2 %)
            ⅓ cup  Sour Cream ( I used full fat)
            1 ¼ teaspoon salt
            2 tablespoon Ghee/ Melted butter
            2 egg yolk
            2 egg white
             ½ teaspoon sugar
             

  •  Heat milk in microwave safe bowl for 1 minute add sour cream,   1 tablespoon of ghee and salt. and mix  everything to combine well and set aside

  • Take out the  dough of buckwheat flour and yeast from the refrigerator and set aside for about 1 hour to bring it to room temperature.
  • In the meantime beat the egg white with ½ teaspoon sugar to  stiff peak and set aside.
  • Add egg yolk, sour cream-milk-salt-ghee mixture to fermented buckwheat flour and mix well.
  • Gradually fold in  the egg white and mix everything to form  loose pancake batter.

  • Heat a skillet in the stove add a drop of ghee brush well to spread everywhere. To this add ¼ cup of batter and  by swirling the pan get batter to spread it into a round crepe.
  • Cook for about 1 minute on side and flip and cook the other side for another minute.

  • Continue to make crepe until you finish the entire batter.

  • Serve warm with maple syrup, Sour Cream and apple. I think maple syrup is best.


Variations:

    • If you want you can add sour cream  along with yeast.

I am linking this healthy  crepe/pancake to Hearth and Soul Blog hop Hosted here.


Diabetic Friendly, Pancake

Favorite Recipes Event: Christmas Recipes

Dec 1, 2012 · 24 Comments


Christmas is around the corner, and everybody has started putting Christmas tree and lighting and also started baking goodies. Christmas is happiest time of year. Kitchen is busy and mom is whipping delicious traditional recipes for family table.

Last month Favorite recipes event  : Rice recipes was guest hosted by Amrita of Sweet n Savory; here is  link of round up. Please hop over to see the wonderful dishes.  Thanks Amrita for guest hosting it.

So for this month’s favorite recipes event, we are going to make awesome Christmas recipes. So dear friends put on your apron and start whipping delicious and traditional delicacies you are planning to serve for your family.
I would like to know why that particular dish is your favorite, if it has story like, mom made it or grandma made it, and then add that. 
If you already blogged about favorite dishes, then revisit it and add a fresh twist to it by tweaking recipe or changing ingredients etc. 
A linky will be open from 1stof the month to month end. Now it is from December 1st to December    31th 2012.
No Archived post.  Recipe should be posted in your blog from 1stto month end.
Recipe can be with or without egg and also gluten or vegan free.
You have to link this announcement post in the recipes; using logo is welcome but not mandatory. 
Non-bloggers can also welcome, send me full recipe with a photograph to this e-mail. 
If you want to contact me please e-mail at favoriterecipes12@gmail.com

Uncategorized

Pineapple Grape Juice: No Sugar Added

Nov 30, 2012 · 42 Comments


Has anybody start baking for Christmas yet? I haven’t started yet, but I feel that I need too. I have a long list of goodies I plan to make, but I don’t know whether I will get the time to finish it; maybe I will be able t finish at least ¼ of what I have planned, we will see.  I have lots of bread, cookies, and traditional recipes from my home state, Kerala. My hubby says it is a six month project that I want to finish in one month. I have no comment on that.
We buy lots of pineapple, and that’s because everybody in my home likes it; especially my princess who loves it.  Grocery shopping without them I feel is not complete. My hubby and princess like to eat them as such, but I love to make dishes out of it. The only that they agree with me is pineapple pachadi. But whenever I say can I make pineapple upside down cake, hubby says it has lot of sugar, you can make, and I won’t eat it. When you get clear cut answer like this how can I try? Since he agrees with me in trying other recipes I have to listen to him.
Pineapples have lot of goodness; it is loaded with vitamins and minerals including vitamin A, vitamin C, calcium, phosphorus, and potassium. It is also rich in fiber and calories.  
Since pineapples are rich in vitamin C, it can help you in fighting common cough and colds.  Pineapple contains substance called bromelain in the core of the fruit and stems which is known to reduce inflammation and excessive coagulation of blood. It also helps our digestive health too.
It is rich in manganese, an important trace mineral our body needs to build bones and connective tissue.
When we are young, eating a carrot will help your eyes health, but as you get older carrot can’t help you as much, then pineapple comes to your help. Pineapple also helps to control the effects of Macular degeneration, which is the primary cause of vision loss in adults, and is caused by damage to the retina. Reading, recognizing faces, and doing daily activities can become a lot more difficult because of this problem. This is because this fruit contains beta carotene that is good for our sense of sight.
Due its anti-inflammatory capacities it can help in reducing the pain of arthritis, carpel tunnel syndrome and gout. I have a family history of arthritis.   Read more about pineapple from here and here.
With all the goodness you can get just by eating a fruit why in the world are we are not eating it, so try to eat them when you can.
Couple of weeks ago, while I was watching Dr OZ show on TV, he is telling that eating Gamboge / Kodum puli supplement can  help with weight loss, as the  in clinical studies, there have been significant loss even without  any surgery. In Kerala, we add it in sea food curries. It is easily available in Indian store specially selling stuff from Kerala. I will prefer the original ingredients than a supplement any time.
Coming to Red grapes, the  other fruit I used to make this juice, it is rich in flavonoids that can help in the prevention of  heart disease. It can reduce the plaque buildup.
Antioxidants like Polyphenol and anthocyanin in the skin of red grapes can help to prevent cancer development. It also contains a polyphenol (resveratrol) which helps to lower the blood cholesterol level. It also prevents blood  clots .
The lutein in red grapes helps to protect your vision, especially to reduce the effects of macular degeneration. 

Red grapes are rich in vitamin A and C.             
Normally when my hubby drinks a juice especially fresh orange juice in the evening, his blood sugar is spiked in the morning. However after drinking this combo juice his blood sugar was low, but in certain diabetic persons, both water melon and pineapple has tendency to spike blood sugar. So make sure to check how your body reacts.  
If you want to see how much sugar in fruits take a look at here.
If you have pineapple chunks and red grapes in your hand make this juice, healthy, delicious without any addition of sugar.
If you buy a fresh pineapple, remove its skin, core and cut it into small pieces. I know it is pain in the butt, still  it  is worth it. Precut ones will take a chunk of money. 
 Wash 2 cups of  red grapes and dump it into blender along with 1 ½ cup of water and 1 ½  cup of pineapple pieces. Blend it until everything comes into a smooth consistency.  Strain it and enjoy with some ice. So refreshing.
                                                               Print Recipe 

Pineapple Grape Juice: No Sugar Added

Prep Time    5 minutes
Cook Time    5 minutes
Serves    2

Ingredients:
1 ½ cup Chopped Pineapple
2 Cup    Grapes  ( I used Red Grapes)
1 ½ cup Water
Ice
Steps:
In a blender combine everything and blend together to form a smooth consistency and strain through the strainer and set aside.

Serve with Ice


Drinks, Juices, No sugar

Khanom Krok / Thai Coconut-Rice Pancakes

Nov 27, 2012 · 48 Comments

Kahanom Krok /Thai coconut-rice pancakes is a traditional Thai dessert. They are prepared by mixing rice flour, sugar, and coconut milk to form a dough.
November is coming to an end, and Thanksgiving has come and gone.  This year Black Friday started on Thursday Thanksgiving day.  We usually don’t venture out for black Friday shopping. The long standing line and both I and husband are not made for each other. I too have stood in long lines during my college days to watch my favorite hero’s movie, however, now standing in line is not cup of my tea.  My two kids won’t help either.
We shopped this Saturday morning after busy black Friday.  Both my prince and princess got dresses. I too got some goodies, like a wok, grill and griddle combo and thermos. My daughter got her own toy kitchen. Otherwise my pots and pans are vanishing from the cupboards and coming back in really bad shape. She also got miniature blender, coffee maker and toaster. So morning after waking up from the bed she starts cooking in her toy kitchen, bring mamma and papa pretending tea, soup, in her plastic bowl. We have to taste it and tell her it is good. Then she will ask do you want more? If you nod your head she will bring another round of her tasty dishes. Anyway I got some extra toy stuff to take care of it. It is really hard to walk around without tripping on toys. If I put toys in the basket and keep it aside, it will come back to floor within 5 minutes. Once upon a time I was a cleaning freak, now I am happy if I can get some continuous sleep. Not worry too much of cleaning. If I worry, my hair will start pulling up. Basically our Christmas shopping is over.  On the top of it my hubby had a muscle spasm resulting in bad back pain, so we stayed pretty much in our house except for venturing out for shopping on Saturday.
I Hope everybody has started to put on Christmas tree and lighting,  but we are not putting up tree this year, but lighting will depend upon the master  of house gets some time. He told me he will do it this Saturday, we will see promises some time broken ones.
I need to soak some dry fruits for cake in rum if possible this week. I don’t know when I can do that.
Coming back to recipe, Khanom Kork, is a coconut rice pancakes and also famous street snacks of Thailand. I have a weakness towards, Thai cuisine, also to street food. I feel if somebody makes living out if then it should be good, otherwise nobody will buy. I am planning to make this pancake for long time. Every time when I watch YouTube video, I will be thinking that, I am going to make it today. But something always comes in between and I didn’t get time to make. This weekend, I finally made this. Main ingredients in these small beauties are coconut, rice, coconut milk, tapioca flour, green onion.  Since I don’t have khanom kork pan, I used my  uniyappam pan/  Ebelskiver pan, it won’t be thin round as the one you get thai street, but it will be slightly deeper side.
I adapted the recipe from a post of Thai blogs  along with tip of using the drink Sprite from the post.  He has given the recipe from the book It rains, fishes legends and traditions and  the joys of thai cookingby Kasma Loha-Unchit.   I have seen lots of version of this recipe; some are using cooked rice, and some using lime stone paste. Street food vendors are usually making it by mixing Kharom krok flour and water and coconut milk. So I thought Kasma’s recipe will be more loyal.
So after looking at YouTube video and sizzling sounds it makes, it put on my apron and started making it. I did first batch and it turned out the pan was too hot and burnt it. So next batch onwards I reduced the heat from medium to low   and it took about 20 minutes as my pan has deeper indentions than the traditional one. Also they are making it in charcoal which can maintain uniform heat for long time. These are tasty and delicious, even my princess approved it. I had some leftover for next evening tea that too was devoured with lot of enthusiasm.
These khanom Krok/coconut rice pancakes has two layers; the outer layer is crisp and inner layer is custardy or soft layer. Traditional topping includes, green onion, pumpkin, taro etc. I used traditional green onion topping  and carrot that is my addition
 In one video the vendor is selling them in banana leaves boats, so I made some and served in homemade banana leaves boat.
If you are crazy coconut lover/Thai food lover, then try this at comfort of your home. They are delicious.  You may be making it more often.
First grab ingredients from the panty.
 For outer layer, in a blender grind raw rice and desiccated coconut into fine powder. Add this mixture to a medium bowl. To this add rice flour, coconut milk, salt and sugar and water form a loose batter.   Consistency of batter should right when you mix batter with wooden spoon it gets coats to back of the spoon in a thin layer.  When you are ready to make Khanom Krok  mix in sprite.
 For coconut cream, open coconut milk can and without shaking remove upper thicker part into a bowl. To this add tapioca flour, salt, sugar and mix well together form a thick cream  and set aside. If it is not dissolving properly lightly heat and mix once again for uniform mixing.  This makes your inner layer ready.
Heat unniappam pan /Ebelskiver pan/ Khanom krok pan, brush with oil and pour the batter for outer layer. When it sets after 2-3 minutes add custard layer, and sprinkle the topping of your choice. I used green onion and carrot.  Cover and cook until the custard layer sets it takes about 25 minutes in low heat.
Remove it serve in pairs. Enjoy with your favorite tea or coffee.

Print Recipe
5 from 1 vote

Khanom Krok/ Thai Coconut  Rice Pancake

Kahanom Krok /Thai coconut-rice pancakes is a traditional Thai dessert. They are prepared by mixing rice flour, sugar, and coconut milk to form a dough. 

Prep Time10 minutes mins
Cook Time30 minutes mins
Course: Dessert
Cuisine: Thai
Keyword: Khanom Krok, Thai Coconut pancake
Servings: 14
Calories: 148kcal

Ingredients

  • For Outer  layer
  • ½ cup Rice flour
  • 1 ½ tablespoon desiccated coconut
  • ¾   tablespoon Raw rice
  • 1 cup coconut milk      I used Thai kitchen brand
  • ¼ cup water
  • ¼ cup  sprite
  • ½ teaspoon salt
  • 1 tablespoon sugar
  • 2 tablespoon   canola oil
  • For  Custard Layer
  • 1 cup thick coconut cream Upper portion of canned coconut milk without shaking
  • 1 ½ tablespoon tapioca flour
  • ½ teaspoon salt
  • 2 tablespoon sugar
  • Topping
  • ¼ cup chopped  Green onions/ carrot

Instructions

  • If using canned coconut milk, spoon into a small saucepan the creamiest part from the top of two cans of coconut milk. Add sugar and tapioca flour and mix everything to form smooth and set aside.
  • Combine the remaining coconut milk from the cans and stir until smooth,
  • Grind the uncooked white rice and dessicated coconut  in a food mill or clean coffee grinder as finely as possible.
  • In a  medium  pan combine the two with the rice flour, salt  sugar and coconut milk.
  • Stir and mix until well blended and smooth. Consistency of batter should right when you mix batter with wooden spoon it gets coats to back of the spoon in a thin layer.  When you are ready to make Khanom Krok  mix in sprite.
  • Heat a well-seasoned khanom krok pan(or substitute with an Ebelskiver pancake pan ) on the stove,
  • When the griddle is hot, brush the surface indentations with  canola oil .
  • Wait a few seconds before spooning the outer layer mixture into each indentation to about two-thirds full.
  • The batter should sizzle when it hits the hot metal. (If you have a teakettle with a spout, you may find it helpful as a container from which to pour the rice batter onto the griddle.)
  • Before the batter sets or in 2 minutes, add a dab of the sweet coconut cream mixture/inner layer over the top to fill and sprinkle the center of each cake with a little bit of one of the toppings, or leave plain.
  • Cover with a round lid and allow to cook for a few minutes, or until the pancakes are firm and crispy brown on the bottom. It takes about 25 minutes if you are using Ebelskiver pan.
  • Remove gently with a rounded spoon.
  • Re-grease the griddle before making the next batch. Because rice flour tends to settle, stir the coconut mixture well before pouring onto the griddle.
  • Serve the khanom krok in pairs of two.
  • Variations:
  • Use traditional topping like pumpkin, taro, corn kernel etc.

Notes

Serve the khanom krok in pairs of two.
Variations:
Use traditional topping like pumpkin, taro, corn kernel etc.
Adapted from It rains, fishes legends and traditions and  the joys of Thai cooking by Kasma Loha-Unchit.

Nutrition

Calories: 148kcal | Carbohydrates: 11g | Protein: 1g | Fat: 12g | Saturated Fat: 9g | Sodium: 170mg | Potassium: 103mg | Fiber: 1g | Sugar: 3g | Vitamin A: 18IU | Vitamin C: 1mg | Calcium: 6mg | Iron: 1mg
Tried this recipe?Mention @nidhinikhil or tag #zestysouthindiankitchenrecipes!

Adapted from It rains, fishes legends and traditions and  the joys of Thai cooking by Kasma Loha-Unchit.
Pin it for later

Snacks., Thailand

Roasted Spiced Sweet Potatoes with Garam Masala

Nov 22, 2012 · 48 Comments


 Wishing all my readers and friends a  Happy Thanksgiving to you and your family. 
Hope everybody’s turkey is brined already and only roasting/frying part is left. Dinner rolls, casseroles, sides, desserts are getting ready to going into the oven. Once they come out of oven, the house is going to smells with nice aroma and warmth of friends and family make it awesome experience.
I am thankful to God that he gave me my prince this year, and my princess started going to mother’s day out. Every day she brings some smile on my face with her art work and craft that she does in the school. When I going to pick her up she tells the stories that she did this and that.  I am thankful of all my friends who encourage and helped me through difficult time. I am thankful to hubby for making me feel like most beautiful woman in the world. I am thankful to my readers of blog for inspiring me to cook and also read my everyday ramblings.
 I am also thankful to all the Soldiers and their families who have served and are currently serving in the war. I have worked at the Veteran’s Hospital and seen firsthand their injuries and the emotional scars that they have. I also wish them a safe and Very Happy Thanksgiving.
I am thankful to God for all the happiness that He has  given us and hope that He continues to protect and guide us.
For my Indian and other countries friends, Thanksgiving, is holiday celebrated on the fourth Thursday of November in the United States. Main attraction of thanks giving is dinner or lunch. Some will have it as lunch and other will have it as dinner. Roasted Turkey will be main dish with bread stuffing along with gravy, cranberry sauce and casseroles. Dessert will be a pumpkin pie, pecan pie, sweet potato pie etc. I have tried everything except turkey when one of friend’s families had us for a thanksgiving dinner. In the local news I saw lot people standing in line to grab pie from a store for their Thanksgiving menu.
For Thanksgiving sides are must just like the turkey.  Since I didn’t make any turkey; or any dessert do to fear of sugar overload, I made some sides. I had bought few sweet potatoes thinking that boiled sweet potato can lure my prince to eat. I was utterly wrong, he is a clever guy, and he knows mama is fooling him with boiled sweet potato. After taking a bite, he turned his face away. With rest of sweet potatoes, I made this roasted spicy sweet potato. I earlier tried cooking sweet potato with my all and one spicy lentil powder. This time I want to do something not tried before. I adapted the recipe from my friend Reeni of Cinnamon Spice and everything nice.   I made some change  to recipe by adding garam masala and skipping  black pepper.
 Roasted the sweet potato with chili, garm masala and cumin powder by making a marinade of all these with salt and olive oil. Baked the sweet potato for about 35 minutes at 375F, they turned out the delicious. It turned out be highly addictive with exact balance of sweet and spiciness. If you don’t want it very spicy, reduce the amount of chili powder.  Try it, and it will add zing to your thanksgiving dishes, also well for having with rice.
Here goes the recipe.
Preheat oven to 375F. Peal the skin of sweet potato, rinse with water and chop them into cubes of about 1 inch. Make marinade with spices, salt and olive oil, mix with sweet potato.
 Transfer to baking sheet lined with aluminum foil and spread evenly. Roast them for about 35 minutes or until it is well done. In between turn them to get uniform roasting.
Enjoy
                                             Print  Recipe  

Roasted Spicy Sweet Potatoes

Adapted from Cinnamon Spice and Everything Nice
Prep Time: 20 minutes
Cook Time    35 minutes
Serves    2

Ingredients:

2 Cup     Chopped Sweet potato
½ teaspoon  Kashmiri chili powder
½  teaspoon  Cumin Powder
½ teaspoon salt
½ teaspoon Garam masala
1 ½ tablespoon  Olive  Oil

Steps:

Preheat oven to 375 F. Line baking sheet with nonstick aluminum foil and set aside.
Peel the skin of sweet potato and rinse with water and chop into cubes of 1 inch thickness.
In a small bowl add salt and spices and olive oil  mix everything to form a marinade
Add the chopped sweet potatoes into marinade and using a spoon mix everything  so that it gets coated well.
Transfer the sweet potatoes coated with marinade into baking sheet and bake for about 35 minutes or until it is done.
Enjoy as much you wish.

Variations:

    • If you don’t want spicy you can reduce the  amount of chili powder.
 

Bakes, Side dishes

Lion House Dinner Rolls

Nov 20, 2012 · 38 Comments

Delicious and cute rose and cloverleaf shaped dinner rolls made with flour, yeast and sugar. This recipe is adapted from Lion House Dinner Rolls. Best part is that you can use your muffins to make these dinner rolls.

Rose Shaped dinner rolls

What is Lion House Dinner Rolls ?

These Lion house dinner rolls was in Studio 5 show, where Brenda Hopkin, the Lion House Head Baker was showing how to make these dinner rolls with their mixes, I was curious and decide to try it.

Lion house bakeries are a famous bakery in Salt Lake city, Utah. 

This is same recipe that lion house bakeries dinner rolls exactly as showed by Brenda in that video.

Only change from the orginal lion house rolls, this recipe uses both all-purpose and bread flour compared to all purpose flour alone in the orginal recipe. I like that combo to prevent the chewiness.

Various shapes like rose shaped and clover leaf rolls with same dough. It turned out the delicious and soft.

How to make Lion House Dinner Rolls? 

These are the ingredients to make these Lion House Dinner rolls at home.


Ingredients for Lion house dinner rolls

  • All purpose flour : Unbleached all purpose flour is used in this recipe.
  • Bread flour : you can use any bread flour
  • Egg : Add moistness to the bread dough
  • Shortening: Increase the texture and appearnce of the baked goods.
  • Butter : Adds higher rise, a crisper crust, and a longer shelf life. 
  • Sugar : Adds sweetness to the bread dough
  • Yeast : I used instant yeast you can use any type of yeast for this recipe
  • Dry Milk : Give caramelize taste to the bread
  • Water

Instructions to make this Lion House Dinner Rolls

In a small bowl mix warm water and milk powder and combine well and set aside.

Dough to make lion house dinner rolls

In a bowl of kitchen aid stand mixer mix the flours, salt, sugar, yeast, shortening and butter along with wet ingredients to form a sticky dough.

Knead well to form smooth dough and transfer to a greased bowl for doubling. It took about 90 minutes.

After the dough is double in volume transfer to well floured area and spread it into rectangle.

Then cut the dough into various shapes like rose or clover leaf.

Clover leaf dinner rolls

Clover leaf shapes

To make Clover leaf shape of dinner rolls cut the dough into 3 equal circles and place them into muffin tin.

Clover leaf dinner rolls
Clover leaf dinner rolls after baking

You serve these freshly baked cloverleaf dinner rolls with butter.

For Rose shaped dinner rolls

To make Rose shaped dinner rolls ,first cut into two and ¾th inch circle and fold like this.

Shaping of rose dinner rolls

These rolls can be baked in muffin tins.

Dinner rolls ready before baking

Variations of these Lion House Dinner Rolls

You can make with all purpose flour alone or adding whole wheat flour combo.

These recipe can be doubled or tripled according to the needs. You may need more muffin tins.

Dinner rolls after baking

Storage

These Lion House dinner rolls will remain fresh for 2-3 days at room temperature .

Long term storage, freeze the dinner rolls both pre-shaped or with baked dinner rolls.

Rose shaped dinner rolls after baking
Print Recipe
5 from 5 votes

Lion House Dinner Rolls

Cute and delicious rose and clover leaf shape dinner rolls is adapted from Lion House Rolls
Prep Time3 hours hrs
Cook Time25 minutes mins
Total Time3 hours hrs 25 minutes mins
Course: Breakfast, Brunch
Cuisine: American
Keyword: Buns recipes, dinner rolls
Servings: 12
Calories: 170kcal

Equipment

  • Muffin tin
  • Kitchen aid Mixer

Ingredients

  • 1 cups warm water 110-115 degrees
  • ⅓ cup ½ tablespoon  41g  nonfat dry milk (instant)
  • 1 ¼   Tsp.  12 g dry yeast
  • 1 ½ tablespoon 19g sugar
  • 1 ⅛   tsp.  6 g salt
  • 2 ½ tablespoon butter
  • 1 tablespoon  shortening
  • ¼ th of  egg
  • 1 ½ cup  240 g bread flour
  • 1 ½ cup 210g all purpose flour

Instructions

  • In a small bowl combine the water and the milk powder and stir so the milk dissolves and combine well.
  • In the large bowl of an electric mixer,  add flour,  yeast ,  sugar, salt, shortening, egg . Gradually add water and milk mixture and mix on low speed of mixer until ingredients are wet, then turn to medium speed and mix for 2 minutes. The dough will be getting stiff and you may need to remove the bowl from the mixer. The dough should be soft, not overly sticky, and not stiff.
  • Scrape the dough off the sides of the bowl and pour approximately one  tablespoon of vegetable oil all around the sides of the bowl. Turn the dough over in the bowl so it is covered with the oil. (This helps prevent the dough from drying out.) Cover with plastic and allow to rise in a warm place until double in size it takes about 90 minutes.
  • Sprinkle a cutting board or counter with flour and put the dough on the flour. It is now ready to roll out and cut into desired shape and size of rolls. Place on greased (or parchment lined) baking pans. Let rise in a warm place until the rolls are double in size (approx. 30 to 45 minutes) .At end of second rise heat the pre-heat oven to 375F. When you are ready for baking brush with egg wash.
  • Bake for 15-20 minutes or until they are browned to your satisfaction.
  • Remove from the oven and cool it in wire rack. Enjoy with warm butter.

Nutrition

Calories: 170kcal | Carbohydrates: 26g | Protein: 5g | Fat: 5g | Saturated Fat: 2g | Polyunsaturated Fat: 1g | Monounsaturated Fat: 1g | Trans Fat: 0.2g | Cholesterol: 13mg | Sodium: 214mg | Potassium: 87mg | Fiber: 1g | Sugar: 3g | Vitamin A: 112IU | Vitamin C: 0.3mg | Calcium: 39mg | Iron: 1mg
Tried this recipe?Mention @nidhinikhil or tag #zestysouthindiankitchenrecipes!

Bakes, Bread, Featured, Yeast Bread

Eggless Shaped whole Wheat Dinner Rolls

Nov 16, 2012 · 46 Comments

Delicious eggless shaped whole wheat dinner rolls made flour, milk water, sugar and yeast. Various shapes can be made with same dough.

What are shaped dinner rolls

Shaped dinner rolls are a delightful addition to any meal! There are various ways to shape them, from simple rolls to more intricate designs like knots or twists.

  1. Cloverleaf Rolls: These are made by placing three small balls of dough in each cup of a muffin tin to create a clover-like shape.
  2. Parker House Rolls: These rolls are folded over to create a half-moon shape, often with a soft, buttery interior.
  3. Knot Rolls: These rolls are twisted and tied into knots, creating a visually appealing shape that's great for pulling apart.
  4. Braided Rolls: Dough is divided into strands, braided together, and then formed into a circle or knot.
  5. Pretzel Rolls: These rolls are formed into a pretzel-like shape and typically have a slightly chewy texture and a hint of sweetness.
  6. Crescent Rolls: Dough is rolled into a triangle shape and then rolled up from the wider end to create a crescent shape.
  7. Twisted Rolls: Two strands of dough are twisted around each other, forming a spiral-like roll.
  8. Flower Rolls: Petals are formed by making several cuts on the edges of a round piece of dough, creating a flower-like shape when baked.

Each shape can add a touch of uniqueness and charm to your dinner table!

  Made dinner rolls of six shapes, and are 1) Clover leaf.  2) Rose Shape 3) small braid 4) knot 6) Rosette or Kaiser 7) Line house rolls. I was not able to get time to make crescent shape.  

How to make these eggless shaped whole wheat dinner rolls

You need following ingredients to make these shaped whole wheat dinner rolls.

  • All purpose flour : Unbleached all purpose flour is used in this recipe.
  • White Whole wheat flour : Adds mild flavor than the whole wheat flour to the bread.you can use whole wheat flour too .
  • Potato flour/ Starch :  2 or 3% potato flour is used to preserve freshness, due to the increased water absorption afforded by the potato flour. The addition of 2–4% potato flour does not affect the exterior quality of the bread, but it improves interior qualities such as texture, aroma, and flavor.
  • Dry milk: Milk powder gives sweeter, slightly more caramelized flavor. The added sweetness and protein helps bread dough rise—particularly enriched dough like brioche.
  • Salt : Adds flavor and controls the fermentation rate.
  • Yeast : Used instant yeast in this recipe
  • Sugar : Granulated sugar adds sweetness to the bread.
  • Water : Use luke warm water approximately 60-62% hydration rate.
  • Milk : 2% milk is used in this recipe you can use whole milk .
  • Butter : Unsalted butter is used in this recipe

Instructions of make eggless shaped dinner rolls

For Braid, lion house rolls, kaiser and knot you need to grab following ingredients. This is eggless shaped dinner rolls.

In a bowl of kitchen aid stand mixer make dough

Lion house rolls are made like this

You can make lion house rolls ( Lion House rolls are a regional specialty made famous by Utah's Lion House restaurant.) by dividing the dough and rolling them into a rectangle.  

For Kaiser Rolls

Roll the dough into long rope and then tie the rope and brings the end together like this.

 For Knot

For knot shaped dinner rolls you have to make 5 inch rope and twist and bring the end inside out like this .

Braid shaped dinner rolls

Here is 3 braid shaped dinner rolls

After you shaped everything set aside for second rise

 Once you are ready for baking brush with milk and bake them in preheated  oven. Bake for about 25 minutes. Once you remove from oven immediately brush with butter .

Serve warm.

Storage of these eggless shaped whole wheat dinner rolls

These dinner rolls will stay fresh for 2-3 days at room temperature. For long term storage freeze the dinner rolls

You can also freeze the before baking after first shaping. When you are ready to bake thaw and rise for second time and bake.

Variations

If you want you can make entirely whole wheat or all purpose flour dinner rolls. This recipe is really forgiving so you can make different shape with same dough.

Print Recipe
5 from 5 votes

Shaped Whole Wheat Dinner Rolls

Delicious and easy variou shaped dinner rolls made with same dough.
Prep Time3 hours hrs
Cook Time25 minutes mins
Total Time3 hours hrs 25 minutes mins
Course: Appetizer, Breakfast, Brunch
Cuisine: American
Keyword: #dinnerrolls
Servings: 8
Calories: 259kcal

Equipment

  • Pyrex bowl
  • kitchen scale
  • Dough whisk

Ingredients

  • 2 cups 180g King Arthur Unbleached All-Purpose Flour
  • 1 ½ cup/ 225g King Arthur white Whole Wheat flour
  • 2 ¼ teaspoons 7g instant yeast
  • ¼ cup 46g Potato flour
  • ¼ cup 26g Baker's Special Dry Milk or nonfat dry milk ( see notes)
  • 1 1/ 2 tablespoon 26g tablespoons sugar
  • 1 ¼ teaspoon 6g teaspoons salt
  • 3 ½ tablespoon 43g soft butter
  • 1 cup Luke warm water
  • ½ cup 123glukewarm milk
  • Topping
  • 2 tablespoons melted butter

Instructions

  • Combine all of the dough ingredients in a large bowl, and mix and knead   using a stand mixer, to make a soft, smooth dough.
  • Place the dough in a lightly greased container — an 8-cup measure works well here. Cover the container, and allow the dough to rise for 60 to 90 minutes, until it's just about doubled in bulk.
  • Gently deflate the dough, and transfer it to a lightly greased work surface.
  • Divide the dough  859g into 3  equal pieces and again each pieces into  ¼ inch thick rectangle.
  • For Lion house rolls : Dough pieces should be cut out into 4 inch long and 2 inch wide. brush with butter and lightly spread the dough piece and make swift roll with two hands. Dough pieces should be rolled facing you. Take a look at this video
  • For Kaiser  rolls:    Dough pieces should be cut into 4 ½ inch long and 1 inch wide.  Roll them into rope. Bring the two ends together and place one end over other, pull  and make a knot. Tuck in one end from top and other end from bottom.
  • For knot rolls: Dough pieces should be cut into 5 inch long and 1 inch wide. Roll them into rope. Bring the two ends together and place one end over other, pull  and make a knot.
  • For Braid: Dough pieces should be 7 inch long and 4 inch wide. cut into three pieces. And  make a braid.
  • Once you are done with all shape place them in baking sheet lined with parchment paper and
  • Cover the pans, and allow the buns to rise till they're crowded against one another and quite puffy, about 45 minutes. Towards the end of the rising time, preheat the oven to 350°F.
  • Uncover the buns,  brush with milk and bake them for 25 minutes, until they're golden brown on top and the edges of the center bun spring back lightly when you touch it. An instant-read thermometer inserted into the middle of the center bun should register at least 190°F.
  • Remove the buns from the oven, and brush with the melted butter. After a couple of minutes, turn them out of the pan onto a cooling rack.
  • Serve warm. Store leftovers well-wrapped, at room temperature.

Nutrition

Calories: 259kcal | Carbohydrates: 36g | Protein: 7g | Fat: 10g | Saturated Fat: 6g | Polyunsaturated Fat: 0.5g | Monounsaturated Fat: 3g | Trans Fat: 0.3g | Cholesterol: 26mg | Sodium: 453mg | Potassium: 194mg | Fiber: 2g | Sugar: 7g | Vitamin A: 303IU | Vitamin C: 1mg | Calcium: 68mg | Iron: 2mg
Tried this recipe?Mention @nidhinikhil or tag #zestysouthindiankitchenrecipes!

Bread, Buns and Dinner Rolls, Featured, Yeast Bread

Kadala parippu Sundal/ Split Chick Peas Salad: For diabetic Awareness and Giveaway

Nov 14, 2012 · 38 Comments


Today is World Diabetes Day. When Carolyn was looking for food bloggers for diabetic awareness day post, I agreed immediately. Diabetes and me has a long relationship, it took away my mom, grandma and aunty. It is disturbing my husband. It visited me in the form of Gestational diabetes when I was pregnant with my princess.

According to World Health Organization diabetes has ensnared around 346 million people in the world with its Black hands. This number is likely to more than double by 2030 without intervention.
Diabetes is a chronic disease, which occurs when the pancreas does not produce enough insulin, or when the body cannot effectively use the insulin it produces. This leads to an increased concentration of glucose in the blood (hyperglycemia).
Type 1 diabetes:  (previously known as insulin-dependent or childhood-onset diabetes) occurs when you body cannot produce insulin.
Type 2 diabetes:  (formerly called non-insulin-dependent or adult-onset diabetes) is caused by the body’s ineffective use of insulin.
In my mom’s case diabetes was discovered only after she developed diabetic retinopathy as a result of long-term accumulated damage to the small blood vessels in the retina. Now When I am reading about that condition it hit my heart as it occurs only after having 15 years of diabetes, and approximately 2% of people become blind, and about 10% develop severe visual impairment. If we knew her condition, we could have treated her early, and perhaps got to see and enjoy with her grandkids. She was well built, but not overweight, fun loving and loved to cook and take care of us. Even after losing her vision she didn’t bothers to tell us. One day I found out just by looking at her while she was pouring a cup of coffee. She was not pouring into the cup but on the flour. I asked her “Mom what you are doing”? She told me she was making coffee for me. When we took her to doctor, and realized the problem, he prescribed insulin for her. However Diabetes had already done the damage. Even with surgery we couldn’t help her to recover her sight in the left eye. And the right eye had also started losing the vision. Finally she died due to simple vomiting, that caused drop in blood sugar, leading to coma and cardiac arrest. When I look back I always feel that we should do something about it.
In my hubby’s case, he is skinny guy, who went to a routine physical checkup, doctor picked up that he had type 2 diabetes. First we both cried, and then after a week of denial and shock, we realized we had to tackle the situation; he is also belonging to family which has a history of diabetes. From that day onwards we are trying to control his diabetes with food and medicine. He is taking oral medication and maintaining the same dose for about 6.5 years. However, if he eats anything sugary or excess carbohydrates, it will show up in his morning blood sugar.  He loves to eat sugar, and he always asks me whether this will increase blood sugar, I will tell him, I don’t know. Anyway try a little. First thing he will tell me every morning is blood sugar level. We stopped using sugar in our coffee, tea, even my princess like to take it without sugar.
In my case I developed gestational diabetics when I was pregnant with my daughter; I didn’t take any insulin, but controlled it with food. Always my fasting sugar is 75-80, however after one hour of eating instead of 140 it will be 150. At that time I had craving for dosa south Indian crepe or pancake. If I eat 3-instead of 2 it will be high sugar. So decide to skip that. Then I found a solution, morning started with one whole wheat flat bread/ chapathi and egg white. Before lunch I will eat some salad without any dressing.  Then in the night, again some salad and chapathi with some lentil curry. I think I did something good as baby weighed only 7 pounds and I was able to have normal delivery. Only problem immediately after birth was that she has high rate of heart beat. She a naughty 3 and half year old, When I failed 1 hour glucose tolerance test for my son, I thought OMG, again I am going have gestational diabetes. But luckily 3 hour glucose tolerance test turned out be negative and he came to world healthy and happy.
I learned a lesson that it is not the sugar making the diabetes worse; carbohydrates can also do that too, as the body converts it to sugar. Also sugar is sugar whether it is honey or maple syrup or palm sugar it is deadly. We need to take a balance approach between our intake of sugar and carbohydrates. In the morning we usually have a protein rich breakfast with scrambled eggs (only with egg whites) and whole wheat toast with peanut butter. Lunch with rose matta rice and curries made of lentils and veggies. Evening there will be sugarless milk tea and a sundal/lentil snack. Dinner is at times chapathi and curry; mainly made with chana dal, black eyed peas etc.  Snacks are mainly fruits and occasional treats which I baked often.
Now I am in quest of finding the combo of veggies, lentils, and flours other than whole-wheat flour that can keep the blood sugar low. I know fiber rich food is needed. Hubby says al dente pasta keeps blood sugar in normal range, compared to slightly over cooked pasta. So I am looks forward to find steps, ways to reduce blood sugar.  I read somewhere that small changes that we make here and there can add up to make a big difference. And more we control diabetes; it has less control over us. So I want to follow that motto. Balancing the intake of sugar, starch with protein is the key for ideal diabetic menu which will prevent spiking of blood sugar.  Incorporating antioxidant rich berries in diet etc would be wonderful.
This is one tried and tested recipe, which can be used a snack for hunger prangs. Just cook lentils and then season with coconut, and spices. You can opt in for stove top cooking of lentils or pressure cooking them. I found pressure cooking is easier. Delicious, if you want you can add to salad to make it tastier.
Here goes the recipe. 

Soak the chana dal/ spilt chick peas for about 1 hour. After an hour pressure cook the soaked chana dal for about 5 whistle or 25 minutes. 

In a small skillet, heat olive oil, mustard seeds, urad dal, curry leaves, halved red chilies, when mustard seeds starts popping add cooked chana dal, grated coconut and salt. Mix everything and serve warm.
Delicious and healthy protein packed snack. 

                                                              Print Recipe from here

Chana dal sundal /Split chick peas Salad

Prep Time    30 minutes
Cook Time    25 minutes
Serves    2


Ingredients:

½ Cup Chana dal/ Split chick peas   
2 Cup    Water
1 teaspoon  Urad dal/ Split black gram

           ¼ teaspoon mustard seeds
            ⅛ cup fresh grated coconut      

1 teaspoon  olive oil   
1 Red chili
1 sprig of curry leaves
¼ teaspoon salt or to taste

Steps:
         Soak the chana dal/split chick peas for half an hour and pressure cook them with 2 cup of water. Until 4 -5 whistle or 25 minutes.  Drain the excess water  using a colander and set aside.

In a small skillet, heat olive oil, mustard seeds, urad dal, curry leaves, halved red chilies, when mustard seeds starts popping add cooked chana dal, grated coconut and salt. Mix everything and serve warm.
Delicious and healthy protein packed snack.

Variations:

    • Instead of chana dal you can  use your favorite lentils to make this preparation.

 Swerve natural Sweetener is   offering one of  lucky reader this blog  following goodies which includes   2 lb swerve  sweeteners, baking kit and lunch box.


  To enter the giveaway, just leave a comment telling me what would you make with Swerve sweetener. 
For additional entries (please leave a separate comment for each entry)

 In order to be include in the giveaway you need to

  •   Like  Zesty South Indian Kitchen in Facebook  and leave the comment you did so in the comment area.
  •  Follow Zesty South Indian Kitchen at Google connect 
  •  Follow   Zesty South Indian Kitchen in Twitter and re tweet this post
  •  Friend with me at Google plus and  leave the comment in comment area
  • Like Swerve on Facebook and leave a comment  in comment area
  •  Follow Swerve on twitter and leave a comment you did so in the comment area
  •  Pin this post and leave a link to the pin in the comment area

 The giveaway is opened to US residents only as I am taking care of shipping charge. 
 You should be  18 years of age.
Giveaway will be open until Wednesday November 21st at 11.59 pm CST. The winner will be choose via random.org and will be contacted via email.

Swerve is giving away a Blue KitchenAid mixer  Carolyn’s Blog.


Snacks., Sundal

Shankarpali

Nov 13, 2012 · 21 Comments

Delicious Shankarpali lightly sweeted fried cookies made with flour, semolina, sugar , ghee and cardamom. Excellent snack of its own. 
 
Diwali/Deepavali/ festival of lights are unique among all the festivals, and I loved it so much while growing up. I miss those firecrackers, my mom’s cooking and all that crazy ads on TV and Radio about the sales going on for Deepavali. As this year’s Diwali is falling on a weekday, there is not much celebration except I made Shanakarpali, Mysore pak, Ukkaraiand mixture.
I bought new clothes for my princess and prince, as she is going to school and hubby is working not planned to have elaborate breakfast which is must on Diwali day.  As usual, convey my Diwali wishes to dad in India.  Our Diwali celebrations are little dampened by the lingering cold in the household.
 
Diwali day usually started with very early morning bath (usually sesame oil is used in hair and body) followed by wearing new dress and lighting fire crackers and going to temples. Having an elaborate breakfast, with idly (steamed rice cake) and all kind of savories and sweets which mom made for Diwali.
 
After marriage when I visited Mumbai my hubby’s home, there they are painting the house, making rangoli, decorating house with lights, lilting diyas (small earthen lamps) and doing God Lakshmi Pooja. Of course there are lot of sweets and snacks they call it Faral like Shakarpali, Karanji, Rava ladoo and savories like Chakali, Chiwida etc.
 
This time for Deepavali/Diwali I planned to make karanji and shankarpali, but due to me being under the weather, I had to stick to my usual Diwali dishes made only shankarpali. These are small cute fried beauties, crisp, but not hard. They remind me of diamond cut cookies from my home State, Kerala. Shankarpali is easy to put together, as it doesn’t require dunking the fried goodies into sugar syrup like diamond cuts or shakar pare of northern India.
You need All-purpose flour, semolina, sugar, baking soda and milk to form the dough. Then cut the dough into slightly thick pieces and fry them in oil until it is crisp. They are delicious and addictive, are not overly sweetened. It is a very good snack while watching a movie or to have with tea or coffee.


Mix all purpose flour, semolina, ghee, baking soda, salt and cardamom together in medium bowl.
In microwave safe bowl heat milk, water and sugar brings to a boil. Add this boiled milk into the flour mix to form smooth dough.
 
 
Spread the dough into 20 inch length and 15 inch wide rectangle.  Using a pizza cutter cut into strips first and then into 1 inch pieces with ½ inches thick.
Heat oil in thick bottom pan and fry these small pieces until it become golden brown and cooked well. 


Drain them into kitchen towel to remove excess oil.
It should crisp but not hard.
Enjoy as much you wish.
Other fried desserts recipes 
vettucake
                                                

Print Recipe
No ratings yet

Shankarpali /Sweet fried cookies

Delicious and simple shankarpali is a sweet fried cookies made with flour, sugar, ghee and water.
Prep Time10 minutes mins
Cook Time35 minutes mins
Total Time45 minutes mins
Course: Dessert, Snack
Cuisine: Indian
Keyword: Shankarpali
Servings: 4 servings
Calories: 2206kcal

Ingredients

  • 1 C All purpose flour/Maida
  • ¼ Cup Semolina/Rava
  • 2 ½ tablespoon Granulated Sugar
  • ⅛ cup Water
  • ¼ cup Milk
  • 1 tablespoon Ghee
  • ⅛ teaspoon Baking soda
  • ⅛ teaspoon salt
  • 2 nos Cardamom
  • 4 Cup Canola Oil for frying

Instructions

  • Mix all purpose flour, semolina, ghee, baking soda, salt and cardamom together in a medium bowl.
  • In a microwave safe bowl heat milk, water and sugar brings to a boil. Add this boiled milk into the flour mix to form smooth dough.
  • Spread the dough into 20 inch length and 15 inch wide rectangle. Using a pizza cutter cut into strips first and then into 1 inch long diamond shaped pieces with ½ inch thick.
  • Heat oil in thick bottom pan when it reaches hot ( 350F) add pieces of dough fry these small pieces until it become golden brown and cooked well. It takes about 9 minutes to cook one batch.
  • Drain them into kitchen towel to remove excess oil.
  • It should crisp but not hard.

Notes

If you you can increase the amount of sugar to make it more sweeter.

Nutrition

Calories: 2206kcal | Carbohydrates: 40g | Protein: 5g | Fat: 229g | Saturated Fat: 19g | Cholesterol: 11mg | Sodium: 115mg | Potassium: 84mg | Fiber: 2g | Sugar: 8g | Vitamin A: 25IU | Vitamin C: 1mg | Calcium: 26mg | Iron: 2mg
Tried this recipe?Mention @nidhinikhil or tag #zestysouthindiankitchenrecipes!


Featured, Indian Sweets

Royal Milk shake/ Dates, Fig and Nuts Smoothie

Nov 9, 2012 · 27 Comments


In my household, all members I, hubby, my daughter and son are down with runny nose and bad cold. Poor princess doesn’t know why nose is runny all the time. Other guy was crawling all around without know why in the world I am getting constant Niagara Falls in my two little nose. My cooking spirit has taken a back seat as stuffed nose and headache is making a constant reminder that I am here for some time, don’t worry. I am trying all over the counter medication that is available to make me better.

My hubby is political enthusiast, who loves to watch and read all political news and he is one teaching me about the numbers and debate and deficit. So Tuesday we got to bed around 1.00 in the morning (early Wednesday morning) after watching the president win the term for next 4 years. My son who is 9 month old loves to watch political discussion than Sesame Street which his sister plays on TV.

 See who is watching meet the press

Two weeks ago I won the giveaway of natural  delight medjool dates and date rolls with almond and dates rolls with coconut by Garrett who blogs at Vanilla Garlic.

 He is an excellent blogger and cook, who is now writing a cook book. It will be ready in the store soon.  I love reading his blog; it touches the heart, and then there is also yummy food. Dates were so fresh and delicious, initially I was planning to make our sweet chutney with dates, and then changed mind after seeing a cookery show about a juice shop in my hometown (where anchor who painfully repeat everything). Owner of the shop is making and showing varieties of fresh juice as he is serving the customers. He didn’t give any measurements so whatever depicted here is my version.

 I was little curious when he made this smoothie/shake, as he is dumping, dates, figs, cashew nuts, almond, ground ginger, cardamom and milk. He used sugar as sweetener, but he also mentioned that he will serve this shake/smoothie with honey if you pay little more. I didn’t want any sweetener as dates and figs are naturally sweet. He named it royal shake as it has expensive fig, nuts and dates are there. I thought, it has all the favorite ingredients in it why don’t I should try. Asked hubby, and got his approval and made this one on morning. Trust me it delicious, it is really rich and creamy if you like creamy pudding then this is one. After doing a taste test hubby told me it is like our Payasam/pudding.  I think this will be better than any Protein drink in the market. I used milk here as shown in the show, but if you want to make it vegan try with coconut milk. I also used blanched almond as with the skin I feel it is bitter in taste. 
Then comes dreaded photographic session, I don’t have much props, so when I want to take this smoothie it is colored as chocolate and dull, not looking good. Then I try to incorporate few elephants from my collection but ended up rejecting all those pictures. After the stressful photos session was over, savoring this drink was wonderful. If you are a fig, dates and nuts lover, try this and you will love the taste for sure. If you want extra sugar please feel free to add.  This smoothie is really a savior during busy morning.
First soak the dates in the water so that it will be soft and your blades in the blender will be safe. Chop fig and blanch the almond. Easy way of blanching almond is heat ¾ cup water in microwave safe bowl for 1 minute high. Add almond, after 2-3 minutes take them out and just rub with your finger skin will be gone by that rubbing.

In a jar of blender, add cashew nuts, blanched almonds, soaked dates, fig and dry ginger and cardamom and pulse for 5 minutes with ½ cup milk. Once it is done add rest of milk plus water and blend it for another 2-3 minutes. You will get rich creamy smoothie.

Delicious !!!

                                                        Print Recipe 

Royal Shake/ Dates, Figs and Nuts Smoothie

 Adapted from Jaihind TV Cookery Show

Prep Time    30 minutes
Cook Time    15 minutes
Serves    4


Ingredients:

6 no Dates ( I use Medjool natural delights) (soaked in
 warm water for about 30 minutes)
5 no Fig
⅕ Cup Cashew nuts
25 no  blanched almond
1 ½ cup Milk ( I used 2 % milk)
2 cup Water
2 no  crushed Caradamom
⅛ teaspoon dry ginger


Steps:

First soak the dates in the water  for about 30 minutes so that it will be soft and your blades in the blender will be safe. Chop fig and blanch the almond. Easy way of blanching almond is heat ¾ cup water in microwave safe bowl for 1 minute high. Add almond, after 2-3 minutes take them out and just rub with your finger skin will be removed with rubbing.

In a jar of blender, add cashew nuts, blanched almonds, soaked dates, fig and dry ginger and cardamom and pulse for 5 minutes with ½ cup milk. Once it is done add rest of milk plus water and blend it for another 2-3 minutes until consistency you want.

This is creamy and delicious.


Variations:

    • If you want vegan  try with coconut milk
    • Add nuts of your choice.    
 

Drinks

Deepavali/Diwali Snacks and Sweets Round up

Nov 5, 2012 · 17 Comments

 This year’s Deepavali /Diwali ( festival of lights) around corner, it is on  November 13th. When we are young appa would get us new clothes, crackers and sweets for Deepavali/Diwali. While amma will be busy cooking in the kitchen, with her own treats for us. If you want to know 10 reasons to celebrate Diwali, take a look at this link. In my home town, Deepavali is celebrated with crackers, sweets etc. We won’t do light any diya or lamps, our lamp lilting ceremony is during Thirkarthika (another festival, with its specialty foods etc).

Deepvali /Diwali is one of festival celebrated throughout India. It becomes more special when you are newly married. We call it Thala Deepavali (means first deepavali). We Indians celebrate festivals with lot of sweets, savory, new clothes, lightning, noises etc along with lots of enthusiasm. We are so lucky to have one festival every month.Here is my collection of Deepavali snacks  and Sweets.

Thattai

Mullu Murkku

Pakku vada/Ribbon Pakkoda

 
Sabudana murukku
 
Mixture
 
Boondi
 
Omapodi

  Parippu vada/ Lentil fritters

Deepavali Sweets

Mysore pak: Chickpea flour fudge

 Athirsam


Rava  laddo/ Sweet Semolina balls

 
Peda/Milk Sweet
 
Okkari/ Chanadal and Jaggery Sweet
 Gulab Jamun
Boondi ladoo
 
Rasamalai
 Neyappam
Plantain Halwa/Plantain fudge
Maladdu/ Roasted chanadal sweet

Enjoy


Diwali/ Deepavali Recipes

Virgin Fruit cocktail

Nov 2, 2012 · 35 Comments


Okay I have question for you? When you eat food how do you sense the taste? Do you think if the nose and the brain play a role in the taste of food?  If you say no only the tongue play a role I would say you are wrong. Here’s an experiment you would like to try. One when you make any food with a great aroma, try this experiment. Cover your nose tightly with a nose band and try to taste the food, you fill not find any taste. Now remove the nose band and try again. Till yesterday I was having same opinion like you. I changed my view after seeing yesterday PBS show can I eat that.  Nose and brain plays important roll deciding flavors.

Now I remember when my grandma gave me some Ayurvedic medicine and usually a bitter one, she holds the nose together and pours the medicine in the mouth saying that it won’t taste bitter. I didn’t understand the science behind that till yesterday.  When we eat any food, the flavors come from the nose.  In the mouth we have back channel to smell receptors, so when we put food in the mouth vapors from the food goes through the smell receptors and in nose is detecting flavor of food in the mouth.  Not only nose, vision and even sound influence the taste.  It is the sounds that gives you idea of soft, crispiness, crunchiness whether it is hot or cold the food.  Ultimately the flavors of food we eat is coming from brain, it is one created perception of flavors. Our brain takes parts actively in eating than any other process, exercise work or even sex.
I think that I have given you an overdose of science here, coming back to this recipe. This is a recipe from a juice shop in my home town Thiruvanthanapuram (Trivandrum), shown in TV show. He makes lot of fresh juices with fancy name and various compositions. I don’t like the TV anchor that does the show, as he is really bad in repeating everything. He doesn’t even not know honey can cause diabetics, yes sugar in the form of honey; maple syrup, etc are dangerous.  The Juice shop guy is not giving out any recipe but only showing what are ingredients putting it in the juice, I was inspired to make this drink based on the show.  I liked few of his fresh fruit juice ideas, so you can expect that here in this blog.
What makes this juice special is that it has pineapple, grapes, tomato, lemon, orange, pepper, mint, salt, sugar and ginger. I have tried it twice, both times it came our really delicious, it has zing of ginger will remain in your taste buds even after drinking the juice, Try this. You will enjoy.   One more question for you?  Tomato is fruit or vegetable? Answer is fruit. Here goes the recipe.
In a blender combine, pineapple, grapes, tomato, orange and lemon juice, pepper , mint salt, sugar and ginger. Add ice and water and blend well strain and serve it.


Enjoy  great cocktail. 

                                                  Print Recipe

Virgin Fruit Cocktail

Adapted from Jaihind TV Cookery Show

Prep Time    5 minutes
Cook Time    5 minutes
Serves    2


Ingredients:

1 C    Chopped Pineapple
20 no    Grapes
2  no    Tomato ( Remove the skin and seeds)
Juice of one lemon
Juice of  2 small orange
15 mint leaves
⅛ teaspoon black pepper
¼ teaspoon salt
1 tablespoon Sugar ( Increase sugar if you want more sweetness)


Steps:

In a blender combine everything and blend together to form a smooth consistency and strain through the strainer and set aside.


    I am linking this delicious drink to  Gluten free Fridays
    Food Friends Friday
    Gallery of Favorites


Drinks, Juices

Favorite Recipes Event: Rice Recipes

Nov 1, 2012 · 6 Comments

Dear friends, welcome to  another episode of favorite recipes. This event is guest hosted by Amrita of  Sweet  'n' Savory. She  has great blog and amazing recipes.

 Last month it was great fun to host vegetarian recipes event, I got 159 entries, you will amazed to  see  the vegetarian recipes collection, take a peek at here.  

So don your apron and cook some tasty and delicious rice dishes. Hope over  to Sweet 'n' Savory blog to see the rules

If you want to contact me please e-mail at favoriterecipes12@gmail.com.

  This event is open to guest hosting.

Uncategorized

Boondi Ladoo

Oct 30, 2012 · 43 Comments

I am happy to welcome all of my readers and friends to join me in the 3rd year anniversary of my blog Zesty South Indian Kitchen.  I am grateful to all my readers (both visible and silent), friends and visitors who had made this small blog to survive all through these years.   Without your help I could not have achieved this.  Thanks to you all from the bottom of my heart.
I started this blog when my baby girl was six month old; lots happened after that, she is 3 and half year old now, we welcomed our baby boy beginning of this year. I am happy that in spite all these craziness, I am able to blog, that I feel achievement. Few great  friends geared up to help me  with guest post when I was not able to post   at the time of the birth of my son, so thanks  once again for that.
Without any flight tickets, with this blog I was able to take a culinary travel thought out world from my kitchen. I am able to make everyday connection with my mom who left me, before I started the blog, but I connect with her through the memories of her recipes. Even though this little blog is not having breath taking photos, I still try to take good photos and step by step clicks to show how the food looks at each and every steps of preparation. Nowadays I am only able to blog two recipes a weeks, and also hosting my favorite blog hop Hearth and Soul Blog Hop, and the ever growing group of Baking Partners, a group of home bakers who try to learn the nook and corner of Baking. At the same time I enjoy the Favorite recipe Eventsthat rekindled memories of food that we have grown up with.
Blogging makes me happy when somebody says they tried the recipes and came out well. No awards come close to it. Making the dishes, taking pictures and writing the blog has been lots of work most of the time.  It also creates lots of frustration at times, when we are planning to take pictures and arrange food; hubby who wants to take photos immediately so that he can eat. In the meantime my daughter also wants to click pictures and also do tastes test by trying to get to the dishes. An all-round crawler (my son) also is not far behind, crying at high pitch for mommy’s attention.
I also used to get upset when Foodgwaker or Tastespotting rejects my photos, now I tuned myself that if they accept it is well and good if not that is well and good. Not to worry too much. Life and family is worth more than photos.
This year I got one more taste tester, my son to the group of taste testers. He too has sense of taste and doesn’t approve any pre-made baby foods; even his mommy should extra care to make food tasty.
I am happy that I didn’t repost any of my post in last three years; I think every day we need to learn new. Next thing I would like to do is that update photos of all the posts and if time permits to make video of each recipe. I hope you will also continue to help and join me in this journey. Every year pass by I would like to add some more wisdom to parts of brain.
Your helpful criticism, comments and ideas can me better cook and blogger, so continue to do that. If you like my blog please follow in face book page, pinterest, twitter,
For every celebration, we need sweets, so for blog baby’s birthday I made this boondi laddoo. It is a traditional sweet from India. Without this sweet, it is hard to think of any festivals and marriages.  My mom used to like this sweets a lot.  My dad used to tease her, that when I came first to see you (It was part of arranged marriage, visiting prospective groom to prospective bride) you served tea, mixture and a laddoo. I was so blind tasting that laddoo said yes to marry you.  Then Amma will says, no one else’s in the world was ready to marry you. That is why I married you. Yes she lived with appa for about 36 years and left one day leaving him alone. Yes we daughters are there for him, still he misses her.
This sweet when you look at the videos and read the recipes it seems very easy, but in reality it is not that easy. It is mainly you must be careful with the two step in the process of making it. One sugar syrup consistency and second cooking the chickpeas ball, it should not be crunchy but it should be cooked right. If you can master that, then you are a winner. I was able to get it right this time.   Here comes the recipe of this delicious sweet.
First grab besan/ chickpea flour, rice flour, Sugar (yes this is sweet so close your eyes on calories for a second) cashew nuts, raisins, cloves, rock candy, saffron, ghee (if you want vegan free option use coconut oil) cardamom, baking powder, water and canola oil for frying.
In medium bowl sift chickpea flour/besan, rice flour, baking powder together and gradually mix with water  and food color to form a freely flowing pancake batter and set aside.
Next make sugar syrup with sugar and water in a medium sauce pot fitted with candy thermometer. I love my candy thermometer, as age old technique of checking thread consistency may not work well for me.  First boil the sugar and water when it starts boiling add a tablespoon of milk, you will see some form on the top, remove it with spoon (it is impurities in sugar). Boil the sugar syrup until it reaches 225 F/ or single thread consistency add saffron and set aside.
Heat ghee in small skillet and roast the cashew and raisins for about 1 minute until cashew become golden in color and raisins plums up and set aside.
Heat 4 cup oil in a wide mouth pan, when it starts hot, take out boondi ladle (a special slotted spoon/ or normal slotted spoon) and pour the prepared batter into the boondi ladle with tapping with hand or spoon. You can see small bubbles formed in oil. Cook for about 1 minute and remove from the oil using another slotted spoon into a kitchen towel to remove extra oil. It should be cooked well but not crunchy.

While it is hot transfer the cooked boondi to sugar syrup.  Repeat the process until you finish entire batter.

When you are cooking last batch of boondi, instead of putting directly into sugar syrup crush the cooked boondi using a food processor and then transfer to sugar syrup with rest of the boondi.

Add crushed cardamom, roasted cashew nuts and raisins, cloves and rock candy into the sugar syrup containing boondi mix everything to combine well.

When they are warm start making them balls, make small golf sized balls. Make fast as sugar syrup cooled it will become thick and you make not able to make balls.

Enjoy this delicious sweet as much you want. Practice makes perfect boondi. So next time you will be making better boondi.

Print Recipe
No ratings yet

Boondi Ladoo

Delicious Traditional Boondi ladoo made with fried chickpea flour balls and soaked with sugar syrup and spices.
Prep Time25 minutes mins
Cook Time25 minutes mins
Total Time50 minutes mins
Course: Dessert
Cuisine: Indian
Keyword: ladoo
Servings: 12 people
Calories: 277kcal
Author: Swathi (Ambujom Saraswathy)

Ingredients

  • 1  ½ Cup Besan/ Chickpea Flour/Garbanzo  bean flour
  • 1 ½ teaspoon Rice flour
  • half of ⅛th teaspoon  baking powder
  • 1 ¾ cup + 1 tablespoon Sugar
  • ¾ cup +⅛ cup water for batter
  • 1 ¾ cup water for sugar syrup
  • 3 drops of yellow food color
  • 5 nos of Saffron
  • 3 tablespoon  cashew nut pieces
  • 3 tablespoon raisins
  • 1 tablespoon  rock candy
  • 3 cardamom crushed into powder
  • 5 cloves          crushed into powder
  • 1 tablespoon milk
  • 1 tablespoon Ghee if you want vegan free option use coconut oil
  • 4 cups Canola oil   for frying

Instructions

  • In a medium bowl sift  besan/ chickpea flour/Garbanzo bean flour, rice flour, baking powder  and  gradually add water  and food color to form a smooth batter similar to pancake batter.  Make sure it is not runny. Set aside.
  • Heat ghee in small skillet and roast the cashew and raisins for about 1 minute until cashew become golden in color and raisins plums up and set aside.
  • Heat ghee in small skillet and roast the cashew and raisins for about 1 minute until cashew become golden in color and raisins plums up and set aside.
  • In a  saucepan heat water and sugar and bring to boil on medium -high heat. When syrup comes to boil turn the heat down to medium and add 1 tablespoon of milk . You will see lot of form coming on the top of syrup remove it with help of ladle and continue to boil the sugar syrup until it reaches about  single thread consistency of 225 F  in candy thermometer. ( When you pour the sugar syrup into a glass of water at this time you will able to see a single thread). To this add saffron  and set aside.
  • Heat the oil in a frying pan or any wided mouth pan  on medium high heat. The frying pan should have at least 1 ½ inches of oil. Tip: To test if the oil is the right temperature, drop a pinch of batter into the oil; if it rises immediately without changing color then the oil is ready to start frying.
  • Hold the boondi ladle/ slotted spoon  about 1 to 1 ½ inches above the oil over the center of the frying pan with one hand. With your other hand pour some of the batter onto the skimmer to cover all of the holes without spilling over the edge of the skimmer. Tip: if you hold the Boondhi ladle/ slotted spoon higher than 11/2 inches above the oil boondi will not be round.
  • The batter will start dropping through the holes into the oil. If the batter doesn’t drop right away through the holes, means batter is thick and you need to dilute little bit. Drop enough boondi into the oil so they just cover the surface of the oil in frying pan in a single layer
  • Fry them until the sound of sizzling stops and boondis are light gold in color but not crispy! It takes about 1 minute in medium flame. Remove the  boondi out of the oil with a slotted spoon and transfer to kitchen towel while they are warm and put them directly into the warm sugar  syrup.
  • Before making the next batch of boondi, wipe clean the boondi ladle. This helps to keep the boondi round.
  • Repeat the process of making boondi and adding to the syrup with rest of the batter. When you are cooking last batch of boondi, instead of putting directly into sugar syrup crush the cooked boondi using a food processor and then transfer to sugar syrup with rest of the boondi.
  • Add the crushed cardamom seeds, cloves, roasted cashew  nuts and raisins  and rock candy  to the  sugar syrup.
  • While boondi are warm start making  balls. If the boondis become cold you will not be able to form them into ladoos.
  • To make the ladoos, scoop up some of the boondi mixture into your palm with a spoon. Gently squeeze the mixture between both palms to shape into a round ball about the size of a golf ball.
  • As you finish making each ladoo, put it on a plate and continue on to make the next ladoo.
  • As the Ladoos cool to room temperature they will become firm but they should still be moist.
  • Ladoos will keep at room temperature in a covered container for up to 10 days and for one month in the refrigerator.
  • Tips
  • Make sure the syrup is at  right temperature, you will not be able to form the ladoos.
  • If the boondis cool down to room temperature before being shaped into balls, the sugar will crystallize.
  • Don’t worry  if you are not able to make ladoos You can still enjoy them as sweet boondi.

Nutrition

Calories: 277kcal | Carbohydrates: 42g | Protein: 4g | Fat: 11g | Saturated Fat: 2g | Cholesterol: 3mg | Sodium: 16mg | Potassium: 184mg | Fiber: 2g | Sugar: 31g | Vitamin A: 6IU | Vitamin C: 1mg | Calcium: 16mg | Iron: 1mg
Tried this recipe?Mention @nidhinikhil or tag #zestysouthindiankitchenrecipes!

Pin it for later

Indian Sweets

Salt Biscuits/Cookies

Oct 26, 2012 · 43 Comments

Delicious Salt Biscuits/ Cookies akka melt in mouth salted shortbread cookies goes well with cup of tea or coffee.

Salt Biscuits/Cookies From Hyderabad, India: Authentic Cookie From Land of Nizam. Basically a simple salted shortbread cookies  usually eaten during drinking tea.
History of Salt Biscuits/Cookies :
Irani cafes are the most famous for serving thousands of people every day in the twin cities of Hyderabad and Secunderabad, in state of Andhra Pradesh, India. Both old and newest part of cities is famous for its Irani tea and its cookies / biscuits. Most predominantly you can see people sipping tea and enjoying the biscuits by dipping it in their tea and having it. It may happen between routine casual conversations or between serious political discussions.
I been to Hyderabad and Secunderabad, but did not get a chance to try the famous Irani chai and Osmania biscuits and salt biscuits. I was busy running around main tourist attractions and got less chance to explore the cities as a whole.  But I saw few YouTube videos about Irani Chaiand Osmania biscuit and salt biscuits and coincidently find another You Tube video making them. So the chef in me got excited as usual, and I jumped at the prospect of making them.  Recipe adapted from Flavors of India Travelogue, from the Pista House Bakery and Sweets. Hyderabad.
I had already made Osmania biscuits and those were delicious, so I decided to make this salt biscuits/cookie. It is one of the most popular of my recipes next to Thai banana roti. I am really proud of that. I am updating some of the pictures on my post, but not re-posting it. I seen a trend of reposting the recipe in blog because the first time they didn’t get enough readers, I don’t like that idea. Trust me if somebody want to really try it, they will try it irrespective of number of comments.
 My mom loved cookies with sugar and salt in them. Although all cookies have salt, these salt biscuits/cookies have salt in slightly higher amount, and you can feel the salt taste.  Her favorites were a biscuit called 50/ 50, and Krack Jack. At that time, my favorite was cream filled cookies, and not much demand for this salt biscuits, and my mom used to finish it. My father has a sweet tooth so he loves sweet cookies compared to the salt version. I was planning to make it for long time, but I needed custard powder as one of ingredients. In Indian store, I was able to find only Vanilla flavored one. At first it was hesitant to buy it, as it is flavored, but then not finding any other choice I bought it and used for this recipe.
Due to my bread baking stint I have weighing balance in hand, so used that and made the cookies according to weight measures. In the video I have seen on You Tube they are using baker’s ammonia too; however I was not able to find them so I used baking powder. Instead of margarine, I used both vegetable shortening and butter. I added a small amount of egg to the recipe as mentioned in the original. If you are strict vegetarian and would no to egg, you can skip it. Both Osmania and Salt biscuits are soft but crispy cookies. It is easy to put together. If you like salty side in a cookie and love to have with a tea or coffee go for it.
I am happy that my salted short bread cookies looks similar to those sell in Irani cafes and bakeries, confirmed with this pictures from blog.
Here goes the recipe.
In a bowl of kitchen-aid stand mixer fitted with paddle attachment cream shortening, butter and sugar .Then add egg and mix everything well and set aside.
In a bowl sift flour, salt, custard powder, milk powder and baking powder and this flour mixture to egg –shortening and butter mixture and water to form smooth dough.
If you want you can freeze the dough at this point. When you are ready to bake bring it back to room temperature and bake.
Preheat oven to 375 F
Transfer the dough onto slightly floured surface, spread it into ¼ inch thick sheet, prick all over the dough surface with fork (if you have fancy device in your collection use it now). Cut it into thin rounds with a 2 ¼ inch biscuit cutter. Cookies should be thinner than Osmania biscuits.
Bake for about 15 minutes or until it become golden brown in color.
 Enjoy with   Irani chai or  any tea with milk.

Print Recipe
5 from 10 votes

Salt Biscuits/ Cookies

Delicious Salt Biscuits/ Cookies akka melt in mouth salted shortbread cookies goes well with cup of tea or coffee.
Prep Time10 minutes mins
Cook Time15 minutes mins
Total Time25 minutes mins
Course: Dessert
Cuisine: Indian
Keyword: Salt biscuits, salted shortbread cookies
Servings: 18 cookies
Calories: 118kcal
Author: Swathi (Ambujom Saraswathy)

Ingredients

  • 125 g Margarine/butter combo 4 ½ tablespoon vegetable shortening and 4 ½ tablespoon butter
  • 250 g / 1 ¾ cup All purpose flour/ Maida
  • 6.25 g / 2 ½ teaspoon Custard powder I used Vanilla flavored Custard Powder
  • 6.25 g/ 1 ¼ teaspoon Salt
  • 6.25 g/4 teaspoon Milk powder
  • 62.5 g/ ⅓ cup Sugar
  • ½ teaspoon Baking soda Use 6.25g of baker’s ammonia if you have in your hand
  • 50 ml/ 5 tablespoon Water
  • ¼ th of Large Egg

Instructions

  • In a bowl of kitchenaid stand mixer fitted with paddle attachment cream shortening, butter and sugar .Then add egg and mix everything well and set aside.
  • In a bowl sift flour, salt, custard powder, milk powder and baking powder and this flour mixture to egg –shortening and butter mixture and water to form smooth dough.
  • If you want you can freeze the dough at this point. When you are ready to bake bring it back to room temperature and bake.
  • Preheat oven to 375 F
  • Transfer the dough onto lightly floured surface, spread it into ¼ inch thick sheet, prick all over the dough surface with fork (if you have fancy device in your collection use it now). Cut it into thin rounds with a 2 ¼ inch biscuit cutter. Cookies should be thinner than Osmania biscuits.
  • Bake for about 15 minutes or until it become golden brown in color.
  • Enjoy with   Irani chai or  any tea with milk.

Notes

This recipe is adapted from here 

Nutrition

Calories: 118kcal | Carbohydrates: 15g | Protein: 2g | Fat: 6g | Saturated Fat: 1g | Polyunsaturated Fat: 2g | Monounsaturated Fat: 3g | Cholesterol: 4mg | Sodium: 237mg | Potassium: 25mg | Fiber: 0.4g | Sugar: 4g | Vitamin A: 256IU | Vitamin C: 0.05mg | Calcium: 10mg | Iron: 1mg
Tried this recipe?Mention @nidhinikhil or tag #zestysouthindiankitchenrecipes!

Cookies

Syrian Onion Bread

Oct 23, 2012 · 54 Comments


On a visit to Barnes and Nobles, my hubby bought The best ever book of Bread by Christine Ingram. You know I am a bread addict, and love to bake bread. This book is full of colorful photos and information about a large variety of breads.  I have to try a lot of bread, and it will take a few years to finish that book.  While turning the pages I fell in love with this bread. So decide to bake first.
In the last one year, Syria is now known for its war, however it’s earlier known for its deserts and ancient ruins, and just like any other country its has its own cooking. The capital city is Damascus and other main cities are Aleppo and Homs. According to Wikipedia Syrian onion bread comes under the part of appetizer in Damascus cuisine. Za’atr is the major spice blend commonly used in the Middle East, with its regional differences (just like Garam Masala from India). Za’atr from Damascus is less sharp and peppery than the version from Aleppo. I bought a pack of za’atr spice blend however has not used yet this. This bread recipe doesn’t require that.
While looking at the recipe I   found similarities with single-layered manaqish, Lebanon's breakfast bread, in the way of using topping and also shape similar to   any round Arabic bread  and look similar to  our own Bilays.
One afternoon, while babies were taking a cat nap I started making the dough. I used both All - purpose flour and bread flour to make it less chewy. If you want to follow the original recipe you use only the bread flour.  I found that recipe measurements were little off, so I corrected by my own intrusion and increased the filling amount, however reduced the coriander powder amount as my hubby is not fond of it, and added a little chili powder. While baking bread, it was giving out intoxicating aroma with all onion and mint, cumin, coriander and red chili powder.  It was so delicious when it was out the oven.  With my corrected version I was able to get 9 bread, however I will ask you to make 12 bread so it will be less thicker than mine.
Next day too they are fine, but one thing I found that topping have the some age old problem with bread, they started coming off if you tilt or turn the bread, so you have to eat bread holding upright position. My original idea was to eat it with soup or curry, but when we started eating them, we ate it just like that without any add-on. If you want a change from your usual breads, try this.
Here goes the recipe.
At first make the dough using all purpose, bread flour, salt, and yeast. I used instant yeast. If possible weigh the flour and other ingredients. 
 
In a bowl of kitchen aid stand mixer dump all flour, salt, yeast and water gradually to form smooth dough and knead for about 10 minutes.
Transfer to lightly greased bowl and set aside for rise or yeast to do its job.  Once it doubled in volume, it took about 75 minutes. Transfer to well floured surface and divide into 9 -12equal pieces.        
Flat it into a circular disc of about   5-6 inch round, prick all over using fork and transfer to baking sheets cover with a kitchen towel and set aside for another rise to 20 minutes. 
Preheat oven to  400F
In a small bowl add chopped onion, mint, cumin, coriander powder and chili powder and mix everything so that spices get mixed well. 
When you are ready for baking, brush circles with olive oil and sprinkle topping mixture while sprinkle do it  from little height to get uniform topping.  Bake for about 30 minutes or until sides becomes brown.
Serve warm.
      
                                                                          Print Recipe

Syrian Onion Bread

Adapted from  The Best Ever Book of Bread by Christine Ingram  and Jennie Shapter

Prep Time    20 minutes
Rise Time    : First time 75 minutes, Second rise: 20 minutes
Bake Time:  30 minutes
Serves    9-12 no.


Ingredients:
       Bread

2 cup/ 280g/ All purpose flour
2 cup/ 320g/ Bread flour
2 ½ teaspoon/8g Instant yeast
1 teaspoon /5g Salt

            10.5 oz  /1-⅛ cup Water
             2 tablespoon Olive oil
          
          Topping

           ½  cup Chopped Onion
           2 tablespoon chopped mint
           1 ¼ teaspoon  Cumin powder
           1 ¼ teaspoon  Coriander powder
            ¼  teaspoon Red Chili Powder
Steps:

In a bowl of kitchen aid stand mixer  add both flour, salt and yeast and gradually add to water to form a sticky  dough.

            Knead the dough for about 8-10 minutes to form smooth dough.

          Transfer the dough to lightly greased bowl and cover with plastic wrap  and  set aside for rise  

          or   doubled in volume. It  took about 75 minutes.
             
            Punch down the dough and turn into lightly floured work bench. Divide the dough(934g) into 
        9-12 pieces.  Roll it into 5-6 inch round. Make them slightly concave. Prick the disc with fork all 
        over to  prevent  puffing in the oven.
    
            Space the rolled disc into lightly floured baking sheet with  1-2 inch space in between. Set 
     aside  covering with kitchen towel for about 20 minutes.
         
           While dough  is  doing its second rise .

            Preheat oven to  400F

           In a small bowl add chopped onion, mint, cumin, coriander powder and chili powder and mix everything  so that spices get mixed well.
           When you are ready for baking, brush circles with olive oil and sprinkle topping mixture while sprinkle do it  from little height to get uniform topping.  Bake for about 30 minutes or until sides becomes brown.

            Serve warm.


            Variations:

    • Skip Chili powder if you want  follow original recipe.
I am linking to Hearth and Soul Blog Hop hosted  here.
Yeast Spotting 
Bake your own bread


Yeast Bread

Kalikanji / koozh dosa/ Non Fermented Rice Pancake : Gluten and Vegan Free : A guest post for Kitchen Corner Try It

Oct 20, 2012 · 21 Comments

When my friend Suja of Kitchen Corner Try It asked me to do a guest post for her, I immediately said yes.  Blogging has brought me a few, but great friends and she is one of them; she started her blog roughly six month after I started.  She never fails to stop by whenever I post and if I need any help I can ask her. She will not say no to me.  She   has cute little boy who just started pre-school. She is from Kerala, my home state in India, and is an excellent cook, great blogger, great mom and friend.  
Since she knows that I am busy and crazy with two kids, she gave me freedom to choose recipe. I choose this recipe as it is close to my heart. My mom used to make it very often. She makes regular dosa (our south Indian crepe), Adai (rice and mixed lentil crepe) and Kalikanji dosa. It is one of the traditional Tamil Brahmin cuisines.  She used to makes it once a week, when she ran out of batter for regular dosa.  Both I and my sister usually would have it with sugar. My father would choose some spicy chutney /pickle or curry. I was planning to make this for long time; however I had only vague memories about this recipe.
I told my father during a phone conversation that I am missing kalikanji dosa which amma used to make it. I don’t how to make them. Then he gave me the recipe. I never learned any cooking from my mom, and I got interested in cooking only after staying alone. Meaning running out tasty food option? Yes I did that.
This recipe is made only with rice flour and coconut and salt, one step in the cooking process make its really soft crepe.  You don’t need any overnight fermentation like dosa, only need is to soak the rice for about 3 hours grind it into smooth batter and set aside   a portion of the batter and then cook the batter to form porridge and add it to the batter. Make pancakes as soon you need it.
It’s yummy and you only need a spicy side dish to dig in. Try it and it won’t disappoint you.

Please  hop over her blog 
  .

Here goes the Recipe
Ingredients
2 cup raw rice
2 cup water + extra water for soaking
½ teaspoon salt
¾ cup grated coconut (fresh or frozen, don’t use desiccated one)
2- 3 tablespoon of oil
How I made
Soak the rice for about 3 hours and set aside
Wash and grind the rice with½ cup water in grinder or blender. After grinding rice   set aside ¼ cup of rice batter and add coconut and grind once again to combine everything well.
In a small sauce pan heat ¼ cup rice batter you set aside with ¾ cup water for about 2 minutes with constant whisk to prevent forming clumps.  Batter should be cooked and have nice shiny white / transparent in color.
Add this cooked batter to remaining rice –coconut batter, add salt and ½ cup water to form a loose crepe or pancake like consistency.
Heat favorite girdle or skillet and brush with oil and pour ¼ cup of batter and spread it in a circular motion to form a 9 inch circle. Add few drops of oil around the side of circle.
Cook for 30 seconds on one side and flip the other side and cook for another 30 seconds. Once it is done it have small brown spots. Mainly white in color. 
Enjoy with any spicy curry. They are soft and delicious.
 Preparation time: 3 hour soaking time+ 20 minutes
Cooking time: 15 minutes
Yield: 10
 

Pancake

Rajgira aloo roti: Amaranth and potato flat bread

Oct 19, 2012 · 38 Comments

Delicious Rajgira Aloo roti flatbread made with gluten free amaranth flour and potato and spices. Simple flat bread goes well with any curry.

 
I had bought a small packet of rajgira flour from Indian store after seeing an episode of pudding made with rajgira by one of the chef in a You Tube Video. Since it is Navarthri, people in north and western part of India do fasting and at that time they won’t any wheat and prefer gluten free grains like Rajgira.
Normally cooked with potato, they make puri,(fired flat bread)  roti etc.  They call it vrat  ka khana meaning eaten during fasting. They don’t use any lentils rice, wheat and even regular salt etc.
 
However in south India where I am from we don’t do fasting and we prefer eat lentils during Navarathri, and make sundal seasoned with coconut, and curry leaves and mustard seeds.
Rajgira Flour is Amaranth Flour. It is pleasant and nutty in taste. This flour has high level of protein content and fiber as compare to regular cereals like wheat and rice.   According to Bob’s Red  Mill site, it is used to replace 25 % of flour in the recipes.
It's especially high in lysine which is lacking in many grains. They work best when you combined with potato starch or any other non- grain flour.
 Yesterday I decide to make Rajgira roti/flat bread for our dinner.  I asked my hubby do you think I need to use potato flour or mashed cooked potato along with rajgira /amaranth. Without addition of potato flour, it can’t be used to make anything.
He told me to use mashed cooked potato as in India we don’t have potato flour. Potato alone will taste bland, so decided to add some spices. I added cumin powder and chili powder.
I love to add cumin in all possible things. My hubby is okay with that too.  But he is against coriander powder. I used regular salt.
As any gluten free flour amaranth flour is sticky too, you need to drench with flour to make the flat bread.
If you have tortilla presser, take it out of pantry and use it. I don’t have it. I had only one 200g  ( 1 ½cup) packet in my hand. I used the entire packet for dough, so while making flat bread I used rice flour.
In the end I found out another way to make them flat.  Take a Ziploc bag and brush with oil on side and press the dough with your hand. You can make perfect round, that way you don’t need any flour. It takes about 2 minutes to cook the roti. When it is warm, brush them with oil. They have nutty taste. Yum with a great side.
It is really helpful in controlling blood sugar too. I asked my hubby yesterday do you think this amaranth flour roti/flat bread will reduce the blood sugar, as they are calling it one of great gluten free flour. He told me may be, but because it has potato in it I don’t know. To our surprise his morning blood sugar was 92. If he ate anything in the evening or dinner it will show up in next morning blood sugar.  So yes this one is really diabetic friendly.
I am always amazed by traditional Indian food, they all have hidden goodness. If folktale tells that this is good means yes it is good. So next time during your whole foods or Indian store visit grab a packet of Rajgira/amaranth flour try this one.
Here goes the recipe.
First grab your ingredients from pantry
 
In a bowl add rajgira/amaranth flour, salt, cumin, chili powder a tablespoon of coconut oil along with mashed cooked potato and gradually add boiled water to form smooth dough.
Divide the dough into 10 equal rounds about a size of lemon and set aside.
Take one ball of dough and drench it into bowl of rice flour and spread it with the help of roller.  Use more flour to prevent the flat bread from sticking. You need to have patient at this phase, it won’t form round immediately you need to practice a little bit.  This time tortilla press will came great rescue.
Other easy way I found out that take Ziploc and brush the surface with oil and place the dough ball slowly spread it into a circle with your hand.
Heat griddle or skillet and carefully place the roti and cook for about 1 minute on each side. When you get brown spots on each side it is cooked well.
Remove from the fire and brush it with oil on both sides.
 
 
Enjoy with any spicy curry, pickle and a bowl of yogurt.


Print Recipe
No ratings yet

RAJGIRA ALOO ROTI: AMARANTH FLOUR AND POTATO FLAT BREAD

Delicious Rajgira Aloo roti flatbread made with amaranth flour and potato and spices.
Prep Time10 minutes mins
Cook Time20 minutes mins
Total Time30 minutes mins
Course: Main Course
Cuisine: Indian
Keyword: Flatbread, roti
Servings: 5 people
Calories: 606kcal
Author: Swathi (Ambujom Saraswathy)

Ingredients

  • 11/2 cup 200g Rajgira flour/Amaranth flour
  • 1 /2 cup 158 g   Cooked Mashed potato
  • ¼ teaspoon Cumin powder
  • ¼ teaspoon  Chili powder
  • ½ teaspoon salt Use rock salt if you are making for Vrat/fasting
  • 1 tablespoon  coconut  Oil
  • ½   cup Boiling water
  • ¼   cup Rice flour for rolling if you have amaranth flour in hand use it
  • 3 tablespoon Oil I used olive oil

Instructions

  • n a bowl add rajgira/amaranth flour, salt, cumin, chili powder a tablespoon of coconut oil  along with mashed cooked potato  and gradually add boiled water to form a  smooth dough.
  • Divide the dough into 10 equal rounds about a size of lemon and set aside.
  • Take one  ball of dough and drench it into bowl of rice flour/ amaranth flour  and spread it with the help of roller.  Use more flour to prevent the flat bread from sticking. You  need to have patient at this phase, it won’t form round immediately you need to practice a little bit. If you have tortilla press  in hand  take and use it now.
  • Other easy way I found out that take Ziploc and brush the surface with oil and place the dough ball slowly spread it into a circle with your hand.
  • Heat griddle or skillet and carefully place the roti and cook for about 1 minute on each side. When you get brown spots on each side it is cooked well.
  • Remove from the fire and brush it with oil on both sides.

Notes

Variations:
You can use spices of your choice.
I am linking this delicious roti/flat bread to

Nutrition

Calories: 606kcal | Carbohydrates: 94g | Protein: 18g | Fat: 20g | Saturated Fat: 5g | Sodium: 263mg | Potassium: 68mg | Fiber: 13g | Sugar: 1g | Vitamin A: 30IU | Vitamin C: 6mg | Calcium: 172mg | Iron: 9mg
Tried this recipe?Mention @nidhinikhil or tag #zestysouthindiankitchenrecipes!

Pin it for later

Other Flatbead 
 
Mooli Ka Paratha 

Featured, Flat Bread

Pumpkin Quinoa Cashew nut Muffins

Oct 15, 2012 · 48 Comments

Delicious Pumpkin quinoa cashew nut muffins made with quinoa, pumpkin puree, oil, If you want you can skip cashew nut with cranberries

<img src="pumpkin quinoa cashew nut muffins.jpg" alt="pumpkin quinoa cashew nut muffins">
I hope everybody planned for Halloween Party. My daughter wants to be dressed as Princess, so she is going to be princess. I don’t know about my prince, since he is only 9 month he can’t tell me what he wants? So I can decide what ever costume he can wear. May be I got that privilege for one more year. After 3 he is also going to tell me his decision?  I just impose it as good Mom isn’t?
I came to know about Halloween tradition only during my stay in Stockholm.  In Sweden, I used to see carved pumpkin and lanterns inside the apartment at the windows, at the apartments where I stayed. So that is my knowledge, also it was the time if I turned on the TV I can see almost all kinds of spooky movies. After watching one movie I was so brave enough that I can’t sleep without light on. My hubby wants to watch Paranormal Activity series and he wants company? He is requesting me lot, I am not going to join him unless he change his movie choice.  I don’t want to increase my blood pressure.
In India there is no Halloween celebration. The spooky movies in India always have a lady singing song with her hair open and walking around in the middle of night in white sari. Her eyes will be red and fire or water can come through it depending upon the situation. When I was kid while watching movie, I will close my eyes when that kind of scenes were shown. Frankly telling now if I watch them they are not at all spooky to me, kind of funny.
Yesterday we visited a pumpkin patch in a church. It was really fun, my daughter enjoyed very much, however she was more interested in the play ground than in pumpkin.   It was a good drive, both my kids behaved well. We bought four cute little pumpkins. The technique of carving pumpkins has not been mastered by any member of my house. I think it will come as my kids grow.
Coming back to recipe since pumpkin is the star ingredient for this month baking partner’s challenge, as this time it is theme: it is cupcakes or muffins. Reshmi of Easy Cook, Priya of  Cook Like Priya and Julie of Erivum Puliyumm suggested 3 recipes of muffins and cupcakes. I baked pumpkin muffin suggested by Reshmi of Easy Cook suggested Pumpkin chocolate chips Muffin from Joy of baking.
<img src="pumpkin quinoa cashew nut muffins.jpg" alt="pumpkin quinoa cashew nut muffins">
I changed the recipe slightly by adding quinoa and whole wheat flour along with All-purpose flour, but skipped butter and added oil and used homemade pumpkin puree. I also skipped chocolate chips with cashew nuts  I tried this recipe twice, first tried with cashew nut and second with cranberries, both version turned out be delicious.
Second time I was more health conscious by using only 1 egg, brown sugar and forgot to add baking soda. The result was smaller muffins; this recipe will yield 12 delicious muffins. It was finished within a day. Quinoa the wonder grain adds nuttiness and moistness to the muffin.

Pumpkin quinoa cranberry muffins

<img src="pumpkin quinoa cranberry muffins.jpg" alt="pumpkin quinoa cranberry muffins">

Take a look at our fellow baking partner’s wonderful creations, they all made delicious muffins or cupcakes depending upon their taste buds, so please visit and discover the taste. You may get wonderful ideas for dessert for your Halloween party.

Here goes my recipe.
First make pumpkin puree. I made homemade version here is recipe. Then cook the quinoa by washing in the running water and roasting them with little oil for about 6-7 minutes and then cook them with water for about 15 minutes with lid closed. Once it is done set aside.
Preheat oven to 350 °F and Line muffin tin with paper cups and grease with cooking spray.
In a medium bowl sift, all purpose flour, whole wheat flour, ground cinnamon, ground ginger, ground cloves, all spice, grated nutmeg, crushed cardamom, baking powder and salt.
In another bowl lightly beat eggs, sugar, and oil and then adds pumpkin puree and cooked quinoa. Gradually mix in the dry ingredients and finally fold in chopped cashew nut. Transfer batter to prepared muffin pan and bake for about 24 minutes or until tester comes out clean.
Enjoy the muffin as much you want.
<img src="pumpkin quinoa cashew nut muffins.jpg" alt="pumpkin quinoa cashew nut muffins">
Here is the  cut portion
<img src="pumpkin quinoa cashew nut muffins.jpg" alt="pumpkin quinoa cashew nut muffins">
 Here is the Pumpkin Quinoa Cranberry muffins
<img src="pumpkin quinoa cranberry muffins.jpg" alt="pumpkin quinoa cranberry muffins">

Print Recipe
5 from 6 votes

Pumpkin Quinoa Cashew nut muffin

Delicious pumpkin quinoa cashew muffin made with quinoa, pumpkin puree, and cashew nuts or cranberries.
Prep Time10 minutes mins
Cook Time24 minutes mins
Total Time34 minutes mins
Course: Dessert
Cuisine: American
Keyword: #pumpkin, muffins
Servings: 6
Calories: 471kcal
Author: Swathi (Ambujom Saraswathy)

Ingredients

  • ¾ cup All purpose flour
  • ¾ cup White whole wheat flour
  • ¾ cup Granulated Sugar
  • 1 teaspoon Baking powder
  • ½ teaspoon baking Soda
  • 2 Large Eggs
  • ½ cup Cooked Quinoa
  • ¼ teaspoon salt
  • 1 teaspoon ground cinnamon
  • ½ teaspoon ground ginger
  • ¼ teaspoon ground cloves
  • ¼ teaspoon ground allspice
  • ¼ teaspoon nutmeg
  • ¼ teaspoon cardamom
  • ¾ cup pumpkin puree ( I used homemade
  • ½ cup Light olive oil /vegetable oil
  • ⅓ cup chopped cashew nuts
  • 2 tablespoon turbinado sugar for sprinkling over the top of muffin.

Instructions

  • Then cook the quinoa by washing in the running water and roasting them with little oil for about 6-7 minutes and then cook them with water for about 15 minutes with lid closed. Once it is done set aside.
  • Preheat oven to 350 F and Line the muffin tin with paper cups and grease them with cooking spray and set aside.
  • In medium bowl sift both flours, salt, spices, baking soda and baking powder and set aside.
  • In another bowl lightly beat eggs, sugar and oil and then add pumpkin puree and combine everything well. Then add cooked quinoa and mix once again to combine well. To this gradually add dry ingredients and mix well.
  • Finally fold in chopped cashew nuts.
  • Pour the 2 tablespoon of batter into each prepared muffin tin. Sprinkle the top with turbinado sugar. Make sure batter should only reach ¾ of the paper cup. Bake for about 24 minutes or until tester comes out clean.
  • Once baked leave the muffin in the muffin tin for about 5 minutes and then tilt and remain in the muffin tin for another 5 minutes.
  • Then transfer them to cooling rack.
  • Enjoy as much as you want.

Notes

Omit cashew nut and try with cranberries.
Don’t try to skip baking soda and reduce egg it will result smaller muffin.

Nutrition

Calories: 471kcal | Carbohydrates: 60g | Protein: 8g | Fat: 23g | Saturated Fat: 4g | Cholesterol: 55mg | Sodium: 214mg | Potassium: 258mg | Fiber: 4g | Sugar: 31g | Vitamin A: 4845IU | Vitamin C: 1mg | Calcium: 66mg | Iron: 3mg
Tried this recipe?Mention @nidhinikhil or tag #zestysouthindiankitchenrecipes!

Pin it for later

Pumpkin pie spice Cranberry muffins

Pumpkin Streussel muffins

Featured, Muffins

Oct 15, 2012 · Leave a Comment


https://zestysouthindiankitchen.com/posts/

Uncategorized

Gobi aur matar ki sabji/Cauliflower and Green Peas curry

Oct 12, 2012 · 39 Comments


I was so confident that I can make any Indian dishes, just reading a recipe or watching it in Youtube video. Since I grown up eating Indian dishes, it will be easy to make it? I was dead wrong, too much overconfidence, burnt my fingers in bad way trying jowar ki roti (sorghum flour flat bread) and Kadala mittai (peanut brittle).
I was so enthusiastic and amazed by the goodness of Sorghum flour that I decided to make roti. However, I didn’t realize that it is gluten free flour, and have tendency to attach everywhere, very sticky dough. Not friendly with roller, if roller is going near it, the dough goes on other direction like they are enemies. I watched this Youtube video, where chef making it with help of Ziploc bag. I thought it is going to be easy. I followed his steps religiously without any changes (remember I am not person like that), I got smooth dough. The fun part came when I started making the flat bread/roti.  At first I made a thin round. And when I was ready to transfer to hot griddle, dough was angry at me. It won’t leave the Ziploc bag mess. Then I heard him saying that in rural India, women are making this roti with two hands. I left Ziploc bag and try to use hand, end result was dough is slightly flattened resulting a brick not roti. Even then I got courage to cook them while tasting it is slightly bitter and not tasty. So directly gone to garbage can and had dinner with leftover rice from lunch.
Then yesterday decide to make kadala mittai again followed the steps according to recipe, waited until jaggery/ unrefined sugar reach it soft crack stage. But when temperature showed soft crack stage, my jaggery decide to burn, still I didn’t learn lesson, I was daydreaming about peanut brittle my father used to buy for us or may be the one grandma made for us. Anyway added peanut and made brittle. On taste testing it failed miserably. Again garbage can got happy.
After two disastrous attempts I was seriously researching the solution for it in the internet, when my hubby dear made this delicious curry for us for the dinner. He makes only few dishes you can easily name it, pav bhaji, dal and scrambled eggs and his favorite tea. Every day he makes scrambled eggs for breakfast, he won’t forget it any single day. Nowadays he changed his recipe of scrambled egg by adding onion in it, because I like it. When I was pregnant with princess and prince we had breakfast every day because of those scrambled eggs. Yesterday Lizzy of Skinny Chick Can Bake, made cookies and dinner for neighbor who just had a new born. I wish I had a neighbor like her. Unfortunately mine are happy, if I call them when I make dinner. They will be present even late if I make late dinner.  And our so called friends except few will call once they need something. Otherwise no call or no show up.
Comeback to recipe is entirely designed and executed by my hubby, His cooking is really unique, he won’t cut his veggies first, and he cut and adds veggies as ingredients are needed to add. Sometime it can result burning, so do your prep first.  He didn’t even add any chili powder; I don’t know whether he forgot it, used only garam masala. End result was tasty not at all spicy my princess was going back and forth with her plate. She approves it; it is too delicious no doubt. So if you catch hold of a head of cauliflower, dump peas, onion, ginger-garlic paste, turmeric and garam masala and salt and little oil, if you want add some chili powder.   A great side dish will be ready with 25 minutes. Enjoy with your bread of choice.
Here goes the recipe
Grab the ingredients,   chop veggies, if you are like me or do it as you cook if you are like my hubby. 
Heat oil and add cumin seeds, when it splutters add onion then ginger garlic paste and garm masala and tomato and then add cauliflower and peas with salt. Cover the pan with lid and cook for some time. Once it is done remove the lid and check veggies are tender and cooked or not, if not add little water and cook for some time. 
If you have some coriander leaves in your hand dump it at the end.
Enjoy. 
                                                                           Print Recipe 

Cauliflower and  Green Peas Curry

My hubby’s Recipe
Prep Time   
Cook Time    25 minutes
Serves    6

Ingredients:

4 Cups Chopped Cauliflower
1 Cup    Green Peas ( I used Frozen)
1 Cup   Onion
1 Chopped Tomato

           21/2 teaspoon  Garam masala
           1 tablespoon Salt
          3 ½ teaspoon Olive oil
            1 teaspoon Cumin Seeds
             ½  teaspoon Turmeric  powder
             ½  tablespoon  ginger garlic paste
              ¼ cup water
             2 tablespoon chopped coriander leaves
              Salt, to taste

Steps:

In a saucepan heat oil and cumin seeds, when it starts splutter add onion and cook for about 6 minutes or it become translucent, then add salt,  ginger-garlic paste, spices and tomato and cook for about 3 minutes to get soft mushy.

Then add tomato paste, cauliflower and green peas and cook  with closed lid for about  10minutes and or until veggies are done. Remove the  lid and check veggies cooked or not.If not add  ¼ cup of water and cook  until water evaporates..

Add  chopped coriander leaves and switch off the flame.

Enjoy with any bread.


Variations:

    • You can make spicy by adding some chili powder
I am linking this dish to Favorite recipes : Vegetarian recipes event hosted here.
 Foodie Friends Friday
April and Alea's Gallery of Favorites
Gluten Free Fridays #9 
Feast to Guru
 

Stirfry

Garam Masala Zucchini Chips

Oct 9, 2012 · 53 Comments

Delicious Garam masala Zucchini Chips made with a touch of garam masala, spices, parmesan cheese and panko bread crumbs , best part is it is egg free and baked.
Here is delicious and  simple Zucchini Chips made with  touch  of garam masala spice blend. It not only enhanced the flavor but also give a unique taste to Zucchini Chips. 

 
Coming back to recipe, my hubby like zucchini if I make curry with them. He hates it when it shows up in cake or dessert. He thinks it is something he couldn’t handle. I have friend from whom I learned most of cooking.
Her hubby who doesn’t likes eggplant/brinjal in any form. But she loves it, so she fools him by removing the skin and   make curries with it.  When she buys eggplant, he will say, okay you are buying don’t cook something that you are giving to me.
She will nod the head, no I won’t but in reality she   does. Unfortunately I told this story to my hubby, so he always double check, if zucchini there or not.
 

I usually make stir-fry with zucchini, with touch of coconut and cumin. But this time I have some veggies left for making stir-fry so I decide to make chips with zucchini. While searching I got this recipe and I had all the ingredients in the pantry.  At first I thought of making it without the Parmesan cheese.  But when I think about buttery taste parmesan gives in the end product,

I decide to include them. And then the bread crumbs, who else can give the crispiness of it. So they are also present in the ingredients. My contribution to this easy recipe is garam masala and red chili powder.

Finally when it was finished, it was really delicious and tasty, we eat as such and also as side. Chips were able to keep its charm until a day. After that it started losing it crispiness still okay.

So if you see a zucchini in your grocery aisle, buy them and convert it into simple chips. They are better sides than a snack.  Here goes the recipe. 
 
Grab  following ingredients and zucchini, if you are using small or medium you need 3-4 mine is a  huge one. 
 
Preheat oven to 425 F.
Line baking sheet with non-stick aluminum foil and set aside. Using a mandolin cut zucchini chips into ¼ inch thick round and set aside.
Mix Parmesan cheese, bread crumbs, salt, garam masala, red chili powder, onion powder, garlic powder in a bowl and set aside.
 
In another bowl mix tapioca starch and water to form a loose batter.  Take a zucchini round, dip it in tapioca starch water mix and dredge it in breadcrumbs cheese spice mixture and line it in baking sheet.  
When you are ready to bake, spray with cooking spray or oil and bake for about 30 minutes or until it becomes golden brown. Around 25 minutes, flip the zucchini rounds to get uniform crispiness.
 

Enjoy as a great side.


Print Recipe
No ratings yet

Garam masala Zucchini Chips

Delicious Garam masala Zucchini Chips made with spices, panko bread crumbs best part is it is egg free and baked.
Prep Time10 minutes mins
Cook Time30 minutes mins
Course: Appetizer
Cuisine: American
Keyword: baked zucchini chips, Garam masala Zucchini Chips
Servings: 6 servings
Calories: 117kcal

Ingredients

  • ¾ cup dry breadcrumbs
  • ½ cup 1 ounce grated fresh Parmesan cheese
  • ¼ teaspoon seasoned salt
  • 1 teaspoon garlic powder
  • 1 teaspoon onion powder
  • 2 teaspoon Kashmiri chili powder
  • 2 teaspoon Garam Masala
  • 2 tablespoons tapioca starch
  • ¼ cup of water
  • 4 cups ¼-inch-thick slices zucchini (about 1 big)
  • Cooking spray

Instructions

  • Preheat oven to 425°F
  • Combine first 7 ingredients in a medium bowl, stirring with a whisk.  in a shallow bowl mix tapioca starch and water to form a loose paste and set aside.
  • Using a Mandolin cut zucchini into ¼  inch rounds and set aside. Dip zucchini slices in tapioca starch
  • water mix, and dredge in breadcrumb mixture. Place coated slices on an ovenproof wire rack coated with
  • cooking spray; place rack on a baking sheet. Bake at 425° for 30 minutes or until browned and crisp.
  • Serve immediately.

Notes

Variations:
You can use  your favorite seasoning.

Nutrition

Calories: 117kcal | Carbohydrates: 16g | Protein: 6g | Fat: 3g | Saturated Fat: 2g | Cholesterol: 6mg | Sodium: 348mg | Potassium: 269mg | Fiber: 2g | Sugar: 3g | Vitamin A: 428IU | Vitamin C: 15mg | Calcium: 139mg | Iron: 1mg
Tried this recipe?Mention @nidhinikhil or tag #zestysouthindiankitchenrecipes!

Adapted from My Recipes


chips

How to make Chapati/Chapathi: Indian Whole wheat flat bread

Oct 5, 2012 · 45 Comments

Here is simple and easy way to learn about how to make Chapati/Chapathi , Indian flat bread with whole wheat flour, salt, water and touch of oil .
 
Chapati/Chapathi: Indian Whole wheat flat bread in a plate
Chapati/Chapthi and roti are famous Indian flat bread goes well with any curry and made of Whole wheat flour/ Atta.  This is simplest unleavened flat bread from India. Here complete guide for you to make How to make Chapati/Chapathi: Indian Whole wheat flat bread.
 
Do you think there is a difference between roti and chapati/Chapathi? Some would say both are same, and some would argue no they are different.  I was in the first group until I seriously read about both of them. As you know India is famous for its diverse cuisine, northern part of India prefers whole wheat while south prefers rice.
 
Difference between Roti  and Chapthi ?
 Chapati is typically made with whole wheat flour, water, oil and salt to make soft dough. . Sometimes dough is allowed rest for some time, and then it is rolled into disc.  Gluten formation makes it pliable and soft. The dough is spread using roller to round disc and it is cooked in heated griddle, some will cook half way in the griddle and then cook rest into the direct heat with the help of thongs. I don’t do two steps only cook them in heated griddle. Also I skip adding oil in the dough, just use a little to coat the dough and once it is cooked I brush one side with oil and keep the next one no greased side on the top of oiled surface of chapathi.
 
When whole wheat flour, water and salt is mixed and formed into flat bread it is called Phulka, my sister is really fan of this. She thinks this healthier version. Phulka also cooked in heated griddle and then into direct heat.
 
 Roti is a thicker version of chapati.   Roti can be made with whole wheat flour or with addition of  makki/ corn flour or bajra/ pearl millet flour to wheat flour will give makkii or bajraeki roti. You can make roti gluten free, using chana dal/ chick pea flour( missi roti) amaranth (Rajgira roti), Sorghum flour( Jowar roti)  etc. Usually roti are thicker than chapathi.
 
 However when whole wheat flour( atta) and all purpose flour ( Maida) is also combined to form thin bread called rumali roti. Here is you tube video where a guy is making biggest roti.. If you want to know 15 types of roti then take a look at this you tube video.
 
 So chapati is sister to phulka and cousin to roti. Hope you agree with me.  After seeing all these you tube video, you will be thinking I am going to make something that artistic, sorry, I can’t touch their expertise. 
 
Now we can see How to make Chapati/Chapathi: Indian Whole wheat flat bread. 
Ingredients: 
Whole Wheat Flour/ Atta : You can make chapti/chapthi with whole wheat flour . Best will using Atta Indian whole wheat flour.
Salt to flavor the flat bread 
Oil : This is just to moisten the dough, you can use any oil, I use olive oil 
Water: Using warm water makes soft chapthi . 
 
 
Ingredients for making  Chapati/Chapathi: Indian Whole wheat flat bread
 

I will make simple chapathi, easily made with trusted Kitchen Aid mixer. Dump whole wheat flour, salt and hot water first with paddle attachment combine everything. Change to dough hook and knead for about 5 minutes. Lightly grease your bowl rest the dough for about 15-20 minutes.

Steps  for maing  Chapati/Chapathi: Indian Whole wheat flat bread


Divide the dough into small portion about size of lemon. Spread it into a round disc using roller; when you are ready to make chapathi/chapati, heat a griddle/tawa.  cook it in hot griddle, when small bubbles appears  in top part, turn the other side cook until both sides gets brown spots.  Slightly press the sides with spatula then it will help the chapathi to puff up. It takes about roughly 2 minutes.   Transfer to container, I store it in tortilla container.
 Steps for making  Chapati/Chapathi: Indian Whole wheat flat bread
 
 
Serve warm with curries, yogurt, pickles,
 
Chapati itself tastes bland so you need sides.  Or just put it in a bowl of milk and sugar and eat.


Other flat bread recipes
Avocado paratha
Mooli paratha
Print Recipe
5 from 11 votes

How To Make Chapati/Chapathi: Indian Flat Bread

Here is simple and easy way to make Chapati/Chapathi made with whole wheat flour, salt, water and touch of oil .
Prep Time25 minutes mins
Cook Time15 minutes mins
Total Time40 minutes mins
Course: Main Course
Cuisine: Indian
Keyword: Chapathi, Chapati, Indian flat bread, roti
Servings: 12 pieces
Calories: 89kcal

Ingredients

  • 2 cup whole wheat flour + ¼ cup extra for rolling
  • ½ teaspoon salt
  • ¾ cup to 1 cup warm water
  • 2 tablespoon olive oil

Instructions

  • n a bowl of kitchenaid stand mixer attached with paddle attachment, add whole wheat flour, salt and water and combine well to form a dough.
  • Change paddle attachment and with dough hook knead the dough for about 5 minutes or until they become smooth.
  • Set aside in lightly greased bowl rolling the dough so that dough get coat with oil , this will prevent dough from drying. Keep aside for 15-20 minutes.
  • Divide the dough into 12 equal pieces and roll them into round ball. Dump it into a bowl with ¼ cup flour you kept aside for rolling.
  • Using a roller, spread the dough into 6 inch thin round. Make sure to spread really thin, with a thickness of credit card or around ½ inch. Also dust the extra flour , so that you won’t see any burnt flour in the griddle.
  • Once you spread half of the dough heat a griddle or tawa. When you sprinkle water it will sizzle and jumps that is sign that your girdle ready.
  • Carefully place the spread disc and cook for a minute or until you will blisters or bubbles on the top, flip and cook the other side too for another 1 minute or until you see brown spots on both side.
  • While cooking the second side make sure to press the dough with a spatula that will help to retain steam inside the dough and chapati will puffs up.
  • Remove from the fire and transfer to a tortilla container with brushing both sides of first chapati with olive oil. Close the lid immediately this will make steam to trap inside and make soft chapati.
  • From next one onwards you needs to brush only one side which spacing upward. Continue to cook chapati until you finish the entire dough.
  • You can store chapati at room temperature for one -day and reheat in microwave for 15 seconds before serving
  • Enjoy chapati with side dishes.

Notes

You can use butter or ghee to make it more tasty.

Nutrition

Calories: 89kcal | Carbohydrates: 14g | Protein: 3g | Fat: 3g | Saturated Fat: 1g | Sodium: 98mg | Potassium: 73mg | Fiber: 2g | Sugar: 1g | Vitamin A: 2IU | Calcium: 7mg | Iron: 1mg
Tried this recipe?Mention @nidhinikhil or tag #zestysouthindiankitchenrecipes!

Flat Bread

Pumpkin Pancake

Oct 2, 2012 · 63 Comments


October is here, sun is going down early, and it is getting dark early.  Last weekend it was raining throughout, especially on Saturday, and the weather man on local TV stations got really happy. As they have something to predict and keep explaining the weather patterns. They get some extra screen time. I always think why they always want a hurricane or flooding or wild fire. May be that is their opportunity to shine through the analysis and predictions. Do you know when I was alone I used to watch weather channel a lot next to food channel. So I am depending on them, I should not to say anything wrong. 
This month it is really busy with festivals according to Hindu calendar, we will have 9 day celebration for Goddess called Navarathri and the tenth day it is day of God Saraswathy, the literacy god. She needs to be pleased to get a good education. Usually my mother would arrange tiny dolls and do Pooja that is tradition called Kolu/Golu. It is a customary exhibition of various dolls and figurines in odd (usually 7, 9, or 11) numbered tiers ("padis"). And once you keep golu in your house you need to make offering both morning and evening and after prayers give those to married women and small girl child. When we are young we are happy, as we would get invited to our neighbor’s house and get different types of food and goodies. 
Dad told me to keep Golu this year and also give to some married women offering. Okay, it is easy for him to say, how I will find them.  Both me and hubby have only few friends, even if I call them I should call them during weekend as weekdays they can’t come as it is working days.  I am planning to call some, and make some easy dishes. 
Also this month we are planning to do Vidyarambham for my princess.  Vidyarambhammeans the day of starting formal education. That is to be held on October 24th. It is practice in my hometown, where kids of 3-5 years start writing letters on that particular day. Now my princess is not writing anything, only tearing all the papers from the book. And education is only wealth we can give to her which nobody can take from her.
Then comes the Halloween, We are not planning to take her to trick or treat, may be next year. But I am planning to make some costumes as she is going to distribute candy for trick treat. Hope everybody planning for a great Halloween parties. I am afraid to watch the TV around that time as there are too many spooky movies on all channels. 
Coming back to pumpkin pancake, we love pumpkin whether it is in curry or bread we love it. I made some homemade pumpkin puree to make some dishes; I am left with ⅔ cup of puree after making the muffin. Then my original plan was to convert them to pie. This Sunday I woke up without any breakfast plan, hence I decided to make pancake with pumpkin puree. I made my own pumpkin spice.  Pumpkin made awesome pancake, beautiful color and texture. To make this pancake you need to swift the flour, spices, baking powder and baking soda and salt. Then combine with wet ingredients, milk, egg, brown sugar. Keep aside for few minutes. Then start making delicious and soft pancake. 
Drizzle maple syrup over warm pancake and dig in you can’t say no to this dish. Make this one during cold morning or on Thanks giving and Christmas. Pumpkin spices already smells like holidays. Enjoy. 
 
Here goes the recipe.
Grab pumpkin puree either homemade or store bought along with spices, salt, baking powder and baking soda, and other ingredients.
Preheat oven to 200F
Mix wet ingredients in a bowl and set aside, then swift the dry ingredients in other bowl and set aside.
Gradually combine wet ingredients into dry ingredients and set aside for 15 minutes.
In the mean time heat a griddle and when it ready, you can test it by adding a drop of water and water starts to sizzle with musical sound. Add ¼ cup of pancake batter and cook until one side is set and flip and cook the other side golden brown.
 Transfer pancakes to a warming plate in the oven while you make the rest.
Enjoy with piece of butter and maple syrup.  Yummy.
  Print Recipe

 Pumpkin Pancake
Adapted from All recipes.com
Prep Time    20 minutes
Cook Time    35 minutes
Serves    8  pancakes


Ingredients:

1 cups milk
2 tablespoon water
⅔ cup pumpkin puree  ( I used homemade )
1 egg
1 tablespoon vegetable oil
1 tablespoon  apple cider  vinegar
1 ½ cups white whole wheat flour
1 tablespoons brown sugar ( Increase if you want sweeter pancake)
¾ teaspoons baking powder
½ teaspoon baking soda
¼ teaspoon ground allspice
¾ teaspoon ground cinnamon
½ teaspoon ground ginger
½ teaspoon ground cloves
¼ teaspoon ground cardamom
¼ teaspoon  freshly grated nutmeg
¼ teaspoon salt


Steps:

  1. In a bowl, mix together the milk, pumpkin, egg, oil , brown sugar and vinegar. In another bowl combine the flour, baking powder, baking soda, allspice, cinnamon, cloves, nutmeg, cardamom, ginger and salt in a separate bowl. Stir into the pumpkin mixture just enough to combine.
  2. Heat a lightly oiled griddle or frying pan over medium high heat. Pour or scoop the batter onto the griddle, using approximately ¼ cup for each pancake. Cook the pancakes on 1 side until they are set and then lightly press the bananas into the batter. When small bubbles appear on the uncooked surface, flip the pancakes and cook until golden on both sides, about 8 minutes. Transfer pancakes to a warming plate in the oven while you make the rest.  Serve hot.


Variations:

You add your own version of pumpkin spices. 

I am linking this delicious pancake to Hearth and Soul Blog  Hop  hosted here. 
Foodie Friends Friday


Pancake

Favorite Recipes Event: Vegetarian Recipes.

Oct 2, 2012 · 36 Comments


Dear friends, I am happy to host another episode of favorite recipes.  Do you know that this month is considered as vegetarian month? According to Hindu calendar, we are going to celebrate Navarathri and Vijaya dasami on 24th of this month. And also spooky Halloween is coming up at the end of this month.  Let us whip up some tasty vegetarian dishes for this month.
Last month it was breakfast event, I got 60 entries, if you need any healthy and delicious breakfast ideas take a peek at here.  I got 11 entries from Preeti of  Preetis  kitchen life   and 10 from Sherin of Kuk's kitchen, and with everybody else pitching in with their favorite breakfast. I got a few recipes from Raji, who is a Non-blogger from India. Raji is a stay at home mom having a toddler, and loves to cook.    Here is a link of her recipes in Google docs, take a look at here
So don your apron and cook some tasty and delicious dishes with veggies and link it to this event.
I would like to know why that particular dish is your favorite, if it has story like, mom made it or grandma made it, and then add that. 
If you already blogged about favorite dishes, then make a revisit and add a fresh twist to it by tweaking recipe or changing ingredients etc. 
A linky will be open from 1stof the month to month end. Now it is from  October 1st to October   30th 2012.
No Archived post.  Recipe should be posted in your blog from 1stto month end.
Recipe can be  gluten or vegan free.
You have to link this announcement post in the recipes; using logo is welcome but not mandatory. 
Non-bloggers can also welcome, send me full recipe with a photograph to this e-mail. 
If you want to contact me please e-mail at favoriterecipes12@gmail.com.

  This event is open to guest hosting.


Uncategorized

Cheddar Scallion Bread

Sep 28, 2012 · 47 Comments

Delicious golden cheddar scallion bread made with sharp cheddar and green scallions. Quick easy bread goes well cup of soup or as toast.

Cheddar Scallion Bread
 
On a grocery shopping trip, I bought cheddar cheese thinking that I will make mac and cheese with cauliflower. But Cauliflower got converted into delicious curry by my hubby.  I have to blog about his way of cooking as well as recipe of delicious curry in coming episode of blogging.
I decided to make bread with cheddar cheese.  Bread making gives me happiness in three steps, when I see the yeast working and dough doubling, I am happy thinking this is success # 1.
Then next success step comes when bread bakes well and the freshly baked bread comes out with an intoxicating smell.  The third and final step comes when the bread is cut and a piece gets test tasted by my princess, if she likes it, it is a winner.
 I thought adding scallions may enhance the flavor, then   I hunted for the bread recipes containing scallion.  I saw a potato scallion recipe in bread baking apprentice, also cheddar scallion rolls in King Arthur flour website.
Then found this recipe in of cheddar and Jalapeño bread from here.  If I add Jalapeño my princess can’t take it, so I decided to skip and added scallions. The scallions are new found favorites in breads.
 
You know, I can’t help changing a recipe while trying. My hubby says try original first and then change the recipe next time. Sorry, I won’t follow the rule.  I made this bread as adaptation from Cabot cheese golden cheddar bread recipe.
Changes I made are   used homemade yogurt, honey and also added garlic powder, Parmesan cheese and scallions. One good thing about this recipe is that you need only a small amount of oil for greasing the pan.
I preheated oven to 375 °F and reduced to 350 °F while baking, instead of 400 °F and reduced to 350 °F as suggested in the recipe.  I used active dry yeast compared to instant yeast as suggested by the recipe.
After 55 minutes I was able to get delicious cheesy bread with scallions peaking in between.   Flavors get more intensify if you toast the bread.  I am going to keep this bread recipe in my kitchen.
My hubby wants me to make the Jalapeño /  cheddar cheese bread, which I am going to try when I get a chance. Try it if you are fan of cheddar cheese, make sure to use the sharp cheddar for more flavor.
Here goes the recipe.
First grab the ingredients from refrigerator and Pantry. Grate the cheese and set aside ¼ cup of cheese back in refrigerator. Chop the green onions and set aside 3 tablespoon. 
Cheddar Scallion Bread making
 
Then in small bowl add lukewarm water and¼ teaspoon honey and yeast, so that yeast will be happy to meet honey and they marry each other and proof well.
Cheddar Scallion Bread making
 
 
Measure flour, cheese, salt,  yogurt etc. I like to weigh everything in a bowl of kitchenaid stand mixer, as it will reduce number of dishes for cleaning.
Attach paddle attachment of the kitchen aid stand mixer and mix flour,  cheddar and parmesan cheese, salt, yeast, honey, garlic powder water to form a sticky but smooth dough.Remove the paddle attachment and with dough hook knead the dough well to 10-15 minutes.
Make sure dough should pass window pan test or if you press them it will smooth and shiny.
Set aside in greased bowl with greased plastic wrap and covered with kitchen towel for about 60minutes or it doubles in size. Punch down the dough and set aside for another 30 minutes. 
 
Then take out the dough and spread them into rectangle and roll to form a log and transfer to 9x5 loaf pan greased with oil. Add rest of cheese and green onions you kept aside. I forgot this step and did only when I was ready to bake the bread.  Let it rise for another 30 minutes or the dough rise until the rim of the loaf pan. 

Cheddar Scallion Bread making


At the end of second rise pre-heat oven to 375 F and bake the  bread for first 5 minutes 375F and reduce the temperature to 350F and continue to bake for about 45 minutes or until the loaf register the internal temperature of  190F. 
 
Remove from the oven and set aside in the pan for about 5 minutes and then transfer the bread to cooling rack.


Cut the bread only when it is completely cool. Enjoy them as sandwich or side  for  soup.
Cheddar Scallion Bread
 
 
 More closer look
 
Cheddar Scallion Bread making

Print Recipe
5 from 1 vote

Cheddar Scallion Bread

Delicious golden cheddar scallion bread made with sharp cheddar and green scallions. Quick easy bread goes well cup of soup or as toast.
Prep Time20 minutes mins
Cook Time45 minutes mins
Resting time5 days d 15 hours hrs
Course: Main Course
Cuisine: American
Keyword: Cheddar and scallion bread
Servings: 12 servings
Calories: 4325kcal

Ingredients

  • 6 ounces Sharp Cheddar about 1 ¾ cups, divided
  • 3 tablespoon Parmigiano-Reggiano
  • 11/2 cup 210g King Arthur All-Purpose White Flour
  • 2 cup 320g King Arthur Unbleached Bread flour
  • 1 envelope 7g Active dry yeast ( I used Red star yeast)
  • 1 ½ teaspoons salt
  • ¾ cup plus 2 tablespoon water
  • ½ cup Yogurt 127g( I used homemade one)
  • 1 tablespoon plus ¼ teaspoon 20g honey
  • ¾ cup 70g green onion/scallion chopped
  • 1 teaspoon 3g garlic powder

Instructions

  • Set ¼ cup of cheese 2 tablespoon of green onions aside and refrigerate.
  • In a small bowl heat ⅓ cup of lukewarm water and add ¼ teaspoon of honey and yeast and set aside for proofing.
  • In large bowl or bowl of stand mixer, add both flour, remaining cheeses, salt ,rest of honey, garlic powder green onions and proofed yeast.Mix until everything combines well a sticky but smooth dough.
  • Knead dough in stand-up mixer with dough hook for about 15 minutes also and dough should pass window pane test.
  • Put small amount of oil in clean bowl and add dough, turning to coat. Cover bowl with plastic wrap and place dough in warm place to rise until doubled in size, 90 minutes (placing dough in closed turned-off oven next to large pan of just-boiled water works well).
  • Oil 9 by 5-inch loaf pan or coat with nonstick spray. Gently turn dough out onto lightly floured work surface. Press ball of dough into rectangle, about length of pan. Fold rectangle in thirds, as if folding letter. Fold in half again lengthwise, pinching edges and ends together firmly until sealed.
  • Place dough seam-side-down in pan. Sprinkle top with reserved cheese and green onions. Cover loosely with wrap and let rise until about 1 inch above top of pan, about 30 to 45 minutes. Toward end of rising time, preheat oven to 375°F.
  • Place bread in middle of oven and bake for 5 minutes.
  • Reduce oven temperature to 350°F and bake for 30 to 45 minutes longer or until bottom of loaf sounds hollow when tapped or instant-read thermometer registers 190-200°F when inserted in center. Remove loaf from pan and let cool completely on wire rack.

Notes

Variations:
Variations and serving suggestions: creative additions to add separately or in combination are chopped fresh jalapenos, hot sauce, minced garlic, chopped olives, chopped sundried tomatoes and fresh herbs like basil or dill.
Serve plain or toasted with soups, or to add a cheddary bite to classic sandwiches like BLT’s, tuna or chicken salad, or avocado-tomato. Toast any leftovers into cheese croutons for salads, soups or snacking.

Nutrition

Calories: 4325kcal | Carbohydrates: 740g | Protein: 155g | Fat: 75g | Saturated Fat: 43g | Cholesterol: 205mg | Sodium: 4884mg | Potassium: 1585mg | Fiber: 27g | Sugar: 28g | Vitamin A: 2691IU | Vitamin C: 14mg | Calcium: 1747mg | Iron: 36mg
Tried this recipe?Mention @nidhinikhil or tag #zestysouthindiankitchenrecipes!

Othere cheddar bread recipes are 

Jalapeno cheddar sourdough bread 


Bread, Cheese, Yeast Bread

Spicy Mushroom Stir fry

Sep 25, 2012 · 50 Comments

My love for mushroom started during my stay in Stockholm, Sweden. My advisor Prof. Rolf makes really good mushroom dishes. He loves to cook and would invite everybody in the department and will have a full course lunch in his garden.  He is the one told me that if you add a little butter and olive oil to mushrooms with a little salt and pepper, it makes an excellent side dish or you can make soup with them.  

Before that mushrooms for me meant the ones that are growing in decaying woods or the ones that comes up after the rain, but not for consumption. I always believed they are poisonous, and if you eat them you will get sick. Rolf told me that there both kinds of mushrooms are in the world, those you get it in store are really good. 
After that whenever I see mushroom, I would buy them.  My culinary journey into the world of mushroom started with button mushrooms, and now has expanded to shitake, portabella, you name it and I love all of them and would find a way to cook them. 
Nowadays mushroom isles in Hong Kong market can lure me to make dishes. 
I can show you a simplest way of cooking mushroom. Fry them in butter and oil combo, and when they are almost roasted, add little spicepowder (milagaipodi/spice powder) that accompanies the famous south Indian pancake Dosa or steamed cake idly. If you don’t have Milagai podi/spice powder in your kitchen, one solution for you is to add a little of cumin and chili powders. It is delicious by its own standard, even my 3 year old like it. 
Here I used button mushrooms, you can try it with all kinds of mushrooms and it tastes great. It is really a tasty side, you need only some gravy to finish you lunch. Last month I made mushroom ginger dumpling soup which we loved. Next is to make an Indo-Chinese dish with them.  Just like my hubby says you have kitchen, internet and blog, hence you are always going to make something or other, saying I am just trying.
So when you see mushroom in your local grocer, grab it and make this one, you are also going to love the mushrooms.  Here goes the recipe.
Grab mushroom, butter, olive oil, spice powder and salt from the pantry.
Clean the mushroom with damp kitchen towel and cut it into pieces and set aside.
In a skillet heat butter and oil and add mushroom and salt and cooked for about 15 minutes. Then add spice powder or chili and cumin powder and mix everything and switch off the flame. 
Enjoy with rice.
                                                           Print recipe

Mushroom Stir Fry  with Spices

Prep Time    5 minutes
Cook Time    15 minutes
Serves    4


Ingredients:

16.oz  Chopped mushrooms( I used button
           mushrooms)

           2 tablespoon  Butter
           1 tablespoon Olive Oil

1 tablespoon of   Idly molagapodi/Spice powder
( recipe here)
( If you  don’t have spice powder  add
½ teaspoon  cumin powder + ½ teaspoon chili powder)   
Salt: ½ teaspoon  or to taste


Steps:

In a skillet, heat oil and butter add washed and wiped the mushroom and salt. Let it cook for about 10 minutes or until it starts to get roasted. Then add spice powder of spices combo  and mix everything to so that it will get combined well. Switch  off the flame  and  enjoy with rice.


Variations:

    • You can  use any kind of mushrooms for this recipe.
    • For vegan option use olive oil.
I am linking this delicious recipe to Hearth and Soul blog hop hosted here

Stir fry

Inippu Kozhukattai / Ukadiche Modak

Sep 21, 2012 · 32 Comments

 Inippu Kozhukattai /Ukadiche Modak is a  a traditional  steamed rice dumpling  with sweet  coconut filling made during festival of Vinayaka Charthurthi
Inippu Kozhukattai / Ukadiche Modak
Inippu Kozhukattai / Ukadiche Modak is a traditional recipe made with rice flour outer covering and sweet coconut filling. Which is later steamed  and served as such. 

What is Vinayaka Charthuthi ? 

Vinayaka Charthuthi  is  an Indian festival celebrated  during month  August-  Sepetember with  with great enthusiasm and devotion.  Lot tradtional recipes are made during this festival. 
 
Lord Ganapathi
 
 
We both sisters would patiently wait for my mother to finish Pooja to have this sweet. My mom says after marriage, when she left my grandma’s house, she bought a small idol of Ganesh. It is made of stone, she used to do Pooja. As years went by the idol lost one hand and shoulder, then neighbor told  my mom that you can’t keep this idol in the house, you need to replace with a new one and this one you have immerse it in sea. She did that with great pain.
But after marriage when I visited my  hubby’s  homeland, Mumbai, I saw everybody bring Ganesh  idol during this  festival and keep and worship in home for 1.5,3,5, or 7days and after that they take him on a  procession and immerse him in sea or  river called visrajan.  I admire the passion of celebrating this festival. Even though there is lot of noise pollution, still it is really fun as everybody busy cooking, worshipping the God at same passion throughout the country.
I have already blogged about my mother’s version of making this sweet, but this time I wanted to make Maharashtrian Ukadiche  Modak, the  same as  south Indian sweet Kozhukattai, but in their sweet filling they add poppy seeds  along with beautiful outer covering.  However, I am failed to make the artistic outer cover, made my version of ukadiche modak with coconut-jaggery-poppy seeds filling.  Original ratio of filling should be double the amount of outer cover. I made   ¾   of filling, yes it is delicious, poppy seeds added an extra crunch. You can increase the filling amount if you have a sweet tooth.
My princess is only interested in fillings and   not the outer cover, so she makes a hole in the middle and cleans up the filling and give me or hubby the outer covering with an expression in her face, that I  am done do whatever you want with rest?
Try this if you want a snack which is really gluten and vegan free.  Here goes the recipe.
Grab everything from your pantry.
Ingredients to make Ukadiche Modak

How to make Inippu Kozhukattai / Ukadiche Modak? 

 First make filling .Roast poppy seeds in a sauce pan and set aside.
Heat jaggery in a sauce pot with ¼ cup and once it is melted strain jaggery water for impurities. Bring back to heat once again when water starts of dries up add coconut,  cook until they become thick mass. It took about   5 minutes. Add crushed cardamom and roasted poppy seeds switch off the flame and set aside.
 Divide the sweet filling into 9 equal pieces and roll them into balls.
Steps for making the filling of Ukadiche Modak
 Once the filling is done, start making outer covering.
Heat ¾ cup water in sauce pot and when it starts boiling add oil, salt and rice flour, mix everything and remove from fire.

Once it is cool enough to touch knead well and make soft dough and set aside.

Outer covering for Ukadiche Modak /

When you are ready to make sweet kozhukattai, divide rice dough into 9 equal pieces and gradually make thin disc with center being thicker and sides get thinner.  Use water and oil to rub hand to prevent dough from sticking. Once it is 2.5 to 3 inches disc then places the filling and cover completely and makes a ball.  Finish the rest of the dough in the same way.

Shaping and steaming of Ukadiche Modak

Place a steamer with water in stove, I used steamer. When waters starts boiling place the sweet kozhukattai you made earlier in upper rack, cover and steam it for 15 minutes or until the surface become shiny.

Inippu Kozhukattai/ Ukadiche Modak

Print Recipe
No ratings yet

Inippu Kozhukattai / Ukadiche Modak / Steamed rice dumpling with sweet filling

Delicious traditional steamed rice dumpling with sweet filling made during festival of Vinayaka Charthurthi
Prep Time15 minutes mins
Cook Time30 minutes mins
Total Time45 minutes mins
Course: Dessert
Cuisine: Indian
Keyword: Modak
Servings: 9
Calories: 172kcal
Author: Swathi ( Ambujom Saraswathy)

Ingredients

  • For cover
  • 1 Cup rice flour
  • ¼   teaspoon  salt
  • ¾ Cup  Boiling Water
  • 2 teaspoon  + 1 tablespoon of coconut oil
  • For filling
  • 1 ½   cup freshly grated coconut
  • ½   cup Jaggery
  • 3 cardamom crushed
  • ½   tablespoon poppy seeds

Instructions

  • or filling
  • Lightly roast poppy seeds for about 2 minutes and set aside.
  • Heat jaggery in a sauce pot with ¼ cup and once it is melted strain jaggery water for impurities. Bring back to heat once again when water starts of dries up add coconut cook until they become thick mass. It took about   5 minutes.
  • Add crushed cardamom and   roasted poppy seeds switch off the flame and set aside.
  • Divide the sweet filling into 9  equal pieces and roll them into balls.
  • For cover
  • Heat ¾ cup water in saucepan and when it starts boiling add 2 teaspoon of oil, salt and rice flour, mix everything and remove from fire.
  • Once it is cool enough to touch knead well and make soft dough and set aside.
  • When you are ready to make sweet kozhukattai, divide rice dough into 9 equal pieces and gradually make thin disc with center being thicker and sides get thinner.  Use water and oil to rub hand to prevent dough from sticking. Once it is 2.5 to 3 inches disc then places the filling and cover completely and makes a ball.  Finish the rest of the dough in the same way.
  • Place a steamer with water in stove, I used Idly steamer. When waters starts boiling place the sweet kozhukattai you made earlier in upper rack, cover and steam it for 15 minutes or until the surface become shiny.

Notes

You can use moong beans, chana dal along with coconut and jaggery mixture.

Nutrition

Calories: 172kcal | Carbohydrates: 28g | Protein: 2g | Fat: 6g | Saturated Fat: 5g | Sodium: 69mg | Potassium: 68mg | Fiber: 2g | Sugar: 12g | Vitamin C: 1mg | Calcium: 17mg | Iron: 1mg
Tried this recipe?Mention @nidhinikhil or tag #zestysouthindiankitchenrecipes!

Featured, Indian Sweets

Pani Popo: Samoan Coconut buns

Sep 18, 2012 · 47 Comments

Pani Popo delicious Samoan Coconut buns made with fresh coconut and coconut milk and sugar, great as breakfast or dessert.

I am curious about international cuisine, and love to try them whenever I get a chance.There are some dishes that you just can’t go to the local restaurant and try; you have to make it to get a taste of it. Yes I saw this recipe in King Arthur flour blog the first time. When I saw it, I like it very much and planned to make it. But it stayed in my plans for a long time. Finally I got time this weekend I made it, we loved it.
Samoa is group of Islands in South Pacific Ocean. It comprises two jurisdictions, the independent country of Samoa in the western half of the islands, and the territory of American Samoa comprising the islands to the east. The two regions are separated by 64 km of ocean.  Just like any other  food culture, their also  includes lot of locally available ingredients like, coconut, breadfruit, taro and other root vegetables, fish, lobster and chicken etc. If you want read more from here .
 

If you are interested know more about Samoan food then this site will be a good. I have a weakness to coconut and its derivatives, and love to try whenever I get a chance. Pani Popo (in Samoa, pani means buns and popo means coconut).  Buns are baked with coconut milk sauce and the resulting baked buns have a coconut milk dunked bottom side. And it tastes great.  I read lot of recipes and watched this you tube video.
Basically it is sweet milk buns dunked with coconut milk. I adapted the recipe from My kitchen snippets, also from King Arthur flour site and used both All-purpose flour and bread flour to prevent them from being extra chewy.  I used a slightly increased the amount of yeast, water and sugar. Coconut milk sauce was made with equal parts of coconut milk and water and sugar to taste according this recipe. For sweetness I used powdered sugar as I found the recipe of King Arthur flour using cornstarch in the coconut milk. Since powdered sugar/ confectioners’ sugar contains cornstarch, I used 3 tablespoon of powdered sugar for ½ cup of coconut milk.  You can increase the amount of sugar if you want a really sugary bun. I baked buns with sweetened coconut sprinkled on the top, even though it is not in traditional recipe.
These buns will be good with mixed vegetable stew. My hubby enjoyed it with spicy pickle. While both me and princess enjoyed it as such. I love it, and I am going to make more often. Try this when get hold of a can of coconut milk or you make fresh coconut milk at home.
 
 
I found that measuring everything in the kitchen aid stand mixer bowl seems to be easy. Measure flour, yeast, salt, sugar, then warm the milk and add butter in it so that it will melt easily. Gradually add milk and butter mixture to the flour mixture and form smooth dough. Add water if necessary. Set aside in a slightly greased bowl for first rise. It takes about 90 minutes at room temperature. 
 
Once dough doubles in volume punch down, transfer to work bench and cut into 8 equal pieces. Grease a cake tin and set aside. Make balls out each piece by squashing the bottom to form a perfect round and place it in grease cake tin. Set aside for second rise. 
 
At end of the rising time pre heat the oven to 350 F.  Make coconut milk sauce by mixing equal parts of coconut milk and water and add 3 tablespoon confectioners’ sugar.  Slightly warm it in microwave for uniform mixing.
 
When you are ready for baking, pour coconut milk sauce all over the raised buns.  Sprinkle the top of buns with sweetened coconut.
 
 And bake for about 30 minutes or until golden brown or it register internal temperature of 190F.
 
Serve warm with coconut milk dunked part on  top.
 
If you have any left overs for next day slightly warm before serving. Serve extra dose of coconut sauce if you want.
Print Recipe
No ratings yet

Pani Popo: Samoan Coconut Milk Buns

Pani Popo Samoan Coconut buns made with fresh coconut and coconut milk
Prep Time20 minutes mins
Cook Time30 minutes mins
Rising time2 hours hrs 30 minutes mins
Total Time3 hours hrs 20 minutes mins
Course: Dessert
Cuisine: Samoan
Keyword: Samoan Coconut buns
Servings: 8 buns
Calories: 205kcal

Ingredients

  • For bun
  • 1 cup 160g Bread flour
  • 1 cup 141 g All purpose flour
  • 1 ¼ teaspoon Instant yeast
  • ½ tablespoon 8g Sugar
  • ¼ teaspoon Salt
  • ¾ cup 171g Warm Milk
  • 1 ½ tablespoon Water
  • 1 tablespoon butter
  • 2 tablespoon of sweetened coconut
  • For Sauce
  • ½ cup thick coconut milk
  • ½ cup water
  • 3 tablespoon of confectioners sugar or powdered sugar

Instructions

  • If you are using active dry yeast you need to proof the yeast with milk and sugar. I used instant yeast so skipped that part.
  • Heat milk in microwave safe bowl to 30 seconds or it reaches lukewarm temperature. In the warm milk add butter so that it melts and set aside.
  • In bowl of kitchenaid stand mixer add in the 2 cups of flour, yeast, sugar and salt. Mix and knead the dough milk and water for form a smooth dough.
  • Transfer the dough to lightly greased bowl for double in size, it takes about 90 minutes.
  • Prepare and grease an a round baking pan and set aside.
  • Once the dough is doubled in size remove from bowl and divide it into 8 round balls. Place them in the baking pan, cover and let it rest again until double in size.
  • In the meantime, make coconut milk sauce by mixing the coconut milk with water and 3 tablespoon of confectioners sugar and set aside. ( if you want you can slightly warm the coconut milk in microwave for about 15 seconds for uniform mixing of sugar)
  • By the end of second rising, preheat the oven to 350F.
  • when you are ready to bake, pour the sauce all over the buns and sprinkle the sweetened coconut over the buns and bake for about 30 minutes or they become golden brown color and register the internal temperature of 190 F.
  • Serve warm with upside down, that is coconut sauce side on the top
  • It is delicious.

Notes

You can add more coconut .

Nutrition

Calories: 205kcal | Carbohydrates: 31g | Protein: 5g | Fat: 7g | Saturated Fat: 5g | Cholesterol: 6mg | Sodium: 110mg | Potassium: 125mg | Fiber: 2g | Sugar: 6g | Vitamin A: 81IU | Vitamin C: 1mg | Calcium: 33mg | Iron: 1mg
Tried this recipe?Mention @nidhinikhil or tag #zestysouthindiankitchenrecipes!

Buns, Buns and Dinner Rolls, Yeast Bread

Ultimate Chocolate Cream Cheese Cookies for Baking Partners Challenge

Sep 15, 2012 · 43 Comments


Who in the world does not love cookies? Everybody has grown up with a few cookies as their favorite. I have grown up with a famous cookie called Parle G; we call them glucose biscuits too. It is really tasty like shortbread. Also it is one of world largest selling cookies. We call them biscuits which is no relation with any breakfast biscuits that we get over here.  Usually amma will give when we back from school and having tea or coffee. 
Nowadays I buy Parle G  from Indian store and keep it as emergency snack on our car trips.  However instead of biscuits my princess call them crackers or cookies as she is busy working in back seat while her papa or mama is driving the car. And her little brother will be crying as he is bored sitting in the car seat. 
After I started baking I tried oat meal cookies, peanut butter cookies, and chocolate chips cookies. I love to try various combos and various tastes which are not possible to get it in the store.  So I am excited as this month we Baking Partners did a theme for our baking partner challenge that is cookies; we have 3 cookie recipes to try from our incredible partners. I tried all three. 
Tina of  Pinays cooking  Corner suggested Ultimate Chocolate Cream Cheese Cookies, Priya of  Priya’s versatile recipes suggested  Cornflake cookies and Reeni  of  ( Cinnamonspiceandeverythingnice)suggested Homemade Oreo Cookies: Fauxreos
Since I had some cream cheese left from making cream cheese Chantilly, I thought I will try ultimate chocolate cream cheese cookies first. They are every chocolate lovers dream and ultimate, cake like soft cookies, will have lingering taste you love to remember even after it is finished. We love it.
Then next come cornflake cookies, for that I need some cornflakes. However in my house no takers for ordinary cornflakes, my princess won’t eat them but like to play with it and invite all the ants around world into the home. So I stopped buying them. But she likes Post Great Grains cereal, which are not really cornflakes. So I used post great grain cranberry almond crunch which is in my hand. It turned out great. I loved most, and got the chance to finish the entire batch.

Next I made homemade Oreo cookies, for that I even bought a packet of Oreo cookies to compare the taste. However, I failed and Oreo won. It turned out to be slightly on the bitter side. May be because I  used dutch cocoa.  So I have to use slightly heavily on filling resulting in a big no from my husband; but my princess loved the filing. I again got the chance to finish lots of cookies.

I halved all the three recipes and made approximately around 25 cookies each. It is really easy to put together. I try to spaced the time so that we can enjoy the cookies, however, I got bonus in most of the case. 
Please take a look at each baking partners contribution as they are different in their look and story behind them is different, even though it is came from same recipe. Some partners are creative in changing them into egg- less versions. 
Here I am presenting the Ultimate cream cheese cookies, take a look at it. If possible try it; you are going to be in chocolate dream. I will post the rest of recipes in separate posts.  Here go the recipe.

First grab the ingredients from the pantry.
Melt chocolate in a small bowl by microwave them for 25 seconds and set aside. Stir well to ensure the uniform melting.
Sift, flour, cocoa powder, salt, baking soda and set aside.
In a bowl  stand mixer fitted with paddle attachment cream butter and sugar and then add egg and heavy cream and stir once again  to combine everything thing. To this fold in melted chocolate and chocolate chips. Wrap with   plastic wrap and refrigerate for about 2 hours. 
By the end of refrigeration, preheat oven to 350 F and line the cookie sheet with parchment paper.
Scoop about 1 tablespoon of cookie dough and slightly flatten them with hand.  Leave 2 inches in between.
 Bake the cookies for about 12 minutes until they set in center. Remove from the oven and leave it in cookie sheet for about 5 minutes. Then transfer them to cooling rack until cookies cooled completely. 
Keep the cookies in airtight container for about 3 days, if you lucky it will remain 3 days. In our house it finished with two days.
 Take a look at it piece.
                                                               Print Recipe

Ultimate  Chocolate Cream Cheese Cookies

Adapted from Matt Lewis and Renato Poliafito
Prep Time    10 minutes + 2 hours refrigeration time.
Cook Time    12 minutes
Serves    48

                                                                                                       
Ingredients:

  • 2 ¼ cups (255g) all purpose flour
  • ¼ cup (32g)  unsweetened cocoa powder
  • 2 tsp. (8g) baking soda
  • ½ tsp. (3g) salt
  • 2 sticks (226g) unsalted butter, softened slightly
  • 4 oz (113g) Cream Cheese at room temperature
  • 1 cup (201g) granulated sugar
  • ½ cup (110g) dark brown sugar
  • 2 large eggs
  • 2 Tbsp. (30ml) heavy cream
  • 1 tsp. (5ml) pure vanilla extract
  • 3 oz. (85g) bittersweet chocolate, melted and cooled
  • 8 oz. (225g) of semi-sweet chocolate chips

Steps:

Preheat the oven to 350 degrees and line 2 baking sheets with parchment paper.

In a medium bowl, sift the flour with the cocoa powder, baking soda and salt. In a bowl of a standing mixer fitted with the paddle, combine the butter, cream cheese, granulated sugar and brown sugar and beat until fluffy, about 3 minutes. Scrape down the sides of the bowl. Beat in the eggs, heavy cream and vanilla until blended. At low speed, beat in the dry ingredients.  Add the melted chocolate and chocolate chips and beat just until incorporated.  Cover the bowl and refrigerate the dough for at least 15 minutes or up to 2 hours.

 Scoop heaping tablespoons of cookie dough onto the prepared baking sheets, spacing them two inches apart. Bake for 12 minutes until the cookies are just set; shift the baking sheets for top to bottom and front to back half way through. Let the cookies cool on the baking sheets for 5 minutes, then transfer them to a rack to cool completely.

Note: The cookies can be stored in an airtight container for up to 3 days.


Variations:

    • Instead of chocolate chips you   can try butterscotch chips .


Cookies

Chakkapazham/Jackfruit: How to cut Jackfruit

Sep 13, 2012 · 39 Comments

Jackfruit is one of heaviest fruit, here are tips to successfully how to cut Jackfruit and extract its fruit and seed. This is more cheaper than store bought sliced ones.

Jackfruit sliced

Here is the picture of full fruit
Whole jackfruit
Jackfruit is one of my favorite fruit. In Kerala during summer months that is from April to June there will be an abundance of jackfruit and mango. There are several varieties of mango, but only two kinds of Jackfruit. The jackfruit fruit is the largest tree-borne fruit some time reach about 80 pounds (36 kg) in weight and up to 36 inches (90 cm) long and 20 inches (50 cm) in diameter.
It is native of south East Asia and believed to originate in south western rain forest in India. This tree is widely cultivated in tropical regions of India, Bangladesh, Sri Lanka, Vietnam, Thailand, Malaysia, Indonesia and the Philippines. Jackfruit is also found in East Africa, e.g., in Uganda, Tanzania and Mauritius, as well as throughout Brazil and Caribbean nations such as Jamaica. It is heaviest fruit of world.
Two types of Jackfruit, Koozha chakka, the fruits of which have small, fibrous, soft, mushy, but very sweet carpels where as other one will be more important commercially, with crisp carpers of high quality known as Varika.
We eat Jackfruit in all forms, including young, unripe and ripe form.  Young and unripe forms are used to make curries, stir-fry and chips. Where ripe ones will eat as such or some time convert them into a jam or preservative form called Chakka varatti with jaggery /unrefined sugar. It is not good for eating with bread because it is very viscous and hard to spread; and later used to make desserts and sweets with them.
If you ask me what taste of jackfruit is, I can’t explain in words, but here it is explain as cross of banana and pineapple.
In Kerala, almost every house will have trees like, coconut, mango, jackfruit, banana etc. I remember my grandma used to cut two three unripe jackfruit using a big knife we call it vettukathi (Machete) .
How to cut a Jackfruit ? 
It is not easy to clean the jackfruit as it oozed out latex which is so sticky; you need newspapers and coconut oil. Whenever latex oozes you need to removes it with newspaper and then apply coconut oil over it.  First you need to  cut the fruit into two then removes inedible central core and patiently removes each fruit and its fibrous rag and then cut open and removes the seeds. If it is unripe she will cut into 4 pieces and makes chips.
If you find your fingers getting sticky make sure to apply coconut oil  in fingers as well as knife you used to cut them.
Half portion of jackfruit
Usually our neighbor will join the cleaning process as she had a cow which liked to eat jackfruit cover and rags, and a goat who loved to eat jackfruit leaves. I can only dream nowadays about chips. I have seen jackfruit chips in Indian store; unfortunately nobody knows when it is made.
quarter jackfruit slice
With that I made   Jackfruit preserve pudding and steamed rice packet with sweetened jackfruit preserve.  Then I realized how much pain grandma used to take to make the preserve and chips. When I was young she used to ask me if I can help with removing the seeds, and then I will tell Grandma, I have to play. But I will be timely present for chips when it is removed from the oil. Love to munch at any time of the day. She will be giving to me in my small bowl, telling that it is hot eat is carefully, otherwise you will burn yourself.
Here are following steps you need to take to cut the jackfruit . You can use this  techinque  for cutting non-ripe one too, but not tender ones as tender we use everything except the peel.
First remove the top thick sponge like white portion of the jackfruit
Remove the top portion like this
Extract the fruit like this
Fruit with immature fruit
Remove chunk of the white fibers at the top of the fruit
After slicing the fruit you will see the seed
.
Fruit with seed
Here is  Jackfruit after removing from immature fruits
Last week when my hubby went to Indian store, he saw a jackfruit and normally it cost the price of gold. But he was able to get in lesser prices. When I saw them in Fiesta local grocery there is not much fruit in there, but price was sky high. In Hong Kong market it was the same story. So when he brought it home, it was like a million dollar to me.
I remembered the entire tip and tricks my grandma used to say and do while cutting it. Finally I was able to get 50 pieces. Yesterday I cooked the seeds with little turmeric and salt and removed skin and made stir-fry with onion and red chilies.
If you get a whole jack fruit cut it in the middle to form two halves. Once you cut it don’t touch the center core, you will see sticky latex; first remove that latex using oiled tissue paper. Then cut out central core just like pineapple.
The cut the bulbs from its base, if it is ripe one you can just pull them out and remove chunk of the white fibers at the top of the fruit.  Then peel back all of the white fibers (actually they are immature fruits) surrounding the fruit.   As only yellow part is edible.  Make a cut from top to bottom of the yellow fruit to extract the seed.
Wash and keep the seed for future use.  Best you can make curries with itor just boil in salted water and eat or you can even roast them.

If you get a chance to buy this fruit, buy and try them. It is delicious.

Ready to consume. Fruits peeled into halves.
Jackfruit seeds
Recipes with Jackfruits

Jackfruit Coconut Muffins
Jackfruit shortbread cookies with cardamom
Chakka appam/Steamed Jackfruit Rice Cake
Jackfurit milk shake
Chakka payasam /Jackfruit pudding
Jackfruit icecream
Jackfruit preserve
Chakka pradaman
Tender Jackfruit Stir Fry with Coconut
Plantain and jackfruit stir fry

Print
5 from 4 votes

How to Cut Jackfruit

Jackfruit is one of the heaviest tropical fruit. Here is the tips for successfully cut them.
Prep Time10 minutes mins
Total Time10 minutes mins
Course: Main Course
Cuisine: Asian, Indian
Keyword: How to cut Jackfruit
Yield: 20 servings
Cost: $13 for 20 lb

Equipment

  • Knife

Materials

  • 1 19-20 pound Jackfruit
  • 3 tbsp Coconut oil

Instructions

  • If you get a whole jack fruit cut it in the middle to form two halves.
  • Once you cut it don’t touch the center core, you will see sticky latex; first remove that latex using oiled tissue paper.
  • Then cut out central core just like pineapple.  
  • The cut the bulbs from its base, if it is ripe one you can just pull them out and remove chunk of the white fibers at the top of the fruit. 
  • Then peel back all of the white fibers (actually they are immature fruits) surrounding the fruit.  
  • As only yellow part is edible.  Make a cut from top to bottom of the yellow fruit to extract the seed. 

How to make, Jackfruit, Kerala.

  • « Go to Previous Page
  • Page 1
  • Interim pages omitted …
  • Page 22
  • Page 23
  • Page 24
  • Page 25
  • Page 26
  • Interim pages omitted …
  • Page 33
  • Go to Next Page »

Primary Sidebar

Hi, I'm Swathi! .All the recipes you see here are created by me and approved after taste-test by my family.

More about me →Here

Popular

  • Sourdough Jewish Rye Bread
  • Sourdough Pineapple Mango  Muffins
  • Parmesan Pepper Sourdough Bread: A Bold Twist on a Classic
  • Sourdough Birthday Cake Muffins

About Swathi

SwathiWelcome to Zesty South Indian Kitchen, I am Swathi ( Dr. Ambujom Saraswathy Ph.D) who loves to explore cuisines from all over the world. Whenever possible I try to to give an Indian touch to several of the world cuisine, and has weakness for freshly baked bread. I am mom to twowonderful young kids, and has a wonderful loving husband who gives a up or down vote to the food .All the recipes you see here are created by me and approved after taste-test by my family.
  • Facebook
  • Instagram
  • Pinterest
  • Twitter
  • YouTube

Subscribe

Get Delicious Recipes in Your Inbox

Privacy Policy

Archives

Grow

Footer

Featured on

Subscribe

Get Delicious Recipes in Your Inbox

Privacy Policy

Footer

↑ back to top

About

  • Privacy Policy
  • Disclaimer

Newsletter

  • Sign Up! for emails and updates

Contact

  • Contact

Rate This Recipe

Your vote:


Let us know what you thought of this recipe: Please write your Name if possible ,

This worked exactly as written, thanks!
My family loved this!
Thank you for sharing this recipe

Or write in your own words:

A rating is required
A name is required
An email is required