• Skip to primary navigation
  • Skip to main content
  • Skip to primary sidebar
  • Skip to footer
Zesty South Indian Kitchen logo
  • Home
    • Privacy Policy
    • Disclosure
  • About
    • Contact Me
  • Recipe Index
    • Bakes
      • Bread
  • Work With Me
menu icon
go to homepage
  • Home
    • Privacy Policy
    • Disclosure
  • About
    • Contact Me
  • Recipe Index
    • Bakes
      • Bread
  • Work With Me
search icon
Homepage link
  • Home
    • Privacy Policy
    • Disclosure
  • About
    • Contact Me
  • Recipe Index
    • Bakes
      • Bread
  • Work With Me
×
Home

Jalapenos Cheddar Cumin Scones

Jalapenos Cheddar Cumin Scones

Jun 16, 2014 · 36 Comments

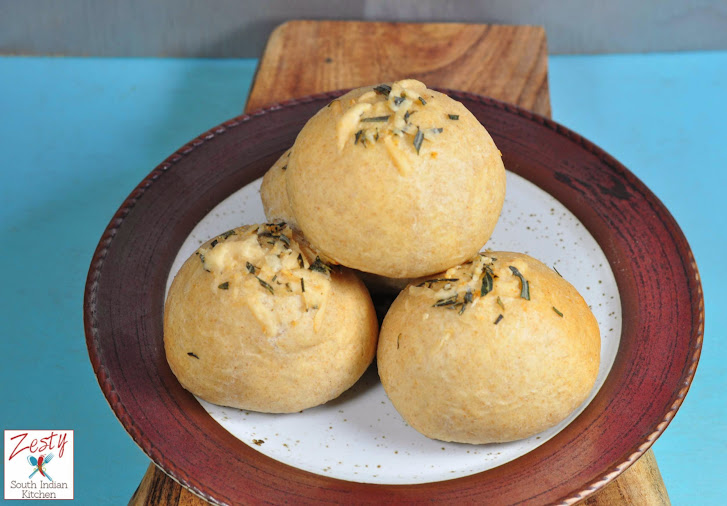
Scones are one of my dreaded dishes, meaning I am afraid of them every time I think of making them. I have tried it a few times unsuccessfully. Finally I made this Jalapenos Cheddar Cumin Scones as part of this month Baking Partner’s challenge. This month the challenge was to make either tart or scones. This was suggested by Archana of “Mad Scientist in Kitchen”. I was in mood to make the tart, but ended up changing my mind when I was getting ready to bake and instead made this Jalapenos Cheddar Cumin Scones.
According to Wikipedia, scone is a single-serving cake or quick bread. They are usually made of wheat, barley or oatmeal, with baking powder as a leavening agent, and are baked on sheet pans. They are often lightly sweetened and are occasionally glazed. They usually served with tea. Normally scones are sweetened one; there are savory varieties also out there. I had tried making scones few times earlier, most of time failed, so this I was nervous and wanted to succeed this time. The recipe suggested by Archana is from Good Food magazine, it is eggless and use buttermilk. It needs self rising flour, cheddar cheese and sage. I don’t have self rising flour and sage in my hand so I tried with Jalapenos peppers. I read that adding eggs and heavy cream to the recipe gives more puffiness to scones compared to just adding baking powder.

Since I had jalapenos and cheddar cheese in my hand which I had bought for making jalapenos poppers, I decide to use them. I know the combo between jalapenos and cheddar cheese will create a wonder. I also added some cumin seeds, it is my favorite seeds which I love to add to everything. I made this jalapenos cheddar cumin scones with two jalapenos de-seeded and then roasted for 2 minutes in butter then made into dough with all-purpose flour, butter and baking powder. Then I gradually mixed the dough in with heavy cream and lightly beaten eggs. Scones are best when they come out of the oven, you can try with ketchup as my daughter did eat like that. However my son found it is spicy and he skipped eating them.


Please check other baking partners challenge by clicking the links, here.Here comes the recipe, since I can get success this scone, then it is delicious no doubt about that. Give it try.

Print
Jalapenos Cheddar Cumin Scones

Rating: 51

Prep Time: 10 minutes

Cook Time: 25 minutes

Total Time: 35 minutes

Yield: 8

Jalapenos Cheddar Cumin Scones

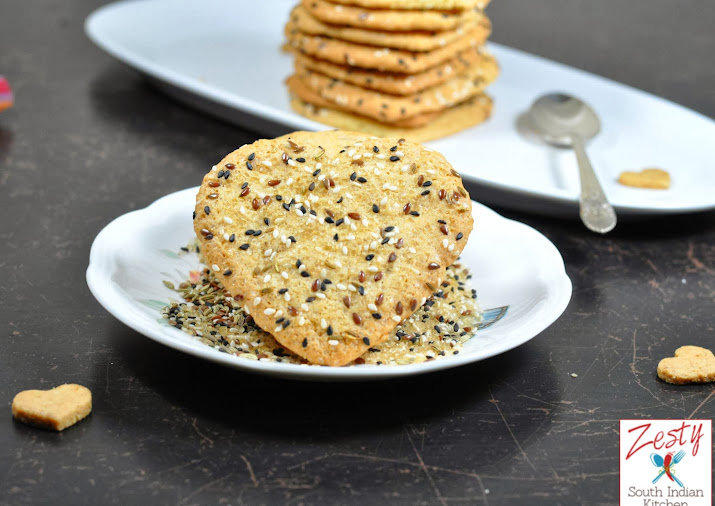
Delicious cheesy, spicy and fragment scones made with cheddar, jalapenos and cumin.

Ingredients

  • 2 cups all-purpose flour
  • 1 tbs. baking powder
  • 1 tsp. salt
  • 8 tbs. cold butter, diced
  • ¼ cup heavy cream
  • 2 eggs
  • 2 teaspoon cumin seeds
  • ½. sharp Cheddar cheese, diced
  • 2 small jalapeño pepper, minced ( about ½ cup chopped)
  • Egg wash (1 egg beaten with 1 tsp. water)

Instructions

  1. Preheat oven to 400. In a small skillet, melt ½ tablespoon of butter.
  2. Sauté jalapeños until soft, about 2 minutes.
  3. Place in a small bowl with Cheddar cheese and coat with 1 tbs. of flour.
  4. . In another bowl, combine the rest of the flour with baking powder , cumin and salt. Cut in remaining butter with a fork until the butter is pea-size.
  5. Lightly whip eggs and cream and add to the flour-and-butter mixture
  6. Using a wooden spoon, fold mixture until it begins to come together.
  7. Add the Cheddar-and-jalapeño mixture to the dough and mix until everything is incorporated.
  8. Turn out the dough onto a well-floured surface and knead gently for less than one minute.
  9. Roll dough ¾- to 1-inch thick and cut into 8 triangles.
  10. Brush with egg wash and place on parchment.
  11. Bake for 25 minutes or until golden brown.

Notes

This recipe is adapted from New york Magazine

Copyright ©2014 Zesty South Indian Kitchen by Swathi(Ambujom Saraswathy) All Rights Reserved

3.1
Copyright ©2013 Zesty South Indian Kitchen by Swathi( Ambujom Saraswathy) All Rights Reserved

Pin it for later

BakingPartnersButton.jpg

 Loading InLinkz ...

Bakes, Featured, Snacks.

Eggs en Cocotte

Jun 12, 2014 · 12 Comments

Don’t get intimidated by hearing the name of this Eggs en Cocotte. It is a French dish called oeufs en cocotte in French, and this dish is named for the ramekins in which the eggs are cooked. I was looking for a dish that is baked and also it has soft runny eggs. This eggs en cocotte is very versatile dish; we can add cheese and herbs, or meat or with chopped cooked vegetables along with eggs.
If you have a buttered toast along with eggs en cocotte then your breakfast or brunch will be delicious. After my favorite Indian omelette and egg bhurji( Indian style scrambled eggs) I love sunny side up eggs with touch of pepper and garam masala in it
The #Safest Choice eggs are pasteurized through an all-natural egg pasteurization process which eliminates the risk of Salmonella in eggs. So you can use Safest Choice eggs without any fear of salmonella. If you taking a paleo diet then raw eggs are important part of smoothie or any other breakfast drink, and I think Safest Choice Eggs will be a wonderful choice for this dish. I made few dishes  and I want not able to find any difference in taste, I will say it is more flavorful with less eggy smell. Each Safest Choice Eggs have earned Seal of Approval for exceptional flavor and culinary performance from the nation’s largest organization of professional chefs, the American Culinary Federation (ACF).


I made my eggs en cocotte with asiago- parmesan garlic cheese mixture, green onions and heavy cream. It is easy to make you need few ramekins, butter them first and then add cheese mixture and green onions and a cracked egg, add a pinch of salt and pepper topped with heavy cream to prevent the eggs from drying while baking in the oven. Then bake eggs in water bath at 375 ⁰F until the eggs whites are set and the yolks is still runny. If you want your soft yolks instead of runny give 5 more minutes.
Here are is the link where you can check the availability of Safest Choice egg in grocery stores near you. So next time you want egg dish for your breakfast or brunch try this eggs en cocotte. It is simply delicious and also easy to try.

Print Recipe
No ratings yet

Eggs en Cocotte

Delicious eggs with cheese and veggies makes excellent breakfast dish.
Prep Time5 minutes mins
Cook Time20 minutes mins
Total Time25 minutes mins
Course: Appetizer, Breakfast
Cuisine: French
Keyword: Egg dishes
Servings: 2 servings
Calories: 187kcal

Ingredients

  • 1 teaspoon of Butter or olive oil
  • 2 safest choice eggs
  • ⅛ teaspoon Salt
  • ⅛ teaspoon Pepper
  • 4 tablespoon Heavy cream optional
  • 2 tablespoon of Asiago-parmesan-garlic cheese mixture 1 ¾ tablespoon of Asiago cheese+ ¼ teaspoon of parmesan cheese+ ¼ teaspoon of garlic powder
  • 2 green onions chopped finely only green part

Instructions

Prepare the Oven and Hot Water Bath:

  • Pre-heat the oven to 375°F. Line the baking dish with nonstick aluminum foil, this will keep the ramekins from sliding when you carry the baking dish.

Butter the Ramekins:

  • Rub the insides of the ramekins with butter or olive oil.
  • Add 1 tablespoon of Asiago –parmesan-garlic cheese mixture, then add 1 teaspoon of chopped green onions.
  • Crack the Eggs into the Ramekins: Crack one egg into each ramekin (or two eggs if using larger ramekins)sprinkle with Salt and Pepper.
  • Then add 2 tablespoon of heavy cream on the top, this will help the yolk from drying out in the oven.

Transfer Ramekins to the Baking Dish:

  • Arrange all the ramekins in the prepared baking dish. Pour hot water into the baking dish to come partway up the sides of the ramekins. Very hot tap water is fine, or you can heat water on the stove until it's just starting to steam.

Bake the Eggs:

  • Transfer the baking dish with the ramekins of eggs to the middle rack of the oven.
  • Bake until the whites are set:15- 20 minutes for runny yolks, increase another 23-24 for soft-cooked yolks, or 25-26 minutes for hard-cooked yolks. Remove the ramekins with oven mitts and eat immediately with toast for dipping. Check the temperature of your oven, mine is one cool side it took about 20 minutes to get runny yolks.

Notes

This recipe is adapted from The kitchen
Copyright ©2014 Zesty South Indian Kitchen by Swathi(Ambujom Saraswathy) All Rights Reserved

Nutrition

Calories: 187kcal | Carbohydrates: 2g | Protein: 7g | Fat: 17g | Saturated Fat: 9g | Polyunsaturated Fat: 2g | Monounsaturated Fat: 6g | Trans Fat: 1g | Cholesterol: 198mg | Sodium: 218mg | Potassium: 124mg | Fiber: 1g | Sugar: 1g | Vitamin A: 799IU | Vitamin C: 2mg | Calcium: 54mg | Iron: 1mg
Tried this recipe?Mention @nidhinikhil or tag #zestysouthindiankitchenrecipes!


Eggs

Caramel Cashew Ice Cream

Jun 10, 2014 · 26 Comments

Delicious homemade cashew caramel ice cream. Creamy rich luscious ice cream with salted cashews gives crunch in every bite

Caramel Cashew Ice Cream

This ice cream has long story to go with it. This dish has been requested from my hubby for a very long time. When I married and moved to Utah my hubby took me to Brigham Young University creamery (BYU Creamery) for the first time and he ordered this caramel cashew  ice cream. He loves it; it was in turn introduced to him by his friend Carl. This ice cream has been in our minds for a long time along with 5 Buck Pizza and beautiful natural wonders of Utah.
When we are in Utah, we were newly married, so every weekend, he will ask me to pack my bags to go hiking and photographing. I enjoyed those outing. Now after two kids, weekend is only for grocery day or cleaning day. One thing about Utah is that on Sunday everything will be closed only a few grocery stores are open. Hubby always asks do you know how to make  caramel  cashew ice cream.

I will say I don’t know I will try it. Poor guy is now diabetics and can’t enjoy a generous dose of ice cream at a stretch. He has to satisfy with 1 or two scoops of ice cream. Finally I got some guts to make this ice cream. Again Google came to my help. I have seen David Lebovitz’s salted caramel ice cream , however it has 5 yolks. I made raspberry ice cream with 5 egg yolk, and I don’t like the texture much. So tried to search some other recipes and then finally settled on this salted caramel ice-cream recipe from Gourmet. I like this recipe as it uses only 3 eggs.


Caramel Cashew Ice Cream with cashew on the background

When I read the reviews I came to know that I have to reduce some sugar, so skipped ¼ cup sugar from the original recipe. I don’t want to make a salted ice cream, so skipped the salt in the ice cream and added roasted salted cashews to make this  caramel cashew ice cream. When I was making caramel my heart is always beating at high speed. However after mixing heavy cream egg mixture to caramel and doing a taste test I was happy, yes I have made perfect caramel.

 How to make Cashew Caramel  ice cream

First you need  caramel: You can either make it from scratch like by heating sugar and caramelize and then  add cream.  You can use store bought caramel sauce. Heat the granulated sugar in a small saucepan over medium heat, stirring constantly to prevent burning. The sugar will begin to form clumps and will eventually melt and turn brown. Once the sugar has melted completely. The mixture will bubble, continue stirring for 1-2 minutes then add the cream. Boil for 1 minute then remove from the heat and add the salt. Allow the caramel to completely cool at room temperature, about 1 hour.

Then Heat the Milk . In a medium saucepan set over medium heat milk and heavy cream, Heat until warm.

Tempering eggs  : This is most important part in making this ice cream. First incorporate  small amount of hot cream and milk with eggs with continuous whisking together the eggs. Go slow so you don’t scramble them! Gradually pour the mixture back into the saucepan. Constantly whisk over medium heat until the mixture thickens and reaches a temperature of 165 degrees. Pour the mixture through a mesh sieve set over a medium size mixing bowl.

Refrigerate. Chill custard, stirring occasionally, until very cold, 3 to 6 hours or overnight, I gave a overnight chilling.

Freeze. Remove the ice cream base from the refrigerator and pour into a prepared ice cream machine or attachment bowl. Freeze according to the manufacturer’s instructions (about 20-25 minutes). During the last stage of mixing add coarsely chop the cashews and fold in. Place in a freezer-safe container, freeze for 3-4 hours before serving.

If you want, you can swirl a bit of the caramel throughout and then drizzled some on top.  After about 4 hours in the freezer and enjoy .

I refrigerated the mixture for overnight. I like to do that as it gives more flavor infuse compared to few hours of chilling. Then next day I mixed in 1 cup of salted chopped roasted cashews and churned the ice cream in ice cream maker. Trust me I got the most luscious ice cream. Great caramel flavor, nutty taste delicious treats in every scoop, my hubby commented that it is classic, and my daughter enjoyed it as one of her favorite ice creams. I am happy that I found a new luscious rich ice cream to dig in.
Here comes the recipe, try at least once, you will always come back to another scoop. I am sure about that.


Caramel Cashew Ice Cream with caramel sauce and cashew nuts

Print Recipe
5 from 2 votes

Caramel Cashew Ice Cream

Luscious rich cashew caramel ice cream with salted roasted cashews and homemade caramel gives a nice crunch on everybite.
Prep Time8 hours hrs
Cook Time20 minutes mins
Total Time8 hours hrs 30 minutes mins
Course: Dessert
Cuisine: American
Keyword: Cashew caramel ice cream, homemadeicecream
Servings: 8 servings
Calories: 465kcal

Ingredients

  • 1 cup sugar
  • 2 ¼ cups heavy cream divided
  • 1 cup roasted salted cashew
  • ½ teaspoon pure vanilla extract
  • 1 cup 2 % milk
  • 3 large eggs

Instructions

  • Heat 1 cup sugar in a dry 10-inch heavy skillet over medium heat, stirring with a fork to heat sugar evenly,
  • until it starts to melt, then stop stirring and cook,
  • swirling skillet occasionally so sugar melts evenly, until it is dark amber.
  • Heat 1 ¼ cups cream in a sauce pan when it starts boiling .
  • Remove from the fire and add to caramel (mixture will spatter) and cook, stirring, until all of caramel has dissolved. Transfer to a bowl and stir in vanilla. Cool to room temperature.
  • Meanwhile, bring milk, remaining cup cream, and just to boil in a small heavy saucepan, stirring occasionally.
  • Lightly whisk eggs in a medium bowl,
  • then add half of hot milk mixture in a slow stream, whisking constantly.
  • Pour back into saucepan and cook over medium heat,
  • stirring constantly with a wooden spoon, until custard coats back of spoon and registers 170°F on an instant-read thermometer (do not let boil).
  • Pour custard through a fine-mesh sieve into a large bowl, and then stir in cooled caramel.
  • Chill custard, stirring occasionally, until very cold, 3 to 6 hours or overnight, I gave a overnight chilling.
  • When you are ready to make ice cream, add chopped salted roasted cashew to the custard mixture and make ice cream according to manufacturer’s instructions.

If you don’t have ice cream maker,

  • First freeze a baking dish while you are preparing the ice cream mixture. Pour mixture into frozen baking dish, freeze for 45 minutes. Take it out, break up frozen bits with whisk or spatula. Repeat this process at 30 minute intervals until it’s nearly impossible to break apart anymore. Scoop into Tupperware containers and place in freezer until ready to serve.

Notes

This recipe is adapted from Gourmet
 

Nutrition

Calories: 465kcal | Carbohydrates: 34g | Protein: 7g | Fat: 35g | Saturated Fat: 18g | Polyunsaturated Fat: 3g | Monounsaturated Fat: 13g | Trans Fat: 1g | Cholesterol: 155mg | Sodium: 173mg | Potassium: 212mg | Fiber: 1g | Sugar: 27g | Vitamin A: 1103IU | Vitamin C: 1mg | Calcium: 96mg | Iron: 1mg
Tried this recipe?Mention @nidhinikhil or tag #zestysouthindiankitchenrecipes!


Featured, Ice cream

Tofu Stir Fry

Jun 4, 2014 · 25 Comments

Delicious tofu fry made with homemade sauce as well as batter fried tofu pieces. Really spicy,salty,sweet surprise.

Tofu Stir Fry

 I made this tofu stir fry/chili tofu, which in turn is an adaption of Indo Chinese dish Chili paneer.
Indo Chinese dishes are contribution of Chinese immigrant settled mainly in the north Eastern India, Kolkata and to some extent in Mumbai. Chinatown is there in both Kolkata and Mumbai. Indo Chinese dishes consist of Chinese seasoning and cooking techniques to Indian tastes. Today every restaurant will have at least few indo Chinese dishes in their menu. Indo Chinese dishes include chili (means hot and batter-fried), Manchurian ( means a sweet and salty brown sauce), and Szechwan (means a spicy red sauce). They may uses local spices turmeric, cumin coriander etc.

Tofu Stir Fry
If I say paneer, my hubby will start run from there. I don’t know why he hates it but he does that. If he runs, my kids will join him also. They too are against paneer, then as a punishment for cooking paneer in the house I need to finish it. But if I make tofu, he will join to do taste test. Kids may or may not join. So I always try my paneer dishes with tofu. Since it healthier than paneer also both them has no taste as such, if you combine with some spices and sauce they will excel each other.

Tofu Stir Fry
This not the chili we have here in the States, it is a side dish made with batter fired tofu and then they cooked again with veggies and sauce. It is delicious. I made this tofu stir fry with my own sauce version, added, sweet chili sauce, tomato ketchup, and Chinese black rice vinegar. I had some vinegar and sauce I bought for making Chinese dumpling soup that I wanted to use. So whenever I make any dish that requires Chinese ingredients, I will try to use them.
First tofu are pressed well and cut into cubes, small cubes and then it is dipped in batter made with all purpose flour and corn starch, ginger garlic paste and salt. Then they are shallow fried. The sauce is made with veggies, onion, tomato ketchup, soya sauce, sweet chili sauce and Chinese black rice vinegar. Spices used include green chili and pepper. It is really easy and delicious and goes well with a bowl of or rice. Give it a try simple delicious dish, you will love it.

Tofu Stir Fry ingredients


Firm tofu cut it into cubes

tofu cubes

Combine all purpose flour, corn starch, pepper, salt and garlic paste in a bowl into a batter 

batter for frying tofu

Coat the tofu pieces with the battertofu getting coated

Then dredge them in 2 tablespoon all purpose flour

dredging tofu with all purpose flour

Fry them until it become golden brown in all sides 

tofu pieces getting fried tofu pieces getting fried  on one side golden fired tofu cubes

For gravy heat oil 

oil is getting heated

chopped garlic and ginger paste and sauté

garlic and ginger paste

Then add the onion and green chili sauté

onion and green chili

Then add green and red bell pepper and sauté

green bell pepper and red bell pepper saute

Add the soya sauce, sweet chili sauce; Chinese black rice vinegar, ketchup and water bring it to boil.

homemade sauce is added to the vegetables

Toss in the fried tofu and mix well.

tofu along with vegetables

Enjoy with with bowl of rice .

Print Recipe
5 from 17 votes

Tofu Stir Fry

Delicious tofu fry made with homemade sauce as well as batter fried tofu pieces. Really spicy,salty,sweet surprise.
Prep Time10 minutes mins
Cook Time15 minutes mins
Total Time25 minutes mins
Course: Side Dish
Cuisine: Asian
Keyword: Chili tofu, Tofu stir fry
Servings: 4
Calories: 1317kcal

Ingredients

  • 14 oz 396g Firm tofu ( squeezed well and chopped into cubes)
  • 3 tablespoon all purpose flour
  • 2 ½ tablespoon corn flour
  • 2 tablespoon all purpose flour for dredging
  • ½ teaspoon salt
  • ¼ teaspoon pepper
  • 1 teaspoon garlic paste
  • ⅓ cup water
  • For gravy
  • 1 ½ tablespoon sesame oil
  • ½ tablespoon hot chili oil
  • 2 clove garlic chopped finely
  • ½ tablespoon ginger paste
  • ½ onion chopped cubes
  • ½ green bell pepper chopped cubes
  • ½ red bell pepper chopped cubes
  • 1 green chili chopped finely
  • 2 tablespoon soya sauce
  • 1 tablespoon Chinese black rice vinegar
  • 1 tablespoon sweet chili sauce
  • 1 teaspoon ketchup
  • ¼ cup water

Instructions

  • Making batter fried tofu
  • First squeeze all the water from tofu and cut it into small bite size cubes.
  • Combine all purpose flour, corn starch, pepper, salt and garlic paste in a bowl
  • and make a smooth batter by adding approximately ⅓ cup of water.
  • Coat the tofu pieces with the batter and then dredge them in 2 tablespoon all purpose flour
  • and shallow fry in hot oil over a high flame until tofu is golden brown. Flip once to get evenly cook all the side.
  • Drain it on kitchen towel and keep aside.
  • For making sauce
  • Heat the sesame oil, hot chili oil and
  • add chopped garlic and ginger paste and sauté over a high flame for 1 to 2 minutes.
  • Then add the onion and green chili sauté for a few more seconds.
  • Then add green and red bell pepper and sauté for 3 -4 minutes.
  • Add the soya sauce, sweet chili sauce; Chinese black rice vinegar, ketchup and water bring it to boil.
  • Toss in the fried tofu and mix well.
  • Serve immediately, garnished with the spring onion greens with a bowl of rice.

Nutrition

Calories: 1317kcal | Carbohydrates: 51g | Protein: 126g | Fat: 68g | Saturated Fat: 8g | Sodium: 945mg | Potassium: 124mg | Fiber: 13g | Sugar: 9g | Vitamin A: 529IU | Vitamin C: 34mg | Calcium: 1749mg | Iron: 18mg
Tried this recipe?Mention @nidhinikhil or tag #zestysouthindiankitchenrecipes!

Diabetic Friendly, Featured, Indo chinese, Side dishes, Sir fry

Indian Omelette

Jun 2, 2014 · 14 Comments

Indian style Omelette made with eggs and egg whites, along with veggies and spices<img src="Indian Omeltette.jpg" alt="Indian style omelette with veggies and spices">

Omelette is part of every cuisine; French makes their own version and so do Greek, Italy, Japan, Iran who has their own version of omelette. I grew up eating Indian version of omelette which has little spices, but full of veggies and eggs. Do you know there are street vendors who sells only omelette to make a living. We love to have omelette at any time of the day, and not only as breakfast dish, but also as brunch or side accompany to lunch or dinner. For making this Indian omelette I used mainly egg white and 2 whole eggs along with veggies, spices like chili powder, turmeric and green chili and pepper.
When Safest Choice Eggs wanted me to create an egg based recipe, I thought of trying their eggs for my favorite omelette dish as it is an everyday dish in my house. I knew that a combination of some veggies and spices would make Egg into a delicious meal. As my 2 year old is happy egg eater, he loves to eat scrambled eggs and omelette; he is ardent fan of anything with eggs. Whereas my 5 year old daughter is cookie and cupcake lover who loves to eat cookie batter as well as cupcake batter, and is fond of licking the remains in the bowl while I am baking a cookie or cupcakes. I always afraid of her eating raw eggs because of salmonella fear. Now I am happy that I found Safest Choice Eggs, and as they are pasteurized eggs, I can continue let her eating cookie or cake batter containing these eggs.
As most eggs in the grocery stores are unpasteurized, this Safest Choice Eggs goes through an all-natural egg pasteurization process which eliminates the risk of Salmonella in eggs from the very start. Using Safest Choice egg gives you peace of mind. So go head, if you are fan of sunny side up egg for breakfast or ceaser salad fan use these safest choice eggs you will be fear of free. The next thing I am going to make is custard based ice cream with Safest Choice Eggs, as my kiddos are ice cream lovers too.

an Omeltette.jpg" alt="Indian style omelette with veggies and spices">
Also another important thing is that taste, I found that pasteurization process doesn’t affect the taste and nutrition of the eggs. Everything I tried with Safest Choice Egg taste similar to the eggs that didn’t go through pasteurization process. May be it has more flavor with less eggy smell. In fact, Safest Choice Eggs have earned the Seal of Approval for exceptional flavor and culinary performance from the nation’s largest organization of professional chefs, the American Culinary Federation (ACF).
Since this Indian omelette is very versatile, you can add any veggies; I used onion, green onion, tomato, green chili and spices. First lightly beat eggs with salt, pepper, red chili powder and turmeric and then add veggies, green chilies and tomato. Mix everything well and cook it in a skillet with 3 teaspoon of oil. Flip once to make sure uniform cooking. You can also add some gram masala if you want.

Here are is the link where you can check the availability of Safest Choice Egg in grocery stores near you. So next time try this omelette, when you thinking of making your regular meal more exciting. As it has good dose of veggies, and also the choice of adding your favorite choice veggies and healthy eggs, it would be a healthy recipe. Give it a try.

an Omeltette.jpg" alt="Indian style omelette with veggies and spices">

Print Recipe
No ratings yet

Indian Omelette

Delicious omelette made with pasteurized eggs,onion, veggies and spices.
Prep Time5 minutes mins
Cook Time5 minutes mins
Total Time10 minutes mins
Course: Appetizer
Cuisine: Indian
Keyword: Indian egg recipes, Omelette recipes
Servings: 4
Calories: 155kcal
Author: Swathi (Ambujom Saraswathy)

Ingredients

  • 6 Eggs I used 4 egg whites and 2 whole eggs for this recipe
  • ½ cup chopped onion
  • 1 tomato chopped remove the seeds
  • 4 green onions chopped finely use only green part
  • 1 green chili
  • ½ teaspoon chili powder
  • ¼ teaspoon ground pepper
  • ¼ teaspoon turmeric powder
  • ¼ teaspoon salt or to taste
  • 3 teaspoon olive oil

Instructions

  • In a bowl add 4 egg whites and 2 whole egg, chili powder, ground pepper, turmeric powder and salt and lightly beat together.
  • To this add chopped veggies and mix once again.
  • In a skillet add olive oil and when it starts to heat add egg mixture to it.
  • Cook until you can able to flip about 3 minutes and then flip the other side and cook for about 2 minutes.
  • Transfer to serving plate you can enjoy as such or with some fresh avocado.

Nutrition

Calories: 155kcal | Carbohydrates: 8g | Protein: 10g | Fat: 10g | Saturated Fat: 3g | Polyunsaturated Fat: 2g | Monounsaturated Fat: 5g | Trans Fat: 1g | Cholesterol: 246mg | Sodium: 430mg | Potassium: 356mg | Fiber: 2g | Sugar: 4g | Vitamin A: 671IU | Vitamin C: 15mg | Calcium: 84mg | Iron: 2mg
Tried this recipe?Mention @nidhinikhil or tag #zestysouthindiankitchenrecipes!

Pin it for later


Eggs

Pao de queijo (Brazilian Cheese bread)

May 28, 2014 · 29 Comments

Delicious Pao de queijo (Brazilian Cheese bread) chewy snacks goes well with coffee. Gluten free made with Asiago cheese and tapioca starch.

How was your Memorial Day weekend, as national weather center predicted it was a total wash out? It was raining throughout the day until today afternoon. Still it is cloudy, and there will be more rain tonight. It was scary Monday evening as there was warning for a possible tornado touch down near our area, luckily there was no tornado. We even got an experience to sheltering inside the closet of our home. I know about hurricane with Hurricane Ike, which never wants to remember it was really scary one. After that warning was lifted at 6.45 PM, I made some pao de queijo (Brazilian cheese bread) for our evening tea.


For this month, the Daring Baker’s challenge hosted by Renata of Testado provado & aprovado was to make Pao de queijo ( Brazilian cheese bread). I was planning to make that for long time, even bought cheese and other ingredients, but never got around to making it. Finally I donned my apron and made it. It is delicious chewy, cheesy delight which I like as bite sizes. Usually it is served along with good Brazilian coffee. Marriage between the cheese and coffee creates wonders. In my house evening always starts with tea so I served with tea. These are one of the gems of Brazilian cuisine which everybody enjoys whether it is from a street vendor, or made from supermarket frozen dough or made from scratch.


Usually Pao de queijo is made with sour tapioca starch. I tried to search them in my grocery store Fiesta, where I couldn’t find them, so tried with tapioca starch (Yuca harina). The authentic recipe calls for “Queijo Minas Curado” which is typical from Minas Gerais. I couldn’t find that here, so used Asiago cheese and parmesan cheese to make this cheese buns. I followed the recipe that Renata given, only change I made is that I used only half the recipe. You can use your favorite cheese to make this delicious treat, but make sure to use a firm cheese.
These pao de queijo is delicious when they come out the oven, you can even freeze them, but make sure to reheat before serving.

First you need to heat milk and butter 

Then add sifted  tapioca starch into a large bowl. Pour the boiled (hot) mixture over the tapioca and start stirring with a fork

Then add grated cheese 

and egg

Make it into a smooth dough 

Make a small balls out of the dough like this 

Bake it in a pre-heated oven at 400F  for 25 minutes 


After baking

Print Recipe
5 from 2 votes

Pao de queijo (Brazilian Cheese bread)

Delicious Pao de queijo (Brazilian Cheese bread) chewy snacks goes well with coffee.
Prep Time15 minutes mins
Cook Time25 minutes mins
Total Time40 minutes mins
Course: Appetizer
Cuisine: Brazil
Keyword: Appetizers, Cheese bread
Servings: 21 pieces
Calories: 85kcal
Author: Swathi (Ambujom Saraswathy)

Ingredients

  • 250 gm 2 cups tapioca starch (If you have access to sour tapioca, you can use 250gm (2 cups) of each)
  • ½ cup 125ml whole milk
  • 1 ½ tablespoons 20 gm butter
  • ½ teaspoon 1.5 gm salt (or to taste depending on how salty your cheese is)
  • 1 ¼ cup Asiago cheese coarsely grated
  • ¼ cup grated Parmesan cheese
  • 2 large eggs

Instructions

  • Heat milk, butter, and salt in a small sauce pan until it comes to a boil. Watch closely as it may boil over. Remove from heat and set aside.
  • Sift tapioca starch into a large bowl.
  • Pour the boiled (hot) mixture over the tapioca and start stirring with a fork.
  • The milk mixture will not be enough to form dough yet. You will have a lumpy mixture, that's what it is supposed to be.Keep stirring with the fork, breaking down the lumps as much as you can, until the mixture cools down to warm.
  • At this point, preheat your oven to moderately hot 400° F/200° C/gs mark 6
  • Add the grated cheese to the tapioca mixture and mix well, now using your hands.
  • Add one egg at a time; mix with your hands until dough comes together. lightly beat the egg with a fork and add little bits until the dough comes together into soft but pliable dough.
  • You only have to knead it a bit, not as much as you knead yeasted bread. It's OK if it is slightly sticky.
  • Form balls with the dough and place them on a baking sheet lined with parchment paper or silicon mat or lightly greased with vegetable oil. If necessary, you can oil your hands to make shaping easier.
  • The size of the balls may vary from small bite-sized balls to the size of ping pong balls. They will puff up quite a bit after baking. I personally prefer the smaller ones.
  • Bake it for about 25 minutes or until they just start to brown on the bottom. You may have golden spots of cheese on the crust. Don't over-bake as they will get hard and bitter.

Notes

If your dough gets too soft and sticky to shape balls, you can always add a bit more tapioca starch or pop the dough into a piping bag and pipe the dough on a baking sheet.
 

Nutrition

Calories: 85kcal | Carbohydrates: 11g | Protein: 3g | Fat: 3g | Saturated Fat: 2g | Polyunsaturated Fat: 1g | Monounsaturated Fat: 1g | Trans Fat: 1g | Cholesterol: 23mg | Sodium: 185mg | Potassium: 23mg | Sugar: 1g | Vitamin A: 114IU | Calcium: 93mg | Iron: 1mg
Tried this recipe?Mention @nidhinikhil or tag #zestysouthindiankitchenrecipes!

pin it for later 

Bread, Featured, Snack, Snacks., Street food

Jalapenos poppers with double cheese: Baked

May 22, 2014 · 35 Comments

Delicious baked Jalapenos Poppers made with double cheese , sharp cheddar and cream cheese, spices and green onion Great appetizer for game day.<img src="Jalapenos poppers.jpg" alt="Jalapenos poppers with double cheese baked">

We love Jalapenos poppers from Jack in the Box. Yes it was one of my cravings while I was pregnant with my son. Whenever we got a chance we would buy them. However I like them making at home as I can control what is in it. Especially I love the Jalapenos popper’s with double cheese a lot.

<img src="Jalapenos poppers.jpg" alt="Jalapenos poppers with double cheese baked">
I have earlier tried jalapenos popper’s which is made with cream cheese and onion as filling. Here is the blog post on this; yes it requires new pictures as my photographic skills were at infancy at that time. Now I think I graduated to toddler’s still many more to go. I think life itself is learning phase, so there is plenty of time to learn and improve. I will do that once I make jalapenos next time. It is tasty and we liked it. However this is a new version, which has both cheddar cheese and cream cheese along with green onions. The filling itself is delicious and tasty. This version of jalapenos poppers is adapted from here. I made few changes by increasing more cheddar cheese and also using chili powder rather paprika.

<img src="Jalapenos poppers.jpg" alt="Jalapenos poppers with double cheese baked">
Indian friends, if you are wondering what is jalapenos popper’s, then Jalapeño poppers are jalapeño peppers that have been hollowed out, stuffed with a mixture of cheese, spices, and sometimes ground meat which is breaded and deep fried. But I love to bake rather than deep fry them, as it is healthier. If you want to make traditional style of baked version then try my original jalapeno poppers there I used whole peppers and if you want less spicy version try this one as it used split peppers.
So give it try next time when you find jalapenos in your super market, along with some cream cheese, cheddar cheese, green onions, egg and panko bread crumbs. You can make this in 45 minutes. Here comes the recipe.


<img src="Jalapenos poppers.jpg" alt="Jalapenos poppers with double cheese baked">


Print Recipe
No ratings yet

Jalapenos poppers with double cheese: Baked

Delicious spicy jalapenos poppers with double cheese .
Prep Time10 minutes mins
Cook Time35 minutes mins
Total Time45 minutes mins
Course: Appetizer
Cuisine: American
Keyword: Jalapeno poppers
Servings: 12 Jalapeno poppers
Calories: 54kcal

Ingredients

  • 6 jalapeño peppers sliced in half lengthwise
  • 2 oz cream cheese
  • 4 medium scallions green part only, sliced
  • 2 oz shredded sharp cheddar
  • 1 egg
  • ¼ cup water
  • ½ cup panko bread crumbs
  • ¼ teaspoon chili powder
  • ½ teaspoon garlic powder
  • ½ teaspoon salt
  • ¼ teaspoon fresh pepper
  • spray oil

Instructions

  • Preheat oven to 350°. Wearing rubber gloves, cut peppers in half lengthwise
  • and scoop out the seeds and membrane.
  • Combine cream cheese, cheddar and scallions in a medium bowl.
  • Combine panko bread crumbs, chili powder, garlic powder, salt and pepper in another bowl.
  • Fill peppers with cheese filling with a small spoon or spatula.
  • Dip peppers with cheese mixture in egg mixture( 1 egg + ¼ cup water slightly beaten)
  • Place pepper in panko mixture, using a spoon to make sure all the seasoning doesn't fall to the bottom of the bowl.
  • Spray a baking pan with oil spray. I lined my pan with nonstick aluminum foil for easier cleanup. Lightly spray the peppers with a little more oil spray.
  • Bake in the oven for about 35 minutes, until golden and cheese oozes out.
  • Remove from oven and serve immediately. Serve hot.

Notes

This recipe is adapted from here

Nutrition

Calories: 54kcal | Carbohydrates: 3g | Protein: 2g | Fat: 4g | Saturated Fat: 2g | Cholesterol: 24mg | Sodium: 167mg | Potassium: 50mg | Fiber: 1g | Sugar: 1g | Vitamin A: 258IU | Vitamin C: 9mg | Calcium: 49mg | Iron: 1mg
Tried this recipe?Mention @nidhinikhil or tag #zestysouthindiankitchenrecipes!

I am linking this delicious poppers to these linky parties. 

Snack, Snacks., Snacks. Munchies

Lemon Bars

May 15, 2014 · 23 Comments

Lemon is always a sign of summer to me. I love to add lemon juice in a breakfast dish (uppma), and to make lemonade my hubby usually makes. I had tried lemon poppy seed cake, which was a hit in my house. I am very happy to see a lemon bars and chocolate walnut bars for this month Baking Partners challenge. It was suggested by Suja of Kitchen Corner Try It. I was in search of lemon bar recipe for long time, and when I got this recipe I tried it immediately.
I reduced the recipe to ¾th, as sugar is enemy in my house. This bar is really delicious as it is tart, sweet and full with lemony flavor. It is really easy recipe; first you need to make the shortbread recipe for the crust and then make lemon custard filling. Only change I made to recipe is that I didn’t add any condensed milk to the filling, as I thought it will increase the amount of sugar.
This recipe is different from the other recipes in the net as it uses about ½ cup of lemon juice where rest I saw use only ¼ cup maximum. Also lemon zest is added in the custard filling which is missing in the rest of recipes out there. Also the shortbread crust is made with powdered sugar rather a granulated sugar.
If you are looking for a full bodied, lemony treat with bursting citrus flavor then go for it. May next time I will try orange, lime and other citrus fruit. I got a beautiful lemon bar recipe in my hand, which I am going to play with different flavor for sure. These lemon bars are excellent companion to cup of tea. Give it a try it won’t disappoint you.


Please take a look at creations of other baking partners too. If you want to bake with us next month shoot me an e-mail. We will happy that you become a part of bake along.

Print
Lemon Bars for Baking Partners challenge

Prep Time: 10 minutes

Cook Time: 43 minutes

Total Time: 53 minutes

Yield: 12 bars

Lemon Bars for Baking Partners challenge

Delicious, tart, lemony bar with full of flavor

Ingredients

    For the shortbread crust
  • 1 cup All Purpose flour
  • ½ cup Confectioner's sugar/powdered sugar
  • ⅛ teaspoon salt
  • 9 tablespoon unsalted butter cut into half inch cubes
  • For the lemon filling
  • ¾ cup Sugar
  • ½ tablespoon Lemon zest
  • 2 eggs ( I used safest choice pasteurized eggs
  • ½ cup Lemon juice ( about 4 lemons)
  • 3 tablespoon of All purpose flour
  • Powdered sugar for dusting

Instructions

    To make the crust
  1. Preheat oven to 325 degree F and position rack in the center of the oven.Butter 8inch square baking pan and set aside (you can also line pan with aluminum foil)
  2. In a kitchen aid stand mixer,mix flour,sugar and salt.Add pieces of butter till the mixture
  3. resembles coarse meal.When the mixture forms large clumps and holds together when pinched between two fingers.
  4. Scrape dough into prepared pan and pat it into an even layer.Using a fork prick the dough at one inch intervals. Bake the crust for 20-23 minutes till the edges become golden brown. Allow this to cool in the pan on a wire rack.
  5. To make Filling
  6. In a kitchen aid mixer add eggs and sugar and whisk till it is pale yellow color. Add the condensed milk, lemon juice, flour.
  7. Pour over the baked crust.
  8. Bake at 325 degree F for18-20 minutes or until just set and firm to touch. Cool in room temperature and the place in the refrigerator to chill for 1 hour before cutting into bars. To finish dust the top of each bar with powdered sugar and serve. Store lemon bars tightly warped in room temperature for two days or in the freezer for one week.

Notes

This filling recipe is adapted from The Secrets of Baking, Sherry Yard and the crust recipe from The Good Cookie by Trish Boyle Copyright ©2014 Zesty South Indian Kitchen by Swathi( Ambujom Saraswathy) All Rights Reserved

3.1
Copyright ©2013 Zesty South Indian Kitchen by Swathi( Ambujom Saraswathy) All Rights Reserved

BakingPartnersButton.jpg

Linking this delicious bar to Favorite recipes : Event hosted at My Kitchen Odyssey.

 Loading InLinkz ...

Uncategorized

Jackfruit Ice Cream

May 13, 2014 · 30 Comments

Delicious Jackfruit ice cream made with jackfruit and coconut milk and heavy cream. Easy and egg free version .

Jackfruit Ice Cream

Hope it was a wonderful mother’s day for everybody. Yes I too enjoyed mother’s day with breakfast from hubby and kisses from my two precious kids. My daughter brought a hand painting from her preschool as mother’s day gift. I do miss my mom everyday and yesterday I wished for her presence. One of my friends had told me that I can get delicious lychee and jackfruit ice cream.

So when I went to Hong Kong market last time I did look for those. I didn’t get jackfruit ice cream, but got a full ripe jackfruit from there, and with that I made this delicious Jackfruit ice cream. I loved to the core.
Jackfruit is my favorite fruit after mango and plantains. If you don’t know what jackfruit is, they are the heaviest fruit you can find in the world. You want to read more about them read from this post. In my hometown most of the houses have jackfruit trees in their backyard. One good thing is that once it starts giving fruit, it will continue until its die. I have profound weakness towards this fruit, and whenever I see them try to grab them. When it is ripe, it has an intoxicating smell that makes me nostalgic about my childhood days. Hubby asked what you are going to do with this huge fruit. I told him I will make some dishes and also make an ice cream.

While searching Google I got a few varieties of jackfruit ice cream recipes especially Pilipino version of Langka ice cream. Most of them use canned jackfruit. But when you have fresh fruit in hand; you want to use it to get a great taste. I found this recipe from here, got inspired from that to develop my own version of jackfruit coconut ice cream by altering the steps in making them.

Since I want to give it to kids, I cooked the jackfruit with ¼ cup sugar for 30 minutes in slow flame. Once they cooked well, pureed them and chilled it while I prepare the rest of mixture. I skipped adding pandan leaves as I did not have it in my hand. Also not sure whether my kids would like it or not, so did not added any pandan extract too.

Ripe Jackfruit
I know that marriage between coconut milk and jackfruit is always delicious, however about adding heavy cream I was not sure, but last week I made one more version of Jackfruit payasam or pudding. I came to know that we can add milk to the jackfruit coconut milk combo without any effect on the taste. I didn’t add any vanilla extract to get full flavor of jackfruit.

I only used puree of jackfruit to this ice cream; if you want you can also add some small pieces of jackfruit in the final stages of ice cream mixing. That way you can feel jackfruit while enjoying the ice cream. I am not a fan frozen fruit in my ice cream, so I decided to skip that step. This tropical ice cream is real treat if you are lover of jackfruit.

Jackfruit Ice Cream
Are you ready for a tropical summer, then give it try it is delicious. You can also use canned version of jackfruit which is available in most of the Asian stores. Otherwise check for Hong Kong market in your area for fresh fruit. Worth the price, Enjoy

Jackfruit Ice Cream

Here comes the recipe
.Jackfruit Ice Cream step by step

Jackfruit Ice Cream


Recipes with Jackfruits

Jackfruit Coconut Muffins
Jackfruit shortbread cookies with cardamom
Chakka appam/Steamed Jackfruit Rice Cake
Jackfurit milk shake
Chakka payasam /Jackfruit pudding
Jackfruit icecream
Jackfruit preserve
Chakka pradaman
Tender Jackfruit Stir Fry with Coconut
Plantain and jackfruit seed stir fry

Jackfruit Coconut Upside down Cake 

Print Recipe
5 from 25 votes

Jackfruit Ice Cream

Delicious jackfruit ice cream made with fresh jackfruit and coconut milk
Prep Time2 hours hrs
Cook Time30 minutes mins
Total Time2 hours hrs 45 minutes mins
Course: Dessert
Cuisine: Asian
Keyword: Ice cream recipes, Jackfruit Ice cream
Servings: 8 servings
Calories: 226kcal

Ingredients

  • 1 cup / 250g Jackfruit
  • ½ cup /100g sugar
  • 1 cup / 232g Heavy cream/whipping cream
  • 1 cup /226g coconut milk I used canned one, if you are using fresh use first press one

Instructions

  • Cook jackfruit with ¼ cup sugar in a medium sauce pot for 30 minutes at low flame.
  • Once it is cool enough to handle make puree with cooked jackfruit. And set aside in refrigerator for chill while you prepare rest of mixture.
  • In bowl add heavy cream, coconut milk and rest of sugar and mix everything well. To this add jackfruit puree and a chill the mixture for about at least 2 hours or overnight. I gave overnight chilling.
  • Next morning make ice cream according to manufactures instructions.

If you don't have ice cream machine: try this method.

  • First freeze a baking dish while you are preparing the ice cream mixture. Pour mixture into frozen baking dish, freeze for 45 minutes. Take it out, break up frozen bits with whisk or spatula. Repeat this process at 30 minute intervals until it’s nearly impossible to break apart anymore. Scoop into Tupperware containers and place in freezer until ready to serve.
  • Enjoy Jackfruit ice cream.

Nutrition

Calories: 226kcal | Carbohydrates: 19g | Protein: 2g | Fat: 17g | Saturated Fat: 12g | Cholesterol: 41mg | Sodium: 16mg | Potassium: 177mg | Fiber: 1g | Sugar: 16g | Vitamin A: 460IU | Vitamin C: 3mg | Calcium: 29mg | Iron: 1mg
Tried this recipe?Mention @nidhinikhil or tag #zestysouthindiankitchenrecipes!

Featured, Ice cream

Multigrain Spelt and Rye Bread

May 10, 2014 · 12 Comments

Delicious Multigrain Spelt and Rye Bread made with spelt flour and rye flour and bulgar wheat soaker. Nutty , tangy sourdough goes well with soup.

Multigrain Spelt and Rye Bread

I am in crazy love with sourdough loafs lately. Normally I make them about monthly one now it become twice weak. Because rye bread gets warm in my house next whole wheat, if you want to bring out best flavor out the rye then you need to use sourdough. Yes that is secret. So I made this multigrain spelt and rye bread.
Actually recipe from which I adapted used rye flakes as soaker. That is not in my hand, so decide to use bulgur wheat as my soaker. If you don’t know about bulgur wheat is broken wheat made from parboiled wheat berries. Which is different from cracked wheat (daila) as it broken raw wheat berries and has longer cooking time compared bulgur wheat. As temperature is getting warm, my kitchen is also getting warm, so rye starter is so happy to work. I have both 100% rye sourdough starter as well as 50% rye starter with whole wheat and rye. I use my 100% rye starter nowadays more as they are really sturdy when working with rye or spelt flour.

Multigrain Spelt and Rye Bread
Spelt is a grassy grain like wheat, rye, and oats etc. Spelt even though it is ancient grain, has a tougher hull that must be removed. For this reason, it is more expensive and less commonly available. While baking bread gluten is important. Gluten is a complex protein, made from the union of two simpler proteins: Gliaden and glutenin. Each of these has its own properties. Gliaden gives dough extensibility, or its stretchiness. Glutenin lends elasticity, or the tendency to spring back into place, and help dough to hold its shape. Our common wheat has a perfect balance of glutenin and gliaden, hence the reason most breads are made from wheat. Spelt gluten tends to be more extensible( Giladen )and less elastic than gluten (glutenin) from modern wheat, resulting in the typical, weaker spelt dough. As result you get more flat loaf than a whole wheat loaf. If you using 100% spelt flour make sure give a long slow fermentation that will help to form loaf better shape. Spelt is not advisable to person who has celiac disease or even strong wheat allergy, as it is more or similar characteristics as wheat.
If you using spelt flour in your dough make sure to do only first mixing with kitchen aid stand mixer no kneading is necessary as it has weaker gluten. Only stretch and fold in enough, but make sure to give some extra time to sourdough to work.


Make sure you have active fed starter in your hand. I usually feed them in the night before going to bed. Next day I will prepare the leavin by mixing rye flour, water and starter. Also make soaker with bulgur wheat and water and set aside in room temperature for about 12 hours. Next morning I made the main dough with leavin and soaker, salt and bread flour. It took about 5 hours to t the bulk fermentation (first rise) and then shape and proofs it for another hour before baking in a preheated oven at 450F with steam. Dough is slightly flatter than other bread loaf.


It is really delicious loaf I love the taste.

Print Recipe
5 from 1 vote

Multigrain Spelt and Rye Bread

Delicious tangy nutty sourdough bread with spelt and rye flour.
Prep Time20 hours hrs
Cook Time36 minutes mins
Total Time20 hours hrs 36 minutes mins
Course: Main Course
Cuisine: American
Keyword: Multigrain spelt and sourdough bread, sourdough bread
Servings: 12 servings
Calories: 159kcal

Ingredients

Levain

  • 16 g /1 tablespoon rye starter (100% hydration
  • 100 g water
  • 113 g / 1.1cup rye flour 113g
  • Mix and rise at room temp for 12 hours.

Soaker

  • 65 g / ⅓ cup bulgur wheat
  • 130 g/ ⅔ cup boiling water 130g
  • Mix and soak with cover for 12 hours

Dough

  • 227 g/ 1.8 cup bread flour
  • 113 g/ ¾ cup spelt flour
  • 170 g/ ½+⅓ cup water
  • 8 g/ 1 ¼ teaspoon salt
  • levain all
  • soaker all

Instructions

Day before baking

  • make levain by mixing rye flour, water and rye starter, it will be thick dough. Set aside for 12 hours at room temperature.
  • Make soaker by soaking the bulgur wheat in boiling water and set aside for 12 hours at room temperature.

On the day of baking

  • Mix everything together, autolyse for 20 to 30min. Then mix everything at medium speed for 3-4 min until gluten starts to develop.
  • Set aside for bulk rise at room temp (~75F) for about 5hrs. Shape and fold the dough at every at 30, 60, 90, 120min and then at 1 hour interval.
  • Shape, put in baskets smooth side down, proof for about 1 hour at room temperature , when you are half way through proofing, preheat oven to 450F. When you are ready to bake, score the bread.
  • Bake at 450F for 15 min with steam, then reduce temperature to 430F and bake for another 35minutes. Turn off oven and leave loaf inside for 10-20min with the oven door cracked open.

Notes

This recipe is adapted from Here
 

Nutrition

Calories: 159kcal | Carbohydrates: 32g | Protein: 5g | Fat: 1g | Saturated Fat: 1g | Polyunsaturated Fat: 1g | Monounsaturated Fat: 1g | Sodium: 286mg | Potassium: 76mg | Fiber: 4g | Sugar: 1g | Vitamin A: 1IU | Calcium: 22mg | Iron: 1mg
Tried this recipe?Mention @nidhinikhil or tag #zestysouthindiankitchenrecipes!

Multigrain Spelt and Rye Bread

Bakes, Bread, Sourdough

Mango Margarita

May 5, 2014 · 19 Comments

Delicious fruity mango margarita with fresh mango juice, tequila, triple sec and lime juice


Yesterday my princess had a wonderful birthday party which she was planning for almost 3 months. I was able to pull off the cake somehow. Today is May 5th Cinco de Mayo, it is celebrated as Mexican American heritage festival. Here in Houston you have lots of Mexican Americans and as a result you will get all Latin American ingredients and also there is lot of Mexican restaurants. Since we couldn’t go out and enjoy the dinner and drink in Mexican restaurants as my kids are small and there is no body to baby sit them. As a result I make margarita and other Mexican dishes at home. I learned to make margarita from one of my friend Andrea. This weekend I made mango margarita which we loved to core.


I made mango juice for my kids and mango margarita for both of us. If you have some tequila, triple sac lime and then fully ripe mango you can make this delicious drink at your home. One good thing about this recipe is that if your mango is fully ripe you don’t need any simple syrup or sweetener for this drink.


I got this wonderful idea of making this salt-chili-sugar combo for the rim of margarita glass from here. Mix a teaspoon of chili powder, a teaspoon of salt and 2 teaspoon of sugar in plate and set aside, soak the rim of the margarita glass with lime and dip it in salt chili sugar. Chili will give a nice kick while sipping the margarita.


If you like fruity drinks then give it a try; it is perfect for any day. I made mango margarita using Ataulfo mangoes which is closely related to Indian Alphonso mango. They are less fibrous and sweeter than then Tommy Atkins mango. In a blender add chopped mango, tequila, triple sac, ice and lime juice blend everything well and transfer to margarita glass.

Enjoy.
Print Recipe
5 from 2 votes

Mango Margarita

Delicious mango margarita from fresh mango without any added sugar
Prep Time5 minutes mins
Total Time5 minutes mins
Course: Drinks
Cuisine: Mexican
Keyword: Mango Margarita
Servings: 2
Calories: 365kcal

Ingredients

  • 2 ataulfo mangoes cubed very ripe *
  • 3 cups ice
  • 4 ounce of tequila
  • 2 ounce of triple sec/ orange liqueur
  • 1 lime juice
  • For rim of the glass
  • 1 teaspoon chili powder I used Kashmiri chili powder
  • 1 teaspoon salt I used Margarita salt
  • 2 teaspoon sugar

Instructions

  • In a blender add everything except chili powder, salt and sugar and blend very well.
  • Take two margarita glasses and wet the sides with lime and dip it in chili-sugar-salt mixture. Then carefully fill in the mango margarita.
  • Add a thin slice of mango/lime to the rim of margarita glass for garnish
  • Sip and enjoy

Notes

*make sure to use ripe mango if not add 2 ounce of simple syrup / agave nectar while blending the ingredients in the blender.
 

Nutrition

Calories: 365kcal | Carbohydrates: 46g | Protein: 2g | Fat: 1g | Saturated Fat: 1g | Polyunsaturated Fat: 1g | Monounsaturated Fat: 1g | Sodium: 1202mg | Potassium: 395mg | Fiber: 4g | Sugar: 42g | Vitamin A: 2544IU | Vitamin C: 80mg | Calcium: 40mg | Iron: 1mg
Tried this recipe?Mention @nidhinikhil or tag #zestysouthindiankitchenrecipes!


Drinks, Featured, Mango, Mexican

Birthday Girl

May 4, 2014 · 16 Comments

Birthday Girl

My Princess turned 5 year old today. Times flies, it is like yesterday, on a Monday afternoon that I got her in my hand. She is celebrating her 5th birthday. Birthday girl is so happy planning her birthday almost a few months.
Every birthday that she attends, she is happy to sings happy birthday song in front of everybody, thinking they all will come and sings the happy birthday song for her. Her favorite color is blue; she wants a blue cake with Hello Kitty in it trying my best to create what is wanted. She is a chatterbox now. She talks a lot about the happening in her school while coming back in the car.
One morning when I was taking her to school, she told me Nidhi is small, so mama drives the car. When Nidhi is big, Nidhi will drive blue car and baby (her brother) will sit in the front and mama will sit in back. She even lets her papa to sit in the front not me. Her role model is Daniel tiger, if he eats strawberry pancake then she wants that. If he goes to doctor and takes vaccination then she is also ready with that part.
Cute little princess love to help mama in cooking, especially kneading the bread dough. She loves to eat curry as soupa. She crazy about Hello kitty, she wants everything “Hello kitty”. She is an artist, who paints only modern art and not likes to follow any rules, no straight lines or painting within the figures. But is very good in using scissor, she even cut her hair with scissor one day around 10.30 P.M and showed me her hair work. I have to do my best to make it little better looking later. She loves her grandma, grandpa, aunts, uncles and nieces but only okay with nephew as he is only 6 month ahead of her.
She loves to pray to God both at the temple as well as in our house. If you teach her something that you have to do while praying to God, she will make sure we have to do that next time. If not mama you didn’t sing that song or mama you have to do that. When she is in naughty mood, it is a terror, she makes you crazy next moments she will comes to me and say Mama I love you. Hearing this everything whatever she done will get vanished in a second.


Thus my precious, cutie pie turned 5 today. Wishing all the happiness in the world to her and a bright future ahead, I will update my creation of her birthday cake later.


Uncategorized

Italian Easter Bread- Pane di pasqua

Apr 29, 2014 · 31 Comments

Delicious Italian Easter bread , Pane di Pasqua is brioche like rich bread with orange zest, orange juice, anise seed and colorful dyed eggs.

You will be wondering why I am posting Easter bread after Easter. It was to complete this month Daring Baker’s challenge, which was to make Easter bread, suggested by Wolf of wolf’s den. I was planning to make  Easter bread for a long time, but never got around to it. Finally I was able to make this beautiful Italian Easter bread-Pane di pasqua.

It all started because my daughter’s school also wanted two hard boiled eggs for coloring the eggs. So thought why not I make few colored eggs for my Easter bread too. I boiled 5 eggs to make hard boiled eggs for coloring; unfortunately only two were able to come out in good shape, while others started cracking while in the water. I boiled a few more eggs, to get intact shelled hard boiled eggs. I usually make hard boiled eggs by adding salt to boiling water. How do you make it?

I get good success with this method, occasionally get some cracking. Since I don’t care much about shell it is not a problem. But for coloring the eggs I need some perfect hard boiled eggs. Also my princess wants to color the eggs with her favorite color blue. I made blue, red, green, yellow and green color to make various colored eggs. I used Wilton gel food coloring to make the eggs.

First you need to make dyed eggs

Even though for the Italian Easter bread recipe I don’t need a hard boiled eggs, only they color the raw eggs and eggs gets cooked while baking. I was hesitant to use raw eggs for coloring.

Boiled eggs in the evening and put it in colored water for overnight in refrigerator and next morning I started to make the bread.

How to make Italian Easter bread, Pane di Pascua ? 

I read that traditional Sicilian Easter bread dough consists of orange zest and anise seed. I always forget to use the orange juice after zesting the orange, so this time I also added orange juice to bread dough. I can’t waste my orange as it is grown in my backyard. This bread has brioche kind of dough and rich with butter and eggs. It is really easy to make dough, just mix flour, butter, sugar, eggs, orange juice, orange zest, yeast, anise seed and milk.


Traditional Italian Easter bread is made as braids with colored eggs pushed it into dough. I made it as individual rings, like I saw here, which doesn’t require pushing it into dough. After first fermentation divide the dough into single ropes and twist them to form braids and set aside for another rise.


Once the dough is raised and ready to bake, place the colored eggs in the center and do the egg wash on the dough and sprinkle with sprinkles. Italian Easter bread is more colorful and summery than the Greek Easter bread. The later consists of red colored eggs which resemble the blood of Jesus. May be next time I will make Greek Easter bread.


Along with this I also tried Norwegian decorative Easter bread, which turned good but decoration was really bad. So my reality was far from the expectation. I will try those too as the bread is so tasty.


For the time being I am happy with Italian Easter bread, here comes the recipe.

Print Recipe
5 from 9 votes

Italian Easter Bread- Pane di pasqua

Delicious Italian Easter bread , Pane di Pasqua is brioche like rich bread with orange zest and juice , anise seed and colorful dyed eggs.
Prep Time5 hours hrs
Cook Time28 minutes mins
Total Time5 hours hrs 28 minutes mins
Course: Main Course
Cuisine: Italian
Keyword: Italian Easter Bread, Pane di pasqua
Servings: 4
Calories: 635kcal

Ingredients

  • 3 cup +1 tablespoon/355g All purpose flour
  • 3 ½ tablespoon /42g of granulated sugar
  • 1 package Rapid Rise instant yeast (about 2-¼ teaspoons)/7g
  • ½ teaspoon/3g of salt
  • ⅔ cup /178g of milk
  • 3 ½ tablespoon/ 49g of butter
  • 2 eggs beaten
  • 2 tablespoon of orange juice
  • ½ teaspoon of Anise seeds
  • Zest of one orange
  • 1 egg beaten with 1 teaspoon of water for egg wash
  • 4 dyed Easter eggs I Used hard boiled eggs, you can skip that by using raw eggs
  • sprinkles or pearl sugar

For coloring the eggs

  • 4 Hard boiled eggs
  • Red green, yellow and Blue wilton food gel coloring
  • 4 tablespoon of vinegar
  • 4 cups of boiled water

Instructions

For coloring the eggs

  • In a 4 disposable cups and fill with 1 cup of boiling water on each. Using a toothpick, dissolve Wilton Gel Food Color or Icing Color until water is your desired hue.
  • Stir until completely dissolved.
  • Add 1 tablespoon white vinegar to colored water; stir.
  • Using a spoon, add hard-cooked egg to water. Let set until egg is desired shade. ( I kept in refrigerator for overnight)
  • Remove egg from water using spoon. Let dry.

Make the dough

  • In a microwave safe bowl, warm the milk for 30 seconds. In a bowl of kitchen aid mixer, and flour, salt, sugar, yeast , orange zest, orange juice and eggs. Add the warm milk and butter. Mix well to form a smooth dough. At first it will sticky, then after kneading for 5-6 minutes it will become smooth supple dough. Place in a greased bowl, cover and let rise in a warm place until doubled, about two and half hour.( my kitchen is cold, make sure to check timing on double it may varies depending upon your kitchen temperature)
  • Punch dough down, divide into 8 pieces of about 84.37 grams each. Roll each piece to form a 1 inch thick rope about 14 inches long and, taking two pieces, twist to form a "braid", pinching the ends, and loop into a circle.
  • Place on a baking sheets lined with parchment paper or Silpats. Cover and let rise until double, about 45 minutes again. Brush the dough with beaten egg wash.
  • Put on the sprinkles or pearl sugar. In the middle of each bread ring, gently place an Easter egg, making an indentation with the egg.
  • Bake at 350 degrees until golden - about 28 minutes. Cool on rack.
  • Discard the eggs don't eat.

Notes

This recipe is inspired from here
 

Nutrition

Calories: 635kcal | Carbohydrates: 89g | Protein: 28g | Fat: 17g | Saturated Fat: 5g | Trans Fat: 1g | Cholesterol: 500mg | Sodium: 214mg | Potassium: 367mg | Fiber: 3g | Sugar: 17g | Vitamin A: 815IU | Vitamin C: 4mg | Calcium: 143mg | Iron: 6mg
Tried this recipe?Mention @nidhinikhil or tag #zestysouthindiankitchenrecipes!

Bakes, Daring Baker's challenge, Yeast, Yeast Bread, Yeasted bread

Thenga Manga Pattani Sundal,coconut mango pea salad: Diabetic Friendly Salad

Apr 25, 2014 · 19 Comments

This is one of the oldest snacks you can find at the beaches and temple festivals in Tamil Nadu. Thenga Manga pattani sundal/ Cooconut, raw mango, and yellow peas salad is a synonymous trade mark of Marina Beach, Chennai. It is usually sold by small boys who carry them in a big steel vessel and sell to beachgoers. Some does it as their livelihood; some does it as part time job when the school is closed. Marina beach is one of largest natural stretch of beach in India and second largest in world.
Thenga manga pattani sundal is actually a very filling snack, and also this subtly flavored dishes burst with lot of freshness. Every day they make it fresh and sell it in a paper cone. My contact with this sundal happened when I visited Marina beach first time with my family. I don’t exactly remember the taste as it happen several years ago. So I decided to try it at home to recreate the classic.
This sundal has green mango which give sourness, filling cooked yellow peas and fresh coconut with touch of little spices. You will be thinking why all of sudden I am craving for this delicious snack. I bought some fresh green mangoes during grocery shopping. Normally when I buy green mango, it is already partially ripe meaning it will have some sweetness, so my only option is to cut them into small pieces and eat it. But this time green mango turned out be real one with great sourness. So made this thenga manga pattani sundal as well as raw mango chammanthi. I have also seen my grandma uses raw mango to make curries, pickles etc.
One more thing, this thenga manga pattani sundal/ coconut mango yellow peas salad is excellent snack for diabetic people as it sugar free and filling. My hubby who is diabetic loved it; it is healthy and you can get all the flavors in single dish, sour, spicy with touch of sweetness from coconut. If you are looking for a calorie less snack which is rich in protein then go for it.
I soaked yellow peas for 5 hours, but you can do it overnight too. Then pressure cook for 1 whistle and seasoned with mustard, onion, red chili, ginger and curry leaves. Add some freshly grated mango and coconut you are ready to go. It is yummy, and you can enjoy it as movie snack if you watching some serious movie or just as accompany to your evening tea or coffee that is what we did.


Here comes the recipe

Print
Thenga Manga Pattani Sundal,coconut mango pea salad: Diabetic Friendly Salad

Rating: 51

Prep Time: 5 hours

Cook Time: 15 minutes

Total Time: 5 hours, 15 minutes

Yield: 2

Thenga Manga Pattani Sundal,coconut mango pea salad: Diabetic Friendly Salad

Delicious sour spicy salad with touch of coconut and spices.

Ingredients

  • 1 cup yellow peas/ vatana /pattani ( soaked,cooked)
  • ½ cup grated green mango
  • 3 tablespoon onion chopped finely
  • 1 tablespoon oil ( I use Olive oil, use your oil of choice)
  • 1 red chili halved
  • 2 green chili
  • ¼ cup grated coconut
  • ½ teaspoon mustard seeds
  • ½ inch piece ginger
  • 2 sprigs of curry leaves
  • ¾ teaspoon of salt or to taste
  • Juice half lemon

Instructions

  1. Soak vatana/ yellow peas/ pattani for 5 hours or overnight. Pressure cook for 1-2 whistle, drain it in a colander and set aside.
  2. Heat olive oil in a skillet add mustard seeds, curry leaves, red chili and when mustard seeds starts spluttering add onion and fry for 4 minutes.
  3. In the mean time coarsely grind the coconut, green chili and ginger and set aside.
  4. Once the onion is fried add cooked peas and salt, to this add ground coconut mixture. Then add grated green mango and finally lemon juice. Mix everything well and enjoy
  5. Healthy protein rich salad ready .

Notes

Copyright ©2014 Zesty South Indian Kitchen by Swathi( Ambujom Saraswathy) All Rights Reserved

3.1
Copyright ©2013 Zesty South Indian Kitchen by Swathi( Ambujom Saraswathy) All Rights Reserved

Pin it for later

Appetizer, Diabetic Friendly, Mango, Salad

Banana Pecan Cream cheese Bread

Apr 22, 2014 · 25 Comments

Delicious moist banana bread with tangy cream cheese and toasted pecans. Great breakfast bread of its own.

This weekend was a 3 day holiday weekend due to Good Friday and Easter Sunday and as the weather was great we had 3 days of fun. On Friday and Saturday we did shopping and also went to attend a Taiwanese festival, and Sunday as usual was cleaning and grocery day. How was your weekend? This weekend I also made this delicious Banana Pecan Cream Cheese bread with some ripe bananas and cream cheese.
At first I was planning to make carrot cupcakes, but my bananas were very ripe, and as usual hubby requested banana bread so I skipped the idea of carrot cakes with cream cheese frosting and made this banana bread.

Banana bread gets the warmest welcome than any other quick bread. Hubby loves to have them for his breakfast and the kids also enjoy eating them. So I am free to make banana bread at any time.
I tried banana bread with sour cream earlier which we liked a lot, so got the courage to try with cream cheese in banana bread.

Only difference I found is that baking with cream cheese is that it requires more time than the regular banana bread without any add on.

Normally banana bread will be ready in 60 minutes; this one took about 75 minutes to get completely cooked.

Banana is awesome fruit which can mingle with anything. Tangy cream cheese makes it moister and heavier.
Normally I make banana bread with whisk and spoon for this I used Kitchen Aid stand mixer, first added cream cheese, butter and sugar, then added egg and vanilla extract and then add flour mixture. And finally fold in mashed banana and chopped pecans (if you want you can roast them also) .Then bake it in a preheated oven of 350 °F for 75 minutes or until tooth picks comes out from the center. Check them after 60 minutes as every oven differs in temperature.
This is one of the moist and soft delicious banana bread and it is hard to stop with single slice. If you like banana bread, you will love them. I have few banana bread recipes in blog, but this one stands in my new favorite banana bread recipe.
Give it try you are going to love this one for sure.

Looking for banana bread recipes here  you can find variety of  banana bread recipes. After school banana bread ,

No sugar banana bread

Double chocolate banana bread

Banana orange walnut bread

Candied ginger cranberry banana bread

Olive oil chocolate chips banana bread

Banana sour cream Pecan Cranberry bread

Plantain cashew bread

Coconut banana walnut bread

Print Recipe
5 from 2 votes

Banana Pecan Cream cheese Bread

Delicious moist banana bread with tangy cream cheese and toasted pecans. Great breakfast bread of its own.
Prep Time10 minutes mins
Cook Time1 hour hr 15 minutes mins
Total Time1 hour hr 25 minutes mins
Course: Breakfast, Brunch, Dessert
Cuisine: American
Keyword: Banana bread, Banana Peacan Cream cheese bread
Servings: 12 servings
Calories: 264kcal
Author: Swathi (Ambujom Saraswathy)

Ingredients

  • ¼ cup ½ stick unsalted butter, at room temperature
  • 1 cups sugar
  • 2 large eggs at room temperature
  • 1 teaspoon vanilla
  • 2 cups flour
  • ½ teaspoon baking soda
  • ½ teaspoon baking powder
  • 8 oz cream cheese I used Philadelphia original
  • ¼ teaspoon salt
  • 1 cups about 4 using medium bananas very ripe bananas, peeled, sliced and mashed
  • 1 heaping cup chopped pecans
  • ½ teaspoon Vanilla extract

Instructions

  • Preheat oven to 350 degrees. Prepare 9x5 inch loaf pan, grease with unsalted butter and lightly dust with flour.
  • In a large mixing bowl, of kitchen aid stand, cream butter, cream cheese and sugar till light and fluffy. Add eggs one at a time and vanilla and beat well.
  • Sift all dry ingredients and add mix with wet ingredients in two batches. Fold in mashed banana. Then finally fold in chopped pecans into the mixture.
  • Pour into greased and floured loaf pans, about ¾ full, and bake for 80 minutes or until the top is golden and a toothpick inserted comes out relatively clean. You want this bread to be moist, so don't over bake.
  • Let cool for 10 to 15 minutes, then remove from pans and allow loaves to cool completely

Nutrition

Calories: 264kcal | Carbohydrates: 37g | Protein: 4g | Fat: 11g | Saturated Fat: 7g | Polyunsaturated Fat: 1g | Monounsaturated Fat: 3g | Trans Fat: 0.2g | Cholesterol: 57mg | Sodium: 165mg | Potassium: 122mg | Fiber: 1g | Sugar: 19g | Vitamin A: 420IU | Vitamin C: 1mg | Calcium: 35mg | Iron: 1mg
Tried this recipe?Mention @nidhinikhil or tag #zestysouthindiankitchenrecipes!

Bakes, Bread, Break fast dishes

Chocolate Babka Swirl Buns for Baking Partners challenge

Apr 16, 2014 · 31 Comments

Delicious Chocolate Babka Swirl Buns light and fluffy brioche buns with chocolate filling. Bite size treats of chocolate babka you can enjoy with cup of coffee

Easter is getting nearby; I hope you have already planned a menu for Easter. I thought of making Easter bunny, and even made an attempt; however what my bunny buns turned out to be is unidentifiable. So I dropped the idea of making the Easter bunny for the time being.  But when I made this chocolate babka swirl buns, it turned out be very delicious.  I was introduced to this chocolate babka swirl buns as part of Baking Partner’s challenge. This recipe was suggested by Tamy of 3 Sides of Crazy.

What is a Babka ? 

Babka,  is a  brioche yeasted cake.  It is traditionally baked for Easter Sunday in Poland, Bulgaria, Macedonia, and Albania, and for the major holidays (Christmas, Easter, New Year, Pentecost) in Romania.

Traditionally it does not have any filling, and is glazed with a vanilla- or chocolate-flavored icing and decorated with almonds or candied fruit, sometimes with rum added. However eastern Jewish version of babka contains chocolate or cinnamon filling with streusel on the top.

Here is funny clip about babka  and Seinfeld.   In this clip Elaine and Jerry are upset about not getting a babka.  But due to my sugar scare, I am not making full size desserts nowadays.  So when Tamy made this chocolate babka swirl buns in muffin tin I was happy and skipped streusel part in the recipe.

It is easy you need to make brioche dough first then spread them into a rectangle and top with semi sweet chocolate chips. Then roll it into cylinder and cut it into small bite size pieces and place it in muffin tin and bake it.  It is delicious chocolaty buttery small treat.

This recipe is  adapted from Smitten Kitchen and Martha Stewart’s Baking Handbook.  Both my son and daughter loved these chocolate swirl buns to the core. If you are chocolate lovers like them it is really hard to finish with one you hand and will automatically goes to next one too. I can assure you of that.

Give it a try, you will like it. Please make sure to take look at other Baking Partner’s creations too. 

Ingredients for making Chocolate Babka Swirl Buns


How to make Chocolate Babka Swirl Buns?

First you need to make dough like this 

.


Once the dough is doubled in volume add filling made with chocolate chips and butter. 


Shape and slice the dough into  muffin tin like this


Print Recipe
5 from 10 votes

Chocolate babka Swirl buns for Baking Partners challenge

Delicious light and fluffy brioche buns with chocolate filling. Bite size treats of chocolate babka you can enjoy with cup of coffee
Prep Time2 hours hrs 30 minutes mins
Cook Time30 minutes mins
Total Time3 hours hrs
Course: Dessert
Cuisine: American
Keyword: Buns recipes, Chocolate Babka Swirl buns
Servings: 12 pieces
Calories: 296kcal

Ingredients

Dough

  • ½ cup 120 ml whole milk, warmed to 110 degrees
  • ¼ cup 50 grams sugar
  • 2 teaspoons instant rapid rise yeast
  • 1 large egg room temperature
  • 2 cups 250 grams all-purpose flour
  • ½ teaspoon salt
  • 3 tablespoons 45 grams unsalted butter, at room temperature

Filling

  • 8 oz. 225 grams semisweet chocolate chips
  • ¼ cup 50 grams sugar
  • ¾ teaspoon ground cinnamon
  • pinch of salt
  • 3 tablespoons 45 grams unsalted butter, room temperature

Egg Wash

  • 1 egg lightly beaten
  • 1 tablespoon heavy cream

Instructions

For the dough

  • In microwave safe bowl add butter and milk and melt it by heating high for 30 seconds.
  • In the bowl of a stand mixer fitted with the paddle attachment, combine the warm milk –butter mixture, sugar, yeast, egg, flour, and salt, and mix on low speed until sticky dough begins to form. Switch to the dough hook, and knead on low speed for 10 minutes. (The dough will be loose and sticky, don't add any more flour . It will all come together as it rises.)
  • Butter a large bowl, and place the dough inside. Cover with plastic wrap or a tea towel and let it rise until doubled, about 1 ½ to 2 hours.

Filling (Prepare while dough is rising)

  • In the bowl of a food processor add the chocolate chips sugar, cinnamon, and salt, and pulse until chocolate is fairly finely chopped and some parts powdery. Add the butter, and pulse until the mixture comes together. Set aside.

Assembly

  • Very generously butter a 12 cavity muffin tin.
  • Turn out the dough onto a lightly floured work surface, and gently deflate the dough. Let the dough rest for 5 minutes.
  • Roll the dough into a large rectangle, about 12x20-inches. Add flour if the dough is get sticking.
  • Sprinkle the filling evenly over the dough. Roll the dough into a tight log, starting from the short end and rolling to the other end. Pinch the seams. Using a serrated knife or tooth floss (the best!), cut the dough into about 1-inch segments. Place each segment into the prepared muffin tin.
  • (If you want to bake the next day, cover with plastic wrap and refrigerate the dough overnight. Bake as directed without letting the dough rise again. Otherwise the dough can also be covered and frozen at this point).
  • Cover with plastic wrap and let rise for about 30 minutes.
  • Preheat oven to 350 degrees F.
  • Whisk the egg and cream together, and brush the tops of the buns with the egg wash. and bake for about 30 minutes, until puffed and brown around the edges.
  • Let cool on a wire rack in the muffin tin. These are easier to remove from the muffin tin if completely cool. It is really hard to resist they are at prime when it is warm.

Notes

  • If you would like an ultra chocolatey bun, you can increase the filling by 50% and this would yield a bun to filling ratio similar to what is in the original babka recipe from Martha. /These buns are best eaten the day they are made, however they were still good the next day reheated for about 10-15 seconds in the microwave.

Nutrition

Calories: 296kcal | Carbohydrates: 36g | Protein: 5g | Fat: 15g | Saturated Fat: 6g | Polyunsaturated Fat: 2g | Monounsaturated Fat: 6g | Trans Fat: 1g | Cholesterol: 31mg | Sodium: 182mg | Potassium: 177mg | Fiber: 3g | Sugar: 16g | Vitamin A: 335IU | Vitamin C: 1mg | Calcium: 35mg | Iron: 2mg
Tried this recipe?Mention @nidhinikhil or tag #zestysouthindiankitchenrecipes!


BakingPartnersButton.jpg

Pin it for later

Bakes, Buns, Chocolate, Yeast Bread, Yeasted bread

Mampazha Kalan and Vishu kanji

Apr 15, 2014 · 21 Comments

Delicious Mampazha Kalan  a sweet and sour curry made with ripe mango and yogurt with touch coconut and spices. And Vishu Kanji  rice porridge made with rice, coconutmilk and  Val/ Hyacinth bean. These are traditional recipes from Kerala. 

Mampazha Kalan

Vishu kanji a delicious kanji made with rice,  coconut milk and beans. 

 Vishu kanji

If you are looking for two traditional recipes you can make for the Vishu festival then here it is Mampazha Kalan and Vishu kanji/ Ripe mango yogurt gravy and Rice porridge with coconut milk.

Since there is not much kanji lovers in my house, I have to finish it, but Kalan everybody takes part in finishing it. I always wondered what the differences are between Kalan and Pulissery as both are yogurt based curries and tastes almost similar.

Mampazha Kalan is making

Only difference I found that for Kalan is thick compared to Pulissery and Kalan is made by boiling the yogurt for long time. Pulissery is more watery and yogurt is not boiled for too long. Both can be made with vegetables and fruits.

Mampazha Kalan  seasoning

Some time I found both Kalan and Pulissery are interchangeable too. Like this recipe where yougrut is not boiling for long time still it is named as Kalan.

Mampazha Kalan
I made this Mampazha Kalan /Vishu Kalan using ripe mango and cucumber. I found the recipe in Vanitha magazine, however I didn’t have jackfruit seed as mentioned in the original recipe, so skipped it. It is really delicious; you can eat an entire bowl of rice using this Kalan. Only need side dish like a thoran to go with it.

Vishu kanji

For making Mampazha Kalan, we need to cook the mango and cucumber with turmeric and salt. Then add a ground paste coconut, cumin, green chili and peppercorns along with thick yogurt. And boil for another minutes and add seasoning that’s all.

As I mentioned earlier, I wanted to try this Vishu kanji for long time as it is one of the traditional dish of central and northern part of Kerala. This porridge/kanji  is usually served only once in year during vishu. As this However in my house there is not much kanji lovers, my hubby is like that you are making kanji don’t ask me to eat it. Kids will follow Papa. So I know that I have to cook very little. So made with ⅓ cup parboiled rice, for sake of easy cooking I used broken par boiled rice and 2 tablespoon of raw rice and ½ cup of thick coconut milk, 3 tablespoon of Rangooni val beans/puliavarakka/ mocha kottai/field beans and 2 tablespoon of grated coconut.

Vishu kanji  getting cooked

If you want you can use equal amount of rice  to make kanji  also increase the amount of puliavarkka. I read that in Ernakulum side, central part of Kerala people like to eat their vishu kanji sweet vishu kanji sweet, so their preparation is different, they use parboiled rice, raw rice, vanpayar/ small red kidney beans and jaggery along with cashews and cardamom.

Vishu kanji cooking

Were as in the Palakkad region Vishu kanji is salty. I made salty version of Vishu kanji. It delicious if you are kanji lover you will enjoy it.
Because of the addition of roasted crushed field beans and grated coconut this kanji has a great nutty taste with hint of sweetness from the coconut milk. It will great with this Mampazha Kalan and side dish or your choice.

 Vishu kanji

Other Vishu Recipes  are 

Pazha Pradhaman
Sweet Vishu Kanji
Vishukatta / Rice and coconut milk cake
Kaniyappam

Print Recipe
5 from 1 vote

Mampazha Kalan and Vishu kanji/ Ripe mango yogurt gravy and Rice porridge with coconut milk

Delicious Mamapazh kalan and vishu kanji made with fresh fruits, spices and with good dose of coconut.
Prep Time20 minutes mins
Total Time1 hour hr 20 minutes mins
Course: Main Course
Cuisine: Indian
Keyword: #curry, Rice dish
Servings: 4
Calories: 493kcal

Ingredients

Mampazha kalan /Vishu kalan/Ripe mango yogurt gravy

  • 3 no of ripe mango chopped into cubes
  • 1 cucumber chopped into cubes
  • ¾ teaspoon salt or to taste
  • ¼ teaspoon turmeric powder
  • 1 cup coconut grated
  • 7-10 peppercorns
  • 2 no Red chili
  • 1 green chili
  • ½ teaspoon cumin seeds
  • 1 cup yogurt/ curd
  • 1 tablespoon coconut oil
  • ½ teaspoon mustard seeds
  • ¼ teaspoon fenugreek seeds
  • 10 no curry leaves

Vishu kanji/Rice porridge with coconut milk

  • ⅓ cup broken boiled rice I used broken matta rice/ podiyari
  • 2 tablespoon of raw rice I used long grain rice
  • 3 tablespoon of puliavarakka/ field beans/ Rangooni val beans
  • ½ cup thick coconut milk
  • 2 tablespoon grated coconut
  • 4 cups of water

Instructions

Mampazha kalan /Vishu kalan/Ripe mango yogurt gravy

  • In a bowl add chopped mango and cucumber and 31/2 cup of water along with turmeric powder and salt and cook until vegetables and fruits are soft to touch.
  • In a blender grind coconut,1 red chili, green chili, cumin seeds and peppercorns with ½ cup of water and then add yogurt and beat one time to get uniform mixing.
  • Add this ground paste to cooked mango and cucumber and boil for 1 minute.
  • In a small skillet heat coconut oil and add mustard seeds, fenugreek seeds and red chili and curry leaves, once mustard seeds starts spluttering remove from the fire and add to cooked curry.
  • Enjoy with rice or kanji

Vishu kanji/Rice porridge with coconut milk

  • In a thick bottom pan add broken boiled rice/podiyari , raw rice and cook with 3 and ¾ cup water. While it is cooking roast the puliavarakka and crushed it into coarse powder.
  • Once the rice is half cooked add crushed puliavarakka/ filed beans and cook once again. When it become ¾th done add ¼ cup thick coconut milk and ¼ cup water, salt and cook until the rice is fully done.
  • To this add ¼ cup thick coconut milk and bring it to a rolling boil and switch off.
  • Serve with grated coconut on the top.
  • Enjoy with any spicy curry.

Notes

•If you want you can use rose matta rice not the broken boiled rice/ podiyari then cook raw rice and rose matta separately.
•You can also increase the amount of puliavarkka/field beans/Hyacinth bean/ lablab
•You can also use equal amount of both rice, then increase the amount of coconut milk also.

Nutrition

Calories: 493kcal | Carbohydrates: 57g | Protein: 9g | Fat: 28g | Saturated Fat: 23g | Polyunsaturated Fat: 1g | Monounsaturated Fat: 2g | Cholesterol: 8mg | Sodium: 531mg | Potassium: 756mg | Fiber: 9g | Sugar: 28g | Vitamin A: 1960IU | Vitamin C: 121mg | Calcium: 150mg | Iron: 3mg
Tried this recipe?Mention @nidhinikhil or tag #zestysouthindiankitchenrecipes!

Curry, Kerala dish, Kerala style

Kaniyappam/ Vishu Kaniyappam/Deep Fried Rice pancake

Apr 11, 2014 · 27 Comments

Vishu is around the corner and knocking at the door. Yes, this year’s Vishu is on April 15th. Every year I will keep Vishukani and have a small Vishu sadya.  Since it falling on a working day, hubby has to go to office. And my princess has field trip to Houston zoo on that day, she is very excited as she will get to travel in a school bus, on any other day I am dropping her and picking her up. For this Vishu I wanted to try a traditional Vishu recipe which I haven’t tried yet. After searching the internet I found this Vishu kaniyappam /kaniyappam on Malayalam language newspaper and magazine.

I had read about kaniyappam/ a type of pancake in an article. Vishu in south Kerala , Thriuvanthapuram  means seeing Vishukkani ( traditional Vishukkani is a beautiful arrangement of kanikonna and other flowers, fruits, vegetables, rice, pulses, coconut, betel leaves, areca nuts, gold jewellery, gold and silver coins, kasavu, mirror, bell metal lamps and vaalkannadi, all arranged in a bell metal vessel called uruli), symbolizing hope and promise and followed by a sumptuous lunch with various dishes and delicacies, mostly made of seasonal fruits and vegetables. Then there is a tradition that the oldest member of the family would give kaineettam to all those younger to him. Then other elders in the family would follow suit and kaineettam had to be given to everyone coming to the house that day - friends, neighbors, servants, people working in the fields and even the newspaper boy." Gold nanayams (coins) were symbolically given as kaineettam after seeing the kani. These were taken back and coins would be given as kaineettam.  In northern part of Kerala, Vishu is celebrated with lot of fun and enthusiasm along with lighting fireworks. The day also marks the beginning of the ‘Vishu Vilakku’ festival in several temples in the northern Kerala.

Kaniyappm is small fried pancake usually given to kids who visit neighbor’s house asking for kaineetam. There is also another dish called Vishukanji, a  rice porridge made with coconut milk and  butter beans . It differs in central Kerala as well as northern part of Kerala. Non-vegetarian food is avoided on Vishu, but on Moda Vishu (the day after Vishu) non-vegetarian food is mandatory. A traditional dish cooked on this day is Vishukatta, which is made by boiling raw rice in coconut milk and jeerakam. Vishukatta is eaten with jaggery or chicken curry. . However in South Kerala, from where I am vishu days are vegetarian.

I made this kaniyappam based of recipes given in a Malayala manorama news paper as well as Girhalakshmi magazine. I first soaked the raw rice in water for 3 hours and then ground it into powder. To this thickened jaggery syrup, ghee roasted coconut, ghee, fennel and sesame seeds were added and made into a pancake batter and was set aside for 1 hour.  After an hour heat oil in thick bottom pan and then pour ¼ cup batter in the center of pan. Cook the pancake both sides until the edges are crispy and center is cooked well.

Taste wise kaniyappam is a similar to neyyappam and athirasam. I made it twice, and got very tasty kaniyappam , and my kids enjoyed it. If you are looking for a traditional dish to try on this Vishu go ahead. It won’t disappoint.

Here comes the recipe

Print
Kaniyappam/ Vishu Kaniyappam/Deep Fried Rice pancake

Rating: 51

Prep Time: 2 hours

Cook Time: 40 minutes

Total Time: 2 hours, 40 minutes

Yield: 11 no

Delicious traditional deep fried pancake served during Vishu in North Kerala

Ingredients

  • 23/4 cup/342g freshly ground rice flour ( not roasted) ( (I got this much rice flour pounded from 1 ½ cup of raw rice)
  • 180g /6 ounce/3/4cupjaggery
  • 2 tablespoon/19g chopped coconut
  • ½ teaspoon /2g Sesame seeds
  • ⅛ teaspoon fennel seeds
  • 3no of cardamom
  • 4 cup canola oil for frying
  • ¾ cup water
  • 1 tablespoon ghee

Instructions

    Make fresh homemade rice flour
  1. Soak 1 ½ cup of raw rice in 4 cup of water for 4-5 hours, then wash and drain it in a colander and dry it in a tissue paper for 15 minutes, then powder it in a food processor or blender into a fine powder . Then swift it in swifter to remove the big particles. If needed powder the big particle one more time.
  2. Melt jaggery in ½ cup water and strain for impurities and set aside.
  3. Fry coconut in ghee until it becomes golden brown and set aside.
  4. In a bowl add rice flour, jaggery water and sesame seeds, fennel seeds , ghee fried coconut along with that ghee and rest of water to form smooth pancake like batter and set aside for 1 hour.
  5. After an hour heat oil in a thick bottom pan and add ¼cup batter it will spread it into a pancake. Once the side turns to crisp flip and cooks the other side too. It will take about 3 minutes to cook one. Remove from oil with slotted spoon and place it in kitchen towel to remove the excess oil.
  6. Continue to make kaniyappam just like this to finish the entire batter.
  7. Enjoy with tea or coffee.

Notes

Copyright ©2014 Zesty South Indian Kitchen by Swathi( Ambujom Saraswathy) All Rights Reserved

3.1
Copyright ©2013 Zesty South Indian Kitchen by Swathi( Ambujom Saraswathy) All Rights Reserved

Other vishu post are

Vishu 2010

Vishu 2011

Vishu 2012

Vishu 2013

Kerala dish, Kerala style, Vishu

Homemade fresh Pineapple Ice cream

Apr 8, 2014 · 30 Comments

Delicious homemade fresh pineapple ice cream made with just 5 ingrdients, full of flavor without addtion of any egg based custard.

Today morning it was chilly and even the kids were wearing jackets to school. But by 10 in the morning it was bright and sunny and a very beautiful day. In the afternoon when I had gone to pick my daughter from school it was very nice.

We as a family love pineapple a lot. It is fruit that is always on our kitchen table, and the last weekend, I thought why I don’t I make a  homemade fresh pineapple ice cream.


I have tasted pineapple coconut ice cream in favorite Haagen-Dazs brand, but never got a chance to try a pineapple ice cream. So I was skeptical of the outcome. I know the taste of pineapple, but in ice cream how would it taste I was not sure.

As usual hubby gave me a push to try it, I remember his motto, if you don’t try it how you can know the taste. My kids are the absolute taste testers when it comes to ice cream.

They start tasting it from the time I make the base, and while churning my daughter like to stand near the ice cream machine and try to scoop it at every 3 minutes intervals to test it whether it is correct taste.
I found lot of recipes that uses canned pineapple, however fresh pineapple contains bromelain, a natural mixture of two proteases (protein-digesting enzymes). Bromelain is quite effective at dividing proteins, read from here.

So if it is use directly as fruit puree addition to to heavy cream and half and half you will get something which is not what you intended it to do. So I cooked the pineapple with ¼ cup sugar in slow flame for 30 minutes, as a result the enzymes in pineapple got denatured  lost its effectiveness.


The once the cooked pineapple had cooled down, it was ground into a puree and mixed with heavy cream, half and half and milk. I didn’t use eggs. Then the mixture was set aside for chilling overnight. Next day I made ice cream according to manufacturer’s instructions.

It was a delicious ice-cream full of pineapple flavor. Next time I will try with eggs also to compare the taste. You can also add some toasted coconut or coconut milk instead of heavy cream to make it pinacolada flavor.

Options are endless. I didn’t add any pieces of pineapple in the ice cream as my kids won’t like it. If you want to add finely chopped pieces, do that during the end of ice cream making. Try it you will love the fullness of natural pineapple flavor in every scoop.
I am in search of ice cream with fruit, so you can expect more delicious ice creams with various fruits and fruit combo, also there is a coffee ice cream, I am planning to make it.


Here comes the recipe.

Print Recipe
5 from 2 votes

Homemade fresh Pineapple Ice cream which is smooth, creamy without any adiditon of egg

Delicious fresh pineapple ice cream bursting with flavor.
Prep Time15 minutes mins
Cook Time30 minutes mins
2 hours hrs
Total Time2 hours hrs 45 minutes mins
Course: Dessert
Cuisine: American
Keyword: homemadeicecream, Pineapple icecream
Servings: 1 .5 quart
Calories: 1956kcal
Author: Swathi (Ambujom Saraswathy)

Ingredients

  • 2 cups freshly chopped pineapple
  • ¾ cup sugar
  • 1 cup heavy cream
  • 1 cup half and half*
  • ½ cup milk
  • * if you can't find half and half: you can make 1 cup of half and half by mixing ½ cup heavy cream and ½ cup milk

Instructions

  • In medium sauce bowl cook pineapple with ¼ cup sugar in a medium flame for 30 minutes.
  • once it is cool enough to touch grind them into fine puree
  • In a bowl add heavy cream, half and half and milk and rest of sugar and mix well. Make sure to dissolve the sugar completely.
  • To this cream- half and half- milk mixture add pineapple puree and chill it overnight in refrigerator or at least 2 hours. I have given overnight.
  • Next morning make ice cream according to manufactures instructions.

If you don't have ice cream machine: try this method.

  • First freeze a baking dish while you are preparing the ice cream mixture. Pour mixture into frozen baking dish, freeze for 45 minutes. Take it out, break up frozen bits with whisk or spatula. Repeat this process at 30 minute intervals until it’s nearly impossible to break apart anymore. Scoop into Tupperware containers and place in freezer until ready to serve.

Notes

Copyright ©2014 Zesty South Indian Kitchen by Swathi( Ambujom Saraswathy) All Rights Reserved

Nutrition

Calories: 1956kcal | Carbohydrates: 216g | Protein: 18g | Fat: 120g | Saturated Fat: 74g | Cholesterol: 428mg | Sodium: 247mg | Potassium: 1014mg | Fiber: 5g | Sugar: 189g | Vitamin A: 4744IU | Vitamin C: 161mg | Calcium: 590mg | Iron: 1mg
Tried this recipe?Mention @nidhinikhil or tag #zestysouthindiankitchenrecipes!

Other ice cream  recipes in this blog are

Homemade fresh strawberry ice cream

Mango ice cream

Linking this to various linky parties.  including hearth and Soul blog hop hosted here.

Pin it for later

Dessert, Desserts, Featured, Ice cream

Ram ladoo/Gulgule/Deep fried split yellow mung beans fritters

Apr 4, 2014 · 19 Comments

Ram Ladoo a deep fried mung bean fritters served with green chutney and grated radish famous food from the streets of Delhi.

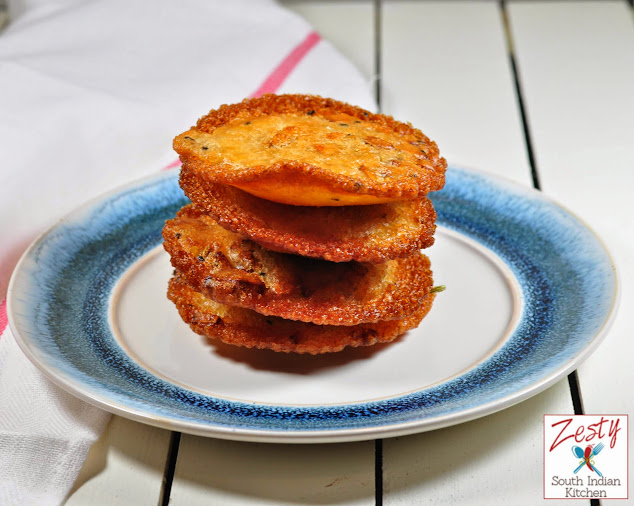
When you see the name Ram ladoo you will be thinking it is a sweet dish, no it is savory dish.

What is a Ram Ladoo?

Actually it is a famous street food of Delhi, capital of India.

These are deep fried mung beans and chana dal fritters served with green chutney and radish. I did not get a chance to taste it from the street vendor while I was in India. So I decided to recreate Ram laddu/ gulgule in my kitchen.

Trivia Behind this savory snack

Immigrants from Uttar Pradesh and Bihar sell ram laddu in street side cart in Delhi. I read that vendors carry the baskets of Ram ladoos on their head and a bamboo stand under their arm.

They set up the stall where ever they see a crowd and serve the ram ladoo in a leaf bowl, garnishing them with grated radish, deep-fried batter-coated green chilies, and a generous helping of raw mango-pudina chutney.

The ladoo itself is dry and rough, but the juicy radish knocks out its little toughness. Blandness of the ram laddu is perfectly balanced with the chutney’s biting sourness. Two serving of ram laddu will cost about Rs. 100 ($2).

I read that you get the most famous ram laddu in Lajpath Nagar area. Next time when I visit my sister, I will make sure to visit that place.

Lajpath Nagar market is also famous for Gole gappa/panipuri and shaved ice with Jamun fruit called chuski/gola and kala-khatta

I was not a fan of Radish/daikon until my recent visit to India. May it was the smell of raw radish that was bothered me; however after tasting moolie ka paratha/ Radish stuffed flat bread from our cook in Mumbai, I started liking them.

That is also the reason I tried to make this ram laddu. I tried twice; both times it was hit with my family.

Since I couldn’t find raw mango here, I used my green chutney made with mint and coriander for this recipe. It is really a simple dish without any fancy items.

Instructions to make Ram Ladoo

First you need to soak moong dal/ mung beans and chana dal/ spilt chickpeas separately for few hours.

Then grind them separately and mix it together and add a little baking soda, red chili powder and salt and beat them with a hand beater until you see a color change, this way we are incorporating the air into the dough.

Now mix the dough with chopped coriander, green chili and cumin seeds. Pinch out the dough in small portion and fry in hot oil until they are golden brown color.

Then make chutney of your choice. If you are looking for exact copycat of what you get from the streets of Delhi. Then try with green mango and mint chutney.

In a bowl add few ram laddo and grated radish and then top with generous serving of green chutney. Delicious, take a dig in this ladoo which I know you will love it.

Here comes the recipe.

Print Recipe
5 from 4 votes

Ram ladoo/Ram laddu/Gulgule/Deep fried split yellow mung beans fritters

Delicious  snack unique to northern part of India .
Prep Time10 minutes mins
Cook Time20 minutes mins
soaking3 hours hrs
Total Time3 hours hrs 30 minutes mins
Course: Appetizer
Cuisine: Indian
Keyword: Appetizeer, fried snack, mung bean recipes, Ram ladoo, snacks
Servings: 4
Calories: 185kcal
Author: Swathi (Ambujom Saraswathy)

Ingredients

  • ¾ cup Moong dal/ split yellow mung beans
  • ¼ cup +2 tablespoon chana dal/ Split chick peas
  • Ginger 1 inch pieces
  • 2 green chili
  • 1 teaspoon cumin seeds
  • pinch of baking soda
  • 1 teaspoon of salt or to taste
  • ½ teaspoon chili powder
  • 1 tablespoon chopped coriander leaves
  • Green chutney ( Recipe from Pani puri post )
  • Radish topping
  • ½ cup grated radish/ Daikon
  • ½ lemon juice
  • 1 tablespoon coriander leaves
  • ¼ teaspoon black salt

Instructions

  • Soak Moong dal and chana dal separately for 3 hours, Then grind separately into coarse paste with green chilies without adding any water.
  • In a bowl mix both dal paste with salt, baking soda,chili powder and salt and beat well with hand blender. color of paste will changed into pale white. By this we are incorporating the air into the recipe. Then add ginger pieces, coriander leaves and cumin seeds and mix once again and set aside.
  • Heat oil in a thick bottom pan, pinch out a small golf size ball of dough and add to hot oil. fry them until it become golden brown color. you need to flip few times in between.
  • Then once it is cooked well drain with slotted spoon and transfer to kitchen tissue to remove extra oil. and set aside.
  • Make green chutney of your choice.
  • Grate fresh daikon/ radish and add lemon juice, black salt and chopped coriander leaves and mix well and set aside.
  • To serve take bowl add few ram laddu and then add radish then top with green chutney. You need to dunk everything in green chutney if possible.
  • Enjoy.

Nutrition

Calories: 185kcal | Carbohydrates: 33g | Protein: 12g | Fat: 1g | Saturated Fat: 1g | Polyunsaturated Fat: 1g | Monounsaturated Fat: 1g | Sodium: 821mg | Potassium: 52mg | Fiber: 8g | Sugar: 2g | Vitamin A: 169IU | Vitamin C: 7mg | Calcium: 45mg | Iron: 2mg
Tried this recipe?Mention @nidhinikhil or tag #zestysouthindiankitchenrecipes!

Featured, Fritters, Indian dish

Homemade Strawberry Ice Cream

Apr 1, 2014 · 29 Comments

I am happy that the cold days of the winter are behind us and we can finally enjoy the beautiful days of spring. Here sunny days are coming up and I enjoy the slight breeze touching the hair like giving a warm hug. Fresh, juicy strawberries and blueberries are also getting to be available in the stores. However blueberries are still expensive; but my princess does not care about the price and wants it all the time.  I was planning to make a homemade strawberry ice cream for a long time, but was not sure, whether I want to go eggless or with egg based custard.

I checked with my friend Suja of Kitchencornertryit, and she told me she made strawberry ice cream without egg. So I decided to give it try. I check lots of recipes on internet and learned lot of tips which came in real handy.  Since strawberry has its natural moisture content ( around 92%) , first wash the strawberry and dry them for 30 minutes in a kitchen towel. Next chop them into pieces and add little sugar and lemon juice and let it set aside for 2 hours to get macerated well. Then puree them in a blender, if you want you can keep little bites of macerated strawberries aside which you can put it into ice cream during your final churning. My kids don’t like frozen strawberries,  as it become hard while freezing.They always throw them out when we buy strawberry ice cream from store, so I skipped adding them. I added only puree to make this ice cream, I got a bright pink color to ice cream without adding any food color to it, so I am very happy about that.

If you want creamy rich strawberry ice cream uses heavy cream and half and half rather than milk. I added vanilla bean; it gave a nice balance to strawberry flavor without overpowering it. First boil half and half with vanilla bean paste and bean with sugar. Then once it cools down add heavy cream and strawberry puree. Mix everything well and set aside for overnight in refrigerator and next morning make ice cream with your ice cream maker’s instructions. If you can’t get hold of vanilla bean, add little vanilla extract to ice cream mixture.
Even if you are custard based ice cream lover you will love it. Delicious, my kids love to core. I think I never buy strawberry ice cream from the store any more.

Print
Homemade Strawberry Ice Cream

Rating: 51

Prep Time: 2 hours, 35 minutes

Cook Time:

Total Time: 2 hours, 40 minutes

Yield: 1 .5 quart

Homemade Strawberry Ice Cream

Ingredients

  • 21/2 cups / 340g strawberries hulled, washed and chopped
  • 3/14 cup/ 150g sugar
  • 1 1emon
  • 1 cup heavy cream
  • 1 cup half and half *
  • 1 vanilla bean*
  • * if you can't find half and half: you can make 1 cup of half and half by mixing ½ cup heavy cream and ½ cup milk
  • * if you can't find vanilla bean substitute with ½ teaspoon of vanilla extract add during final mixing .

Instructions

  1. First wash and hull the strawberries and let it dry in kitchen towel for 30 minutes.
  2. In a bowl add chopped strawberries, ¼ cup sugar and 1 lemon juice and set aside for 2 hours to get them fully macerated.
  3. Once it macerated blend them into puree and set aside.
  4. In a medium bowl heat half and half with vanilla bean paste and vanilla bean until it starts to boil.
  5. Switch off and set aside for cooling. To this add heavy cream and strawberry puree and mix everything and chill the mixture for about at least 2 hours or overnight. I gave overnight chilling
  6. Next morning remove the vanilla bean from the mixture( wash and dry and use it in your sugar bottle you will get vanilla sugar) .Make ice cream according to manufactures instructions.
  7. If you don't have ice cream machine: try this method.
  8. First freeze a baking dish while you are preparing the ice cream mixture. Pour mixture into frozen baking dish, freeze for 45 minutes. Take it out, break up frozen bits with whisk or spatula. Repeat this process at 30 minute intervals until it’s nearly impossible to break apart anymore. Scoop into Tupperware containers and place in freezer until ready to serve.
  9. Enjoy rosy ice cream.

Notes

Copyright ©2014 Zesty South Indian Kitchen by Swathi( Ambujom Saraswathy) All Rights Reserved

3.1
Copyright ©2013 Zesty South Indian Kitchen by Swathi( Ambujom Saraswathy) All Rights Reserved

Pin it for later

Desserts, Featured, Ice cream

Cheese stuffed dinner rolls / buns

Mar 28, 2014 · 22 Comments

Delicious  cheese stuffed dinner rolls/ buns  made with 30 % white whole wheat flour and stuffed with mozzarella cheese

Last Monday when I was checking my refrigerator I found some mozzarella cheese in my refrigerator. I bought mozzarella cheese with lasagna in mind, however it did not happen and cheese was staring at me every time I opened the refrigerator.  My dilemma of what to do with the cheese ended in a cheese stuffed dinner rolls with 30% white whole wheat.

How to make Cheese stuffed Dinner rolls ? 

I have taken inspiration for this cheese stuffed diner rolls from here. I think in order to make this dinner rolls/buns any melting cheese like mozzarella, cheddar, Provolone etc can be used. Do you know there different varieties of melting cheese, Stretchy and stringy melters   like Mozzarella(aged and fresh) , Queso Oaxaca , Scamorza ,Provolone ,String cheese  and Fresh cheddar cheese curds . They stay pretty much where we put them, without running all over the place, and they can form extremely long strings when pulled.  

Or if you want smooth flowing melters  then use Asiago ,Cheddar , Emmentaler,Fontina ,Gruyère ,Havarti,Monterey Jack .Muenster,Gouda , Blue cheeses(they melt around the mold) and Soft-ripened cheeses like Brie and Camembert (the rind will not melt).  O

ur Indian paneer, Halloumi,  Mexican queso fresco and cottage cheese, ricotta, fresh goat cheese and feta are  belong to non melters means they won’t melt due to their high  whey protein content. 

The favorite Parmigiano-Reggiano  belongs to non-melters as it requires some moisture to melt; if you add milk then you can melt them otherwise it remains as such. So it will be good a topping. If you want read more about cheese and its melting behavior read from here.

First I made dough using all- purpose flour, white whole wheat flour, milk powder, potato flour, yeast, garlic powder, sugar and salt. I also used melted butter and canola as fat. Once dough was made, I allowed it to rest for about 90 minutes for first fermentation, as it was a cold day in Houston, you can adjust  the time depending upon how fast it work.

When added melted butter and water I checked the temp with my hand like baby milk test. However didn’t check with thermometer. Once I made the dough, when it touch it, I felt warm, so started panicking and wondered if I would killed my yeast. Then I check with thermometer and it was 89.9 ⁰F.

Then turned to Google, and found that the optimum temperature at which yeast can do the fermentation is 80-90 ⁰F. I thus calmed down and once the dough doubled in volume, I cut the cheese in 12 pieces and stick it into twelve equal parts of dough.

That was the fun part as my princess and prince joined the fun, and when I flattened each piece of dough they will put a cheese piece inside it.

I set aside the dough for second fermentation for another 45 minutes or until the dinner rolls were slightly puffy. Most of the recipe I saw in the internet had only one fermentation step.

When it is ready to bake, I brushed the dough with olive oil and sprinkled some fresh rosemary garlic parmigano-regiano cheese on the top and baked it at 375 ⁰F for 25-30 minutes or until they were golden brown color.

I used rosemary because I have bush in my backyard. If you want you can use any herbs of your choice. If you want little color to dinner rolls brush them with egg wash; I will do that next time and sprinkle with cheese on the top.

These are delicious and are at prime when you have them while they are warm. You can also reheat them in microwave for 15 seconds and enjoy them. It is unique with its hidden cheesy marvel in its belly.

Go ahead and try it with your own favorite cheese. These are delicious dinner rolls, great for any time of the day. Here comes the recipe.

Print Recipe
5 from 5 votes

Cheese stuffed dinner rolls/buns

Delicious  cheese stuffed dinner rolls/ buns  made with 30 % white whole wheat flour and stuffed with mozzarella cheese
Prep Time2 hours hrs 15 minutes mins
Cook Time30 minutes mins
Total Time2 hours hrs 45 minutes mins
Course: Main Course
Cuisine: American
Keyword: Cheese stuffed buns, dinner rolls
Servings: 12
Calories: 256kcal

Equipment

  • Baking sheet

Ingredients

For the buns

  • 2 cup /260g all purpose flour
  • 1 cup /130g white whole wheat flour
  • 2 ¼ teaspoon /7g Instant yeast
  • 3 tablespoon /12.75 of dry milk powder I used skim milk powder
  • 2 tbsp /23g potato powder
  • 2 tablespoon /30g sugar
  • 1 ½ teaspoon / 9g salt
  • 1 tsp /9g garlic powder
  • 4 tablespoon /56.5 g butter

For filling

  • 8 ounce Mozzarella cheese I used Skim Milk

For the topping

  • 2 tablespoon olive oil
  • Parmesan rosemary garlic topping 2 tablespoon of Parmesan cheese, 1 tablespoon fresh rosemary, 1 teaspoon of garlic powder

Instructions

  • Melt butter in microwave safe bowl for 30 sec.
  • In a kitchen aid stand mixer bowl all every thing including melted butter and water and with paddle attachment mix well together to form a sticky dough. Then with dough hook knead the dough for about 7 minutes to form soft pliable dough.
  • Set aside in well greased container for about 90 minutes to double in volume.
  • While the dough is doubling cut 8ounce cheese into 12 pieces and set aside.
  • Once the dough(762g) is doubled divide it into 12 equal pieces ( 63.5g) pieces.
  • Slightly flatten the dough balls and place the cheese and cover it well and make a smooth ball. set aide for doubling in baking sheet lined with parchment paper for 45 minutes. Once the dough is doubled again.
  • Brush with olive oil and add topping and bake it in a preheated oven of 375F for 25-30 minutes or until it changes golden brown color.
  • Enjoy the warm dinner rolls they are delicious with melting cheese.

Nutrition

Calories: 256kcal | Carbohydrates: 29g | Protein: 10g | Fat: 11g | Saturated Fat: 4g | Polyunsaturated Fat: 1g | Monounsaturated Fat: 5g | Trans Fat: 1g | Cholesterol: 17mg | Sodium: 177mg | Potassium: 135mg | Fiber: 2g | Sugar: 3g | Vitamin A: 352IU | Vitamin C: 2mg | Calcium: 132mg | Iron: 1mg
Tried this recipe?Mention @nidhinikhil or tag #zestysouthindiankitchenrecipes!

I am linking this delicious cheese stuffed dinner rolls to Yeast spottting.

Bakes, Featured, Yeast, Yeast Bread, Yeasted bread

Aloo Paratha, Aloo ka Paratha: Potato stuffed flat bread Guest post for MJ's Kitchen

Mar 26, 2014 · 20 Comments

When my friend MJ e-mailed me about writing a guest post for her blog MJ's Kitchen. I told her that I am in India as part of vacation and when I come back I will be happy to write one for you.  I adore her blog; she is a great chef, good teacher, and a simple person.  I made this delicious restaurant favorite aloo paratha/aloo ka paratha/ potato stuffed flat bread  for the guest post, so friends please hope over to   MJ’S blog to see the full recipe and share your thoughts.


Flat Bread, Flatbread, Indian dish

Coconut Berry Oatmeal Smoothie

Mar 25, 2014 · 16 Comments

Our breakfast is always simple and that means 3 slices of whole wheat bread and peanut butter. If hubby is around during breakfast time he will make some scrambled eggs to go with it. If I am alone I will rely on bread and peanut butter. Some time I prefer wholesome smoothies; and usually I would try and taste them as evening snacks then make it as breakfast smoothie. This evening I tried this Coconut berry Oatmeal smoothie. It is delicious.


Majority of our traditional desserts are made with coconut milk and jaggery (Indian raw brown sugar similar to Mexican pioncillo). My mom used to make coconut milk from scratch; but I have no time, so in my pantry I always keep a can of coconut milk. I usually buy the Thai Kitchen brand. If you have time you can even make coconut milk from the desiccated coconut too by adding hot water. It is a great alternative to diary free milk. Use full fat version, if you are worried about full fat use low fat version.
Nowadays blueberries in the market are so sweet, and my princess likes to eat it as such. If you have some frozen blueberries in hand you can use that one too. Likewise fresh strawberries are also available at this time of the year. Adding oatmeal or a flax seed meal for breakfast can make it healthier. Do you know a steaming bowl of fresh cooked oatmeal is the perfect way to start off your day, especially if you are trying to prevent or are currently dealing with heart disease or diabetes. Oats, oat bran, and oatmeal contain a specific type of fiber known as beta-glucan which reduces your cholesterol levels. Consuming just 1 cup of oatmeal give you 3 grams of soluble oat fiber per day (an amount found in one bowl of oatmeal) and typically lowers total cholesterol by 8-23%. Read more about oatmeal from here.
Flax seed meal is healthy and also helps to reduce heart diseases, diabetes, and cancer. However it is not good for pregnant and nursing mothers.
To make this smoothie you need to blend everything into the blender for 5 minutes. You can serve them with fresh blueberries. This smoothie is rather eatable than drink. So make sure to have a spoon handy.

Print Recipe
No ratings yet

Coconut Berry Oatmeal Smoothie

Delicious antioxidant rich coconut berry oatmeal smoothie.
Prep Time5 minutes mins
Total Time5 minutes mins
Course: Drinks
Cuisine: American
Keyword: Healthy Smoothie, Oatmeal recipes
Servings: 2 servings
Calories: 184kcal
Author: Swathi (Ambujom Saraswathy)

Ingredients

  • ½ cup fresh blueberries
  • 6 fresh strawberries
  • ½ cup thick coconut milk
  • 1 ½ cup water
  • 1 teaspoon Flax seed meal
  • ¼ cup quick oat meal
  • 2 teaspoon sugar

Instructions

  • In blender combine everything and blend well for 5 minutes. Serve with fresh blueberries . This smoothie will be thick so you need a spoon.

Nutrition

Calories: 184kcal | Carbohydrates: 17g | Protein: 3g | Fat: 13g | Saturated Fat: 11g | Sodium: 18mg | Potassium: 226mg | Fiber: 2g | Sugar: 10g | Vitamin C: 25mg | Calcium: 22mg | Iron: 2mg
Tried this recipe?Mention @nidhinikhil or tag #zestysouthindiankitchenrecipes!

I am linking this delicious smoothie to Hearth and Soul blog hop hosted here.

Pin for later

Coconut, Drinks

Karadaiyan Nombu Adai

Mar 22, 2014 · 28 Comments

Delicious karadaiyan nombu adai (Sweet and Savory Steamed Rice Cakes) as traditional sweet and savory steamed rice cakes made with rice flour and beans.

I love to stick to some tradition and custom  which my mom taught me while  growing  up and love to celebrate the festivals  and birthday on that rather than that week or month. That is me; I don’t want to judge anybody. This year  on March 14th 2020  is a religious festival called Savithri Nombu or Karadaiyan Nombu for that I made this Karadaiyan nombu adai (sweet and savory steamed rice cakes), there is sweet and salt version for this steamed flat rice cakes.

Karadaiyan Nombu or Karadayan Nonbu is a major Tamil brahmin festival   which is celebrated at the time on Meena Sankranti or Sankramana usually comes in the month of March. It is celebrated at the moment when Tamil month Maasi  ends and month Panguni starts. Karadai is the name of a unique Nivedyam prepared on this day and Nombu means Vratham or Upavasam.

Legend is that Savitri beautiful princess got her husband Satyavan who died on that day brought back from Yama, the Lord of Death on the very same day. Due to this legend Karadaiyan Nombu is also known as Savithri Vratam. Read more about  Satyavan and Savitri from here .   On Karadayan Nonbu day women worship Goddess Gowri and offer her Karadiyan Nombu Nivedyam. After Puja women tie the sacred yellow cotton thread known as Manjal Saradu or Nonbu Charadu for well-being of their husband.

Married women observe it for long lives of their husband while unmarried girls observe it to get ideal person as their husband. On this day married women and young girls wear yellow robes and pray to Hindu Goddesses for long life for their husband or to get ideal person as their husband in the future.


The fast for Karadayan Vritham is observed from sunrise on the transition day when God Surya moves from Kumbha Rashi (Aquarius)  to Meena Rashi( Pisces) . Fast breaking time for Savitri Nombu might fall any time between current day Sunrise to next day Sunrise depending on time of Meena Sankramana. I have seen amma used to wait until sometime late night or early morning to do these pooja rituals. Both I and sister will also join as we are unmarried girls. This time I was joined with my little princess, did exactly what my mom used to do it on that day.


According to legend savitri was staying in forest and making the goodies so it is really simple  and made with daily used ingredients, like rice powder, jaggery( sarakarai), coconut, karamani( black eyed peas) for sweet version. And savory version is made with rice powder, karamani, coconut, salt, green chili, mustard seeds and curry leaves asafeotida( hing) . However only sweet version is offered to god and you only serve one sweet  adai.  While praying we have to chant like this

Urukkatha vennayum Oradayum notren
Orukalum en kanavan piriyathirukkanam

which can be translated as “I offer butter and one adai, bless that me and  my husband will stay together always."

Savory version is eaten after the sweet version.

For this recipe you need to make fresh rice flour from the soaked rice, rice should soaked for 1 hour and then drained and dried for 1o minutes and then ground into powder. Sift so that you will get only very fine powder. Then fry this rice powder for 7-8 minutes until it releases aroma.  

Then add this to jaggery (raw brown sugar) , coconut, cooked black eyed peas mixture and make dough then make it into thick flat cake or disc with a hole in the center. Later it is steamed for 10 minutes or until it has shiny surface. Then it is  served with piece of butter.

For savory version, first make seasoning with mustard, urad dal,  red and green chili, curry leaves and hing( asafetodia) . Then add water and when water starts boiling add roasted rice flour, cooked black eyed peas, coconut pieces and salt. Then make dough and later flatten the dough into thick disc with hole in the center and steam it and serve it with butter.

It takes ½ day work, so make sure to prepare ahead. Here comes the recipe.

Print Recipe
5 from 4 votes

karadaiyan nombu adai(Sweet and Savory Steamed Rice Cakes)

Delicious karadaiyan nombu adai (Sweet and Savory Steamed Rice Cakes) as traditional sweet and savory steamed rice cakes made with rice flour and beans.
Prep Time1 hour hr 30 minutes mins
Cook Time30 minutes mins
Total Time3 hours hrs
Course: Dessert
Cuisine: Indian
Keyword: Indian sweets recipes, Nombu Adai
Servings: 10 sweet rice cake and 9 savory rice cake
Calories: 370kcal
Author: Swathi ( Ambujom Saraswathy)

Ingredients

For Making Rice Flour

  • 1 ½ cup Raw rice I used long grain rice

For Sweet adai/Sweet rice cake

  • 1 cup Roasted Rice flour
  • ¼ cup cooked Black eyed peas/Karamani
  • 1 cup Jaggery
  • ¼ cup Coconut chopped into small pieces
  • 2 ¼ cup water
  • 1 teaspoon Cardamom powder 3nos
  • 2 tablespoon Ghee

For Salt adai( Savory rice cake)

  • 1 cup roasted rice flour
  • ¼ cup coconut chopped in small pieces
  • ⅓ cup cooked blackeyed peas/karamani
  • 1 ½ cups water
  • ¾ teaspoon salt or to taste
  • ⅛ teaspoon Asafeotida/Hing
  • ½ teaspoon mustard seeds
  • 2 teaspoon urad dal
  • 1 sprig curry leaves
  • 1 green chili
  • 1 red chili
  • 1 inch piece of ginger chopped finely
  • 2 teaspoon oil

Instructions

First make rice flour

  • Soak the raw rice for 1 hour then wash and drain and allow to dry for 15 minutes in kitchen tissue or cloth.
  • Then grind it into fine powder, sieve well so that we get only fine powder.
  • In a non stick pan roast the rice flour for 7-8 minutes or until it release aroma. After roasting there will lot of small pieces of rice flour will be there so pulse it in a blender/grinder or food processor to make it fine again. If you were able to make straight line with rice flour, then it is roasted well.

Cooking Black eyed peas/Karamani

  • First roast ½ cup for 6-7 minutes or until it changes the color and reduce a bit.
  • Then wash and cook with 2 cup water for 30-35 minutes or until it become soft but not mushy and set aside.

For making Sweet Adai

  • Melt jaggery with ¼ cup water and strain for impurities and set aside.
  • In a thick bottomed pan add strained jaggery,2 cups of water, ¼ cup cooked black eyed peas, ¼ cup chopped coconuts pieces,and bring to boil.
  • when it starts boil add roasted flour, cardamom and mix well and reduce the flame and cook for another 3 minutes.
  • set aside for cool when it is cool enough to touch add 2 tablespoon ghee and mix everything and knead well to form a smooth dough.
  • Make balls out these sweet dough. Then place it in banana leaves and slightly press it form a 3 inch disc. with finger dipping water make a hole in the center.
  • Then steam this rice disc for 15 minutes or until it has shiny surface.
  • Serve with dollop of butter.

For savory adai

  • In a pan heat oil and add mustard seeds, urad dal, curry leaves and green and red chili mix. When mustard seeds starts spluttering add chopped ginger,cooked black eyed peas, coconut pieces and hing then add water.
  • When it starts boiling add roasted flour and mix well then reduce the flame and cook for another 3 minutes.
  • Set aside for cool when it is cool enough to touch mix everything and knead well to form a smooth dough.
  • Make balls out these sweet dough. Then place it in banana leaves and slightly press it form a 3 inch disc. with finger dipping water make a hole in the center.
  • Then steam this rice disc for 15 minutes or until it has shiny surface.

Nutrition

Calories: 370kcal | Carbohydrates: 72g | Protein: 5g | Fat: 6g | Saturated Fat: 3g | Cholesterol: 8mg | Sodium: 197mg | Potassium: 113mg | Fiber: 3g | Sugar: 21g | Vitamin A: 43IU | Vitamin C: 9mg | Calcium: 23mg | Iron: 1mg
Tried this recipe?Mention @nidhinikhil or tag #zestysouthindiankitchenrecipes!

Pin it for later 

For more steamed rice  recipes 

Ammini kozhukattai 

Beans, Desserts, Dumplings, Indian dish, Iyer cuisine, Kerala style

Vegetarian Chili: A Bowl of Comfort

Mar 19, 2014 · 27 Comments

Delicious vegan and gluten free vegetarian chili made with, 3 different beans like chickpeas, black beans and kidney beans and veggies with touch of spices

Nowadays weather become very unpredictable, one day I switch on the a/c as it is getting hot in the night and next two days switch on the heater as it become chillier. My backyard plants and trees also got fooled by this weather, my curry leaves plant started to grow new leaves and all of sudden this cold drench made it wilt again. Hope it will come back once the temperature warms up. But last evening with the cold weather, I made this vegetarian chili. It is really a bowl of comfort and turned out be delicious.

I have seen lot of chili recipes with canned beans, but I want to start everything from scratch. Including soaking the beans overnight and next morning to pressure cook them. For this recipe I used, black beans (which is grown in my backyard), chickpeas, and kidney beans.  Because of Indian roots, cooking beans is not new to me. I was a strict vegetarian while growing up but now I eat sea food and egg as a habit I developed due to my stay in Japan. During my childhood days, protein in our diet was mainly beans, milk, yogurt etc. On a daily basis our meals always have some carbohydrate and protein mix like rice and lentils/beans.  I used Emeril’s recipe  as a guideline to make this vegetarian chili.

I made few changes to the original recipe, we love corn, but don’t like to eat it in our rice or curry so skipped that. Used fresh garlic instead of garlic powder and added fresh ginger to get a zing and also used chili powder instead of paparika , used Thai green chili instead of Serrano pepper as that was the one in my hand. Also added a secret ingredient, “garam masala’’ now it is not a secret any more. This unique spice blend increase the flavor your dishes very well.

1234

First pre cook beans, then make base with onion, bell pepper, celery, tomato and spices, then add the cooked beans and Zucchini let them cook once again in slow flame for 20-30 minutes to get everything infused well. This stage you can use slow cooker if you have it in hand. Give it try.

Enjoy this delicious chili with bread of your choice I made some chapatti/Indian flat bread to go with it. Indian friends, this is not rajama masala, even though it looks like it tastes slightly different as it has veggies and some extra spice blend added to it.

Here comes the recipe.

Print Recipe
No ratings yet

Vegetarian Chili: A Bowl of Comfort

Delicious vegan and gluten free vegetarian chili made with spices, beans an veggies.
Prep Time9 hours hrs
Cook Time45 minutes mins
Total Time9 hours hrs 45 minutes mins
Course: Side Dish
Cuisine: American
Keyword: Chili
Servings: 6 Serving
Calories: 140kcal

Ingredients

  • 2 tablespoons olive oil
  • 1 ½ cups chopped red onions
  • 1 cup chopped green bell peppers
  • 3 cloves of minced garlic
  • 2 thai green chili and minced depending upon taste
  • ½ medium zucchini stem ends trimmed and cut into small dice
  • 1 cup chopped celery about 3 sticks
  • ½ tablespoons chili powder
  • ½ tablespoon ground coriander
  • ½ teaspoon of cumin powder
  • 1 teaspoon dried oregano
  • 1 teaspoon dried thyme
  • 1 inch fresh ginger
  • ¼ teaspoon turmeric
  • 1 ¼ teaspoons salt
  • 1 teaspoon garam masala
  • 4 large tomatoes peeled, seeded and chopped
  • ⅓ cup of cooked black beans or canned beans rinsed and drained
  • ⅓ cup of cooked chickpea sor canned beans rinsed and drained
  • ⅓ cup of cooked Kidney beans or canned beans rinsed and drained
  • 1 ½ cup vegetable stock or water
  • 2 tablespoon chopped fresh cilantro leaves
  • Sour cream or strained plain yogurt garnish
  • Diced avocado garnish

Instructions

  • Soak beans over night in 2 cup of water and next morning pressure cook them until 4 whistle and set aside.
  • In a large, heavy pot, heat the oil over medium-high heat. Add the onions, fry for 3 minutes then add green chili peppers, bell peppers and celery and fry for another 3 minutes. Then add ginger-garlic paste stir for about 2 minutes.
  • Then add salt, spices and tomatoes and cook until tomatoes are soft. Add the zucchini, cooked beans, and vegetable stock, stir well, and bring to a boil.
  • Reduce the heat to medium-low and simmer, stirring occasionally, for about 30 minutes.
  • Remove from the heat and stir in the cilantro. Adjust the seasoning, to taste.
  • To serve, place ¼ cup of brown rice in the bottom of each bowl. Ladle the chili into the bowls over the rice. Top each serving with a dollop of sour cream and spoonful of avocado and green onions and serve.
  • I served them with Indian flat bread / Chapathi

Notes

This recipe is adapted from here
Copyright ©2014 Zesty South Indian Kitchen by Swathi( Ambujom Saraswathy) All Rights Reserved

Nutrition

Calories: 140kcal | Carbohydrates: 20g | Protein: 5g | Fat: 6g | Saturated Fat: 1g | Sodium: 804mg | Potassium: 502mg | Fiber: 6g | Sugar: 7g | Vitamin A: 1215IU | Vitamin C: 40mg | Calcium: 55mg | Iron: 2mg
Tried this recipe?Mention @nidhinikhil or tag #zestysouthindiankitchenrecipes!

You may like this also

Vegetarian Jambalaya

Pin it for later

chili recipes

Homemade Soda Crackers

Mar 16, 2014 · 35 Comments

Delicious Homemade soda Crackers made with yeasted dough and lightly salted with rosemary garlic seasosning.

What is homemade soda crackers

A soda cracker, also known as a saltine, is a type of plain, lightly salted cracker. These crackers are made from white flour, yeast, baking soda (hence the name), and a small amount of butter or oil.

Soda crackers are known for their dry, crisp texture and are often used as a snack or accompaniment to soups, salads, and cheese. They can also be crumbled and used as a topping for casseroles or as a base for various appetizers.

I made spicy mini cream crackers earlier, that we loved it.
Crackers can be either naturally leavened with yeast, chemically leavened with baking powder or baking soda like many commercial cracker products, or totally unleavened, like matzo or Triscuits.

Usually crackers are crisp and flaky but they don’t follow that rule too. They can be buttery or lean and mean, like saltines and other variations of "water crackers."

Whole grain crackers, regardless of the leavening method, have another major factor that it has fiber. However, the recipe used here yields a very crispy cracker.
It is really easy recipe adapted from King Arthur flour web site.

How to make these Homemade Soda Crackers

You need following ingredients to make these crackers.

All-purpose flour

Vinegar

Baking Soda

Sugar

Yeast

Water

Butter

Olive oil

For seasoning

Sea salt

Rosemary garlic seasoning

Instructions to make these homemade soda crackers

First melt the butter and then in a bowl add all purpose flour, salt, sugar and butter and water to form a mixture into smooth dough.

Next morning spread the dough into thin sheet

It is really soft sticky dough and don’t ever tempt to add any more flour, the next day, spread the dough into a thin sheet, and cut it into small size. Sprinkle your favorite herbs salt and bake it for 10 minutes. You will get really crispy delicious  soda crackers.

I didn’t prick well as it should be so my soda  cracker got little puffy instead of thin. If you are trying make sure to prick three or more times and also spread very thin.

After baking them in very hot oven, switch the oven off and allow cooling the cracker to cool in the oven as the oven cools down and you will get more crispy crackers.

Print Recipe
5 from 7 votes

Homemade Soda Crackers

Delicious Homemade soda Crackers made with yeasted dough and rosemary garlic seasosning.
Prep Time15 minutes mins
Cook Time10 minutes mins
Total Time12 hours hrs 25 minutes mins
Course: Appetizer
Cuisine: American
Keyword: Cracker recipes, Soda crackers
Servings: 32 crackers
Calories: 18kcal
Author: Swathi (Ambujom Saraswathy)

Equipment

  • Pyrex bowl
  • 11x7 inch baking sheet pan

Ingredients

  • ¾ cup all purpose flour
  • ⅛ teaspoon salt
  • ⅛ teaspoon Baking soda
  • 2-3 drops vinegar
  • ½ teaspoon sugar
  • ¼ cup lukewarm water
  • 1 ¼ tsp instant yeast
  • 3 tablespoon water
  • 1 tablespoon butter
  • 1 tablespoon olive oil

For the topping

  • 1 teaspoon sea salt
  • 1 tablespoon rosemary garlic seasoning.

Instructions

  • In a microwave safe bowl add 3tablespoon of water, 1 tablespoon of butter and 1 tablespoon of olive oil and heat high at 30sec.Stir till butter is melted set aside until they are lukewarm.
  • In an separate bowl, take the dry ingredients together like flour, yeast, sugar, salt, baking soda. To this add vinegar and gently mix through. To this add butter-water-oil mixture and ¼ cup water to form soft, sticky dough
  • Transfer this dough to a greased dry vessel and cover with a cling wrap. Refrigerate overnight.
  • After an overnight resting, dough won’t double as such, but still an ‘little’ rise is okay. Next day bring this to room temperature and transfer to work space dusted with flour.
  • Press them into a rectangle of 3x5 inch. This will make your rolling process easier.
  • Roll them into a sheet of 9x10 inch. Make sure to dust the work space liberally with flour to prevent sticking.
  • Fold them through left half vertically. Repeat the same through right side, till this resembles an ‘envelope’.
  • Pre-heat the oven to 425F (200C) . Line the baking sheet with parchment paper and set aside.
  • Turn it into to 90 degree and start rolling. This folding and rolling is done, in order to get an flaky cracker.
  • Make sure to roll it into very thin sheet 10" x 18". Trim the sides to make it a perfect square.
  • Sprinkle the dough with your choice of salt — I used salt and rosemary garlic seasoning — and gently press it in with the rolling pin.
  • Using a rolling pizza wheel (easiest) or a baker's bench knife, cut the dough into 2" squares.
  • Transfer the crackers to parchment-lined baking sheets; you can put them fairly close together, as they'll shrink as they bake, rather than spread. Prick each cracker three times with a fork.
  • Bake the crackers for about 10 minutes, till they're a very light golden brown. Watch them carefully towards the end of the baking time; they can darken very quickly.
  • Turn off the oven, and open the door completely. Leave the crackers on the oven rack; they're going to cool down right in the cooling oven, in order to preserve their crispness. Keep your eye on them for the first couple of minutes; if for some reason your oven isn't cooling off quickly, and the crackers are continuing to brown, pull the rack out partway.
  • When the crackers are completely cool, remove them from the oven, and wrap airtight, to preserve their crispness.

Notes

Spread the crackers thin otherwise, they will be puff like mine. 
 

Nutrition

Calories: 18kcal | Carbohydrates: 2g | Protein: 0.3g | Fat: 1g | Saturated Fat: 0.3g | Polyunsaturated Fat: 0.1g | Monounsaturated Fat: 0.4g | Trans Fat: 0.01g | Cholesterol: 1mg | Sodium: 89mg | Potassium: 4mg | Fiber: 0.1g | Sugar: 0.1g | Vitamin A: 11IU | Calcium: 1mg | Iron: 0.1mg
Tried this recipe?Mention @nidhinikhil or tag #zestysouthindiankitchenrecipes!

Other cracker recipes in this blog are

Spicy mini cream crackers
.

 Loading InLinkz ...

Bakes, Featured

Green chocolate chip cookies for St. Patrick Day

Mar 14, 2014 · 30 Comments

Delicious green chocolate chips cookies made from scratch and with touch of green color as well as green chocolate chips

Green chocolate chip cookies

This delicious green chocolate chips cookies makes excellent St Partick Kids friendly dessert it is simple and easy to to put together.  Made from scratch with touch of green food coloring and green chocolate chips. 

My daughter is having spring break this week; and she wants to eat chocolate chips cookies. In the mean time I am looking for St. Patrick Day recipes. However not being courageous enough to make Irish soda bread, I decided to try these Green chocolate chip cookies.

I didn’t want to add any mint chips or mint extract to the cookie because if I add them my kids may not like it. Even my daughter is a fan of blue color and she wants everything in blue. Still she and her brother were happy to start eating these green cookies, as soon as it came out of the oven. I am planning to make shamrock shake also; I don’t know whether I get time. As tomorrow is one of Tamil Brahmin festival Karadaiyan nombu so I need to make special dishes for that. And Holi, festival of color also falls on March 17th so I need to make something for that too. So maybe next time I will make that.

What is St. Patrick Holiday?

If you don’t know about  St. Patrick is holiday,  it  is  celebrated annually on 17 March, the day of death of the most commonly-recognized  saint of Ireland, Saint Patrick (c. AD 385–461).Even though it is lent time, on that day restrictions are lifted and even drinking alcohol  is tradition as part of St. Patrick’s day celebration. According to Irish folklore St Patrick used 3 leaved shamrock to explain the Christian doctrine to Irish people.

Green chocolate chip cookies  in a plate with milk

How to Make Green Chocolate Chip Cookies ?

You need to add following ingredients to make chocolate chips cookies, 

Along with regular chocolate chip cookie ingredients like Flour, baking soda, salt, sugar, egg, butter.  you need to add green gel food coloring. and green colored chocolate chips along with semi sweet chocolate chips. 

If you want  you can add mint extract instead of vanilla extract. 

Green chocolate chip cookies

Points to remember while making this green chocolate chip cookies.

Try to use gel food coloing for deep color. Liquid color will not be great after baking. 

If you are using mint extract make sure to use less otherwise it can over power the taste of cookies. 

Use a combo of  green chocolate chips cookies  along with semi-sweet chocolate chips

Other Chocolate chip Cookies are
Honey Oatmeal Chocolate chip cookies
Strawberry Chocolate chip cookies
Chocolate Chunk Cookies

Here comes the recipe.

First make a dough 

Green chocolate chip cookie dough

Then shape it into 1 tablespoon balls and bake . 

shaping of green chocolate chip cookies

after baking


Print Recipe
5 from 56 votes

Green chocolate chip cookies for St. Patrick Day

Delicious green chocolate chips cookies made from scratch and with touch of green color as well as green chocolate chips
Prep Time10 minutes mins
Cook Time10 minutes mins
Total Time20 minutes mins
Course: Dessert
Cuisine: American
Keyword: cookie recipes, Green chocolate Chip Cookies
Servings: 18 medium cookies
Calories: 146kcal

Ingredients

  • 1 ½ cups all-purpose flour
  • ½ teaspoon baking soda
  • ¼ teaspoon baking powder
  • ½ cup butter softened
  • ¾ cups white sugar
  • ½ of one jumbo egg
  • ½ teaspoon vanilla extract
  • 3 drops of green gel food coloring Increase or decrease according to your preference
  • ½ cup semi sweet chocolate chips
  • ¼ cup green chocolate chips substitute with mint chocolate chips if you want

Instructions

  • Preheat oven to 375 degrees F (190 degrees C). I used non-stick cookie sheet , if you are using baking sheet line with parchment paper. In a small bowl, stir together flour, baking soda, and baking powder. Set aside.
  • In a large bowl, cream together the butter and sugar until smooth. Make sure not to incorporate too air by beating to long. Beat in egg, food coloring and vanilla. Gradually blend in the dry ingredients. Stir in chocolate chips.
  • Roll dough into balls about one inch in diameter and flatten slightly to create round discs, and place onto ungreased cookie sheets
  • Bake about 10 minutes in the preheated oven, or until golden around the edges.

Notes

This recipe is adapted from here
Copyright ©2014 Zesty South Indian Kitchen by Swathi( Ambujom Saraswathy) All Rights Reserved

Nutrition

Calories: 146kcal | Carbohydrates: 19g | Protein: 2g | Fat: 7g | Saturated Fat: 4g | Trans Fat: 1g | Cholesterol: 18mg | Sodium: 78mg | Potassium: 49mg | Fiber: 1g | Sugar: 10g | Vitamin A: 167IU | Calcium: 9mg | Iron: 1mg
Tried this recipe?Mention @nidhinikhil or tag #zestysouthindiankitchenrecipes!

Bakes, Cookies, Featured

Fresh Strawberry Cream Cheese MilkShake

Mar 11, 2014 · 21 Comments

I regularly go to Sam’s Club is to get Almond Milk, as my son is allergic to the regular milk, and the almond somewhat helps him with his allergies. He drinks only Silk’s original flavor almond milk, and it is slightly cheaper at Sam’s Club compared to Wal-Mart.  At the Sam’s Club I also saw that Fresh Strawberries have started coming to the stores. I have weakness towards fresh strawberries and this Friday I saw it was selling for 3.98 dollars for 2lb strawberries and ended up buying them. I also had some cream cheese also waiting to be used.  So I decided to use both the strawberries and cream cheese along with some vanilla ice cream to make this strawberry cream cheese shake.

Trust me it is delicious. My hubby told me to try a small amount first, and then if you like we can make more. So I reduced the amount of ice cream added to the recipe, and along with fresh strawberries, and also added some vanilla extract too. I was planning to add little lemon zest but forgot to add it. My kids loved it as it has ice cream and strawberries.  The cream cheese adds subtle tanginess hard to find out in shake. Ice cream makes its full flavored drink.

I won’t say this is healthy drink but it is delicious occasionally you can have one.  You can make it for kids birthday parties. I am planning to make this one.

Only problem I encountered with drink was while taking the photography I didn’t get the beautiful pink color from strawberries.

It is easy to make dump everything into blender including ice cream and blend well serve with fresh strawberries. If you add some whipped cream or  Reddi whipp or cool whip on the top to make it  more stylish.

Here comes the recipe.

Print
Fresh Strawberry Cream Cheese Shake

Rating: 51

Prep Time: 5 minutes

Cook Time: 5 minutes

Yield: 2 serving

Ingredients

  • 1 cup Milk ( I used 2 %)
  • 1 cup vanilla ice cream( I used homemade vanilla by Blue bell) (Increase to 2 cups if you wish)
  • 2 oz cream cheese ( I used Philadelphia original)
  • ¼ teaspoon vanilla extract
  • ¼ teaspoon lemon zest ( optional)
  • 1 cup fresh chopped strawberries

Instructions

  1. In a blender add strawberries, milk, ice cream, cream cheese, vanilla extract and lemon zest if using. Blend well for 5 minutes.
  2. Serve with fresh whipped cream or cool whip or reddi whip as you wish.

Notes

This recipe is inspired from here

Copyright ©2014 Zesty South Indian Kitchen by Swathi( Ambujom Saraswathy) All Rights Reserved

3.1
Copyright ©2013 Zesty South Indian Kitchen by Swathi( Ambujom Saraswathy) All Rights Reserved

I am linking this delicious  milkshake to Hearth and Soul blog hop hosted here.  Favorite Recipes event hosted at Ma Niche

Drinks

5 Houston Food Scene

Mar 7, 2014 · 2 Comments

Chicken barbeque , potato salad, coleslaw, and Jalapeno cheddar bread

Houston, the 4th largest city in the US, is also best known for its diverse cultures. You can experience all kinds of food here whether you are looking for Tex-Mex, Indian, Chinese, Vietnamese, Cajun or a Brazilian steak house, you will find it here. You can also get sizzling fajitas,  biriyani  or the best texas style barbeques in this city. Here is a list of my favorite places that I love to eat as well as get my favorite ingredients

Here is the list of my favorite stores and dining places in  Houston  and much more please click the link.

cheddar, Uncategorized

Whole wheat sourdough Tartine style bread

Mar 6, 2014 · 25 Comments

Whole wheat sourdough bread in Tartine bakery style. Delicious, easy and simple whole wheat sourdough with multigrain flours.

When I got the copy of Tartine Bread book from the library, I wanted to try sourdough bread in Tartine style in my home with my faithful 3 year old sourdough. They forgive me for not feeding them as I wish. I know my sourdough makes really good bread. However I want to check whether they are okay with tartine style of bread making. So tried this whole wheat sourdough tartine style bread, they are delicious even the crust mine lot little browned taste awesome.


My son who always wants me to take out the crust of the bread was fine with eating this bread with crust. My hubby told me he loves this bread and wants me to bake more often. I am going to do that. If you been to San Francisco, California you will be familiar with Tartine bakery and café. In a Google review, a reviewer said that you need to book 3 days in advance or stand in line around 5 A.M to get into the restaurant. It’s widely known for its naturally leavened bread, which takes two days to rise. Chad Robinson explained really well in the book how to make tartine style bread.
I didn’t follow his way of making leaven as I have whole wheat leaven in my hand. Also for making the bread he used 900g All-purpose flour and 100g whole wheat flour. I used 900g of white whole wheat flour and 100g of bread flour to make this delicious bread. You need to make sure you have a 200g of active leaven ready to use. I usually feed them before the day of baking.


One the day of baking in the morning I made dough with 200g of leaven, 700g of water, 900g of white whole wheat flour and 100g of bread flour. First mix everything and rest for about 25-40 minutes and then add salt 20g and water 50g to dough and mix well and set aside for fermentation 3-4 hours with every 30 minutes fold the dough . By this folding method you are actually knead the dough.


Transfer to floured surface and divide the dough and set aside for 25 -30 minutes. Make sure to fold the dough more times to increase the surface tension, as result you will get a nice round ball. Transfer each round to a floured towel-lined bowl or basket with the seam facing up. Let rise for 2-4 hours at room temperature or, for maximum flavor, overnight in refrigerator.
When you are ready to bake Place a Dutch oven in the oven and heat the oven to 500 degrees. When the oven is hot, turn the dough out of its bowl onto a floured work surface or a damp kitchen towel so that the seam is down. Use a very sharp or serrated knife to cut four intersecting ½-inch deep slashes in the dough, forming a square of cuts. Carefully place the dough into the heated Dutch oven; cover the pot with its lid and transfer it to the oven. And bake the bread at 450F for 20 minutes, then remove the lid and bake 20-25 minutes longer, until the bread is deep golden brown and an instant read thermometer inserted into the center of the loaf reads about 205 degrees. Remove the bread from the pan and cool on a wire rack for an hour before serving


It is delicious sourdough bread you are going to fell in love with it.

Print Recipe
5 from 2 votes

Whole wheat sourdough Tartine style bread

Delicious, easy and simple whole wheat sourdough tartine style bread with multigrain flours.
Prep Time1 day d
Cook Time45 minutes mins
Total Time1 day d 45 minutes mins
Course: Main Course
Cuisine: American
Keyword: Sourdough
Servings: 12 servings
Calories: 338kcal

Ingredients

  • For starter I used my sourdough
  • For the leaven
  • Add 1 tablespoon of starter
  • 200 g of water
  • 100 g of whole wheat flour
  • 100 g bread flour
  • For the Dough:
  • 750 g Water 80 degrees
  • 200 g Leaven
  • 900 g White whole wheat flour
  • 100 g Bread flour
  • 20 g salt

Instructions

  • Day before making the dough
  • Make the leaven: Discard all but 1 tablespoon of the starter. Feed the remaining starter with 200 grams of warm water, 100 grams of whole wheat flour, and 100 grams of bread flour. Let the mixture rise overnight at room temperature. When it’s ready, the leaven should have risen slightly, float in room temperature water (test a small piece; you can still use this piece in the final dough), and smell like sweet sour pancake batter.
  • On the day of baking
  • Make the Dough: Pour 700 grams warm water into a large mixing bowl. Add 200 grams leaven. Stir to disperse. (Store the rest of leaven for future use.) Add flours and mix dough with your hands until no bits of dry flour remain. Set aside for autolyse in a cool, dark place for 35 minutes. Add salt and remaining 50 grams warm water.
  • Transfer to large container so that you can fold the dough in between. Set aside for fermentation for 3-4 hours. Make sure fold the dough every 30 minutes intervals for first 2 ½ hours and then rest fold at 1 hour interval. To do a fold, dip 1 hand in water to prevent sticking. Grab the underside of the dough, stretch it out, and fold it back over itself. Rotate container one-quarter turn, and repeat. Do this 2 or 3 times for each fold. After the 3 hours, the dough should feel aerated and softer, and you will see a 20 to 30 percent increase in volume. If not, continue bulk fermentation for 30 minutes to 1 hour more. This will help to develop flavor and strength. (The rise is temperature sensitive; as a rule, warmer dough ferments faster. Robertson tries to maintain the dough at 78 degrees to 82 degrees to accomplish the bulk fermentation in 3 to 4 hours.)
  • Pull dough out of container using a dough spatula. Transfer to a floured surface. Lightly dust dough with flour, and cut into 2 pieces using dough scraper. Work each piece into a round using scraper and 1 hand. At first you will dough is slightly attached to sides as tension builds, in the end, the dough should have a taut, smooth surface.
  • Dust tops of rounds with flour, cover with a kitchen towel, and let rest on the work surface for 20 to 30 minutes. Slip the dough scraper under each to lift it, being careful to maintain the round shape. Flip rounds floured side down.
  • Line 2 medium baskets or bowls with clean kitchen towels; generously dust with flour. Using the dough scraper, transfer each round to a basket, smooth side down, with seam centered and facing up. Let rest at room temperature (75 degrees to 80 degrees), covered with towels for 2 to 4 hours before baking.
  • Half hour before you are ready to bake the bread, preheat oven to 500 degrees, with rack in lowest position, and warm a 9 ½-inch round or an 11-inch oval Dutch oven (or a heavy ovenproof pot with a tight-fitting lid).
  • Turn out 1 round into heated Dutch oven (it may stick to towel slightly). Score top twice using a razor blade or a sharp knife. Cover with lid. Return to oven, and reduce oven temperature to 450 degrees. Bake for 20 minutes.
  • Carefully remove lid (a cloud of steam will be released). Bake until crust is deep golden brown, 20 to 25 minutes more or until it register internal temperature of 205F.
  • Transfer loaf to a wire rack. It will feel light and sound hollow when tapped. Let cool.
  • To bake the second loaf, raise oven temperature to 500 degrees, wipe out Dutch oven with a dry kitchen towel, and reheat with lid for 10 minutes. Then transfer the second round and reduce the oven temperature to 450F and continue to bake as you did the first one.

Nutrition

Calories: 338kcal | Carbohydrates: 71g | Protein: 13g | Fat: 2g | Saturated Fat: 1g | Sodium: 650mg | Potassium: 129mg | Fiber: 9g | Sugar: 1g | Calcium: 57mg | Iron: 2mg
Tried this recipe?Mention @nidhinikhil or tag #zestysouthindiankitchenrecipes!

Other Sourdough Recipes in this blog  are

100% Rye bread with sourdough

Swedish Limpa with sourdough

Roasted Garlic Bread

Real Garlic Bread

Pistachio Raisin sourdough bread

French Rye Bread with Caraway seeds

I am linking this to Hearth and Soul blog hop hosted here . Tasty Tuesday and Yeast Spotting


Bakes, Bread, Sourdough

My Visit to India: A travelogue

Mar 4, 2014 · 15 Comments

 This is not a recipe post, it is travelogue of my visit to India. After 4 long years we visited India in the month of February. This was also my son’s first visit to India, and also the first time his grandparents and relatives saw him in person. My princess also came to know more about her grandma and grandpa during this visit. We started from here on 31st January and landed in Mumbai on 2nd Feb.

The first week was horrible, everybody got sick. Jet lag was horrible, waking up in 3 .00 clock in night, following US time for long time. Finally by the end of week we got back to normal routine. Every time we visit Mumbai we make sure to visit Siddhivinayak temple as well as Mahalakshmi temple. It was those two places my sister had introduced me for the first time when I visited Mumbai before marriage. Going to temple from my in-laws house is a tedious job. We stay in Kandivilli west and according to Google maps it should takes only 57 minutes to reach temple, however it took us about 2-3 hours to reach there. My husband’s friend Kishore and his wife Anita took us there in their car. I admire their friendship as they have known each other since they were toddlers and still maintaining their friendship beautifully.  Otherwise this trip to the temple wouldn’t have been very difficult with a cab. The other option would be to take a local train, and for that you need a special training and course required, people are hanging in and out of train.

mumbai-train1
Mumbai local train crowd; Image courtesy from : Mumbai dream come true

 Traffic in Mumbai is really crazy, roads are always jam packed; if you want a little free road then you should travel in night, or early morning before office time. Otherwise it is a mess. Here when somebody cut in front without putting signals I get upset. But if you are driving in Mumbai you need 3-4 eyes to watch out front, back sides everywhere, people can cut at anytime from all sides. They even going on red light, I think traffic lights in Mumbai are a joke at times. Only in a few areas they follow rule. If you think road is this way, air will be fine, you are wrong, even for airplane landing it will take few hours to get the runaway, you will  be circling around Mumbai for at least one to two hours before its gets landing.  We had very fun trip to both temples and on the way back we stopped for lunch in a vegetarian restaurant. I always get excited thinking that I am going to taste best food in world when I visit restaurants in India. Just with one dish my dream crashed into pieces. Most horrible food was served there. My princess was happy to see pizza in their menu, but when it arrived in front her, the poor girl got really upset. It was like flat bread topped with cheese. Did anybody call it a pizza? Finally my sister-in law bought pizza which looks like a pizza from a local food court in mall. She was happy and loves to eat them.

While coming back we were able to see 400 years old Haji Ali Dargah: Tomb of  Pir Haji Ali Shah Bukhari (R.A.)in a distance , this time too I was not able visit it.

Which is in my wish list long time may be next time. It is really unique as it is situated in Arabiansea; you need to visit when it is low tide, otherwise walking will be difficult. Then there is beautiful sea link : Bandra –Worli Sea link bridge, which connects Bandra in the Western Suburbs of Mumbai with Worli in South Mumbai.

Bandra –Worli Sea link bridge, Mumbai

I think the architect got inspiration from our Golden gate bridge in San Francisco. It is really beautiful ride compared to rest of Mumbai ride.

Then second week we went to Delhi to see my dad and sister’s family. We stayed there for 4 days, and were able to see Qutab Minar and India gate.

Qutab Minar

Fountain in front of India Gate: New Delhi

India Gate : New Delhi

Amar Jawan Joythi; Memorial for unknown soldier's who did ultimate sacrifice to the nation.

North Block, Secretariat Buildings

Delhi street vendor

We were not able to take pictures as much we wanted as 4 kids were running around here and there, my two and my sister’s two. I think next time when visit Delhi, we will make sure to visit lot of places including the Taj Mahal. I was able to spend some time with my dad, and he was really happy to see his grand kids, my son went to him easily where daughter was not mingling with him as he wanted. He looks fragile due to old age. I also did some shopping too while I was there. I bought some steel vessels for my prop, sister gave me two sarees and 6 Indian dresses, and kids got their gifts too from my father and sister.  Then we came to Mumbai.

Third week the last week in India, we visited The Global Vipassana Pagoda which was made with inspiration from Shwedagon Pagoda in Yangon, Myanmar.  It is a Meditation Hall near Gorai, North-west of Mumbai, India.  

The Global Vipassana Pagoda , Gorai, Mumbai

Buddha Statue at The Global Vipassana Pagoda: Gorai, Mumbai

Elephant at the Global vipassana Pagoda; Gorai, Mumbai

Sculptures at Global Vipassana Pagoda.Gorai, Mumbai

You need to take ferry from Kandivilli jetty to Gorai. It is one of the most peaceful places in Mumbai. I think we will visit again and again there. With two kids we were not able to meditation still worth the trip.

Even though we missed of lot places, we were able to stay with family and visit friends, every weekend while we are there, my sister-in-laws made awesome lunch for us. My mother-in-law who is another awesome cook made lot yummy dishes. Also I got a chance to learn, Mooli ka paratha, gobi paratha, karanji from the cook who comes to cook at our house.

We also met different version of human behavior while in India, on one trip of Auto rickshaw to local shopping center. My hubby gave him a 500 Rs note and when he gave change, he put the balance in inside his valet without checking. The auto rickshaw driver asked him why come you did not count sir? Hubby told him I believe in you? Then he told hubby that sir you have to count as five fingers in hands are not same and people can cheat. Hubby told him, if I won’t believe you then how can I travel in your cab as you are the one talking through traffic. I trust my life then why should I not trust when it comes to money. The auto rickshaw driver got so impressed an gave big Namaste (a customary greeting).

The other side of human behavior: we were standing in line at airport to check in for our flight to Delhi, one man and woman came with lot of baggage and started pushing me. I told him I am in line; he told us that he is going to miss his flight. So in spite of standing in line with luggage and kids, hubby agreed and let him move ahead. He did another fuss at checking the bag by pushing the man already standing in the counter. This happens around 8.30 A.M, our flight is going to take off at 10.45 A.M so hubby told me it is okay to let that guy go. When we boarded the flight, we saw the same man sitting 2 rows ahead of us on our flight. I was so angry that this man did all the fuss to board the same flight, and lied that he was going to miss his flight. I also find people are rude in Delhi.

Our flight back was totally miserable; at first it took 4.5 h (instead of 3 h flying time) to land in Dubai airport. Then on the flight to Houston, we were sitting in flight for 4 hours before taking off and after 17 hours of flight, here Houston immigration took another 2 hours. Finally when we reach home, it is like reaching in heaven.

Travelogue

Kulukki Sarbath/ ShakenLimeade/Lemonade

Feb 26, 2014 · 16 Comments

In my home town Thiruvnanthapuram in India, summer is very hot and people try to cool down their body heat by drinking Sweetened lime or lemon water. We call it Bonji or Narnaga vellam. Usually it is served sweetened or with little salt and pepper like my hubby like to drink. Nowadays in Kerala, this kulukki sarbath/ Iced Lime/Lemon water is the new trend. Local TV channels are doing shows every day about this kulukki sarbath. Now my connection with hometown street food is only through these shows, and it’s been a very long time since I have visited .

Even though this kulukki sarbath has its origin from Kozhikode, North Kerala, it was made famous by a street vendor called Shaji ( shajikka as the locals call him passionately) . It is really a simple drink recipe, if you have some crushed ice or ice cubes, simple syrup and lemon or lime in your hand you can make it. Everything is combined in the tall glass and is shaken in a cocktail style and served.  It got it name “kulukki” means shaken in Malayalam. He sells one glass of lemonade for 5 Rs (~10 cent), and majority of his customers are school going kids. I found out through this blog that even there is Facebook page dedicated to Kuluki  sarbath.

Nowadays not only Shaji , but lot of street vendors in Kerala are experimenting and serving the kulukki sarbath in many forms. There are several You Tube videos of these vendors, and I was exploring them yesterday. I don’t think in near future I will be visiting Kerala, so I decided to try it at home. I want to photograph the limeade so used ice cubes instead of crush ices. I felt that crush ice will melt while I am photographing.  I have only lime in hand, so made this kuluki sarbath with my lone lime. It is delicious; if you are fan of limeade or lemonade you are going to love this. I don’t know whether I duplicated the taste but it delicious.

Here comes the recipe.

Print
Kulukki sarbath/ Shaken Limeade/Lemonade

Rating: 51

Prep Time: 5 minutes

Total Time: 5 minutes

Yield: 2 serving

Ingredients

  • 1 lime/lemon
  • 2 tablespoon of sugar
  • 1 tall glass of water
  • crushed ice or ice cubes

Instructions

  1. First make simple syrup with 2 tablespoon of sugar and 2 tablespoon of water. In a tall glass add 1 tablespoon of simple syrup and then add juice of half lime and then add a cut piece of lime and water. Then add crushed ice of ice cubes and top the glass with another and shake well like a cocktail shaker.
  2. Serve with piece of lime if you wish.

Notes

This recipe is inspired from this Youtube video
Copyright ©2014 Zesty South Indian Kitchen by Swathi( Ambujom Saraswathy) All Rights Reserved

3.1
Copyright ©2013 Zesty South Indian Kitchen by Swathi( Ambujom Saraswathy) All Rights Reserved

Drinks, Kerala dish, Kerala style, Kerala.

Heart Shaped Crunchy Seed Cookies

Feb 18, 2014 · 15 Comments

Addictive heart shaped crunchy seeded cookies with 4 seeds includes white and black sesame seeds and fennel seeds and flax seeds.

I have tried only cookies with coffee beans and nuts, but never tried baking cookies with any seeds. I have grown up eating cashew cookies, as I loved a biscuit called Britannia Good day Cashew cookies.

These crunchy seed cookies in Adapted from Alice Medrich, Chewy, Gooey, Crispy, Crunchy, as usual wanted to try immediately. So I decide to make it a heart shaped crunchy seed cookies for this Baking Partner’s challenge. As I need one more recipe to try.

I got attracted to these cookies as it has black and white sesame seeds, flax seeds and fennel seeds. Fennel seeds give excellent flavor, so don’t skip that one. If you don’t like fennel seeds try to use anise seeds. My Indian spice roots favor fennel seeds or anything.

Do you know us Indian likes to eat sweetened fennel, and anise seeds after heavy meal, as it supposed to be helps in digestion and also it freshens breath? We call them Mukhwas. You can find them in Restaurants, wedding feast or even in homes.

Ingredients  

You need four seeds and  rest of ingredients to make this cookies. 

White and black sesame seeds 

flax seeds 

Fennel seeds 

Flour 

butter 

egg 

Cream of tartar 

baking soda 
Vanilla extract 

Granulated sugar for the dough and Raw sugar for topping. 

Instructions to make Heart shaped crunchy seed cookies ? 

It is really easy to make first combine seeds and raw sugar like Demerara in a bowl. Then make the cookie dough with creaming butter and sugar, and then add egg, vanilla extract and flour mixture.

Then spread the dough and cut out into heart shaped cookies 

Variations

You can replace  vanilla extract with bourbon. 

Try with bourbon or any type brandy of your choice.

If you are an eggless person skip the egg also you can make them vegan by substitute with vegan butter.


Points to remember while making this cookies?

Since it is extremely sticky dough make sure to refrigerate for 5 minutes. Then spread it into thin ⅛ inch thick sheet on a plastic wrap.

And sprinkle seeds and sugar mixtures press lightly with roller so that it will stick to the dough, flip carefully to lightly floured surface and then sprinkle the seeds and repeat the process.

And finally cut them into various shapes of your choice. I used Heart shaped cookie cutter to make this.

After baking at 375 ⁰F for 18 mins, you will get an addictive crispy cookie. I don’t know how much I ate in one sitting. Love it a lot. 

 Give it try at least one time, if you are fan of crunchy cookie lover, you will love it. This cookie has unique texture and taste with its seeds.

For more Valentine cookies recipes check here 

Red velvet white chocolate chip cookies 

Print Recipe
5 from 3 votes

Heart Shaped Crunchy Shaped Cookies

Crispy crunchy addictive 4 seeded cookies with both white and black sesame seeds and fennel seeds.
Prep Time30 minutes mins
Cook Time14 minutes mins
Total Time45 minutes mins
Course: Dessert
Cuisine: American
Keyword: Cookies recipes, Seeded cookies, Valentine Recipes
Servings: 20 cookies
Calories: 78kcal
Author: Swathi (Ambujom Saraswathy)

Ingredients

  • 1 tablespoon 6g/0.2 oz. black sesame seeds Till/ Ellu
  • 1 tablespoon 6g/0.2 oz. white sesame seeds
  • 1 tablespoon 7g/ 0.25 oz. flax seeds
  • 1 tablespoon fennel seeds saunf/5g/0.2 oz
  • 2 tablespoon of coarse raw sugar like Demara
  • 1 cup +2 tablespoon of all-purpose flour
  • ½ teaspoon cream of tartar if you don’t have substitute with ½ teaspoon of baking powder
  • ½ teaspoon baking soda
  • ⅛ teaspoon salt
  • 4 tablespoons 1 stick butter, very soft
  • ½ cup granulated sugar
  • ½ large egg skip if you don’t want
  • 1 teaspoon of Vanilla extract if you want use bourbon then it is 1 tablespoon I didn’t used it.

Instructions

  • Preheat oven to 375 degrees F. In a large shallow bowl or plate, mix seeds and coarse sugar and set aside. In a different medium bowl, combine the flour, cream of tartar, baking soda, and salt, and mix together thoroughly with a fork.
  • In a large mixing bowl, combine the butter and granulated sugar. With a large spoon or electric mixer on medium-low, mix the butter and sugar until smooth and well-blended, but not fluffy. Add the egg and bourbon/vanilla extract and mix until smooth. Add the flour mixture, half at a time, and mix by hand until completely incorporated.
  • Roll heaping teaspoons of dough into one-inch balls. Press each ball into the seed mixture on both sides (genius!), flattening the ball to a half-inch thick round. Place the cookies two whole inches apart on parchment-lined baking sheets, and bake for 14 to 16 minutes until cookies are slightly browned on the edges, rotating pans halfway through. Set the liners on racks to cool. Cookies will keep for up to two weeks in an airtight container
  • For making square cookies, line a parchment paper or plastic paper and make 8 inch square with ½ inch thick. Sprinkle with dough with half of seeds and sugar. Roll tightly over the seeds with rolling pin to press them in. Turn the dough over. Sprinkle and roll over the remaining seeds. Cut the dough into 4 equal strips in each direction to make total of 32 equal pieces. If you are using heart shaped cutter of 3 inch you will get 20 cookies.

Notes

This recipe is adapted from Chewy, Gooey, Crispy, Crunchy

Nutrition

Calories: 78kcal | Carbohydrates: 12g | Protein: 1g | Fat: 3g | Saturated Fat: 2g | Polyunsaturated Fat: 1g | Monounsaturated Fat: 1g | Trans Fat: 1g | Cholesterol: 10mg | Sodium: 64mg | Potassium: 35mg | Fiber: 1g | Sugar: 6g | Vitamin A: 77IU | Vitamin C: 1mg | Calcium: 15mg | Iron: 1mg
Tried this recipe?Mention @nidhinikhil or tag #zestysouthindiankitchenrecipes!

');

Cookies, Cookies, Featured

Linzer Cookies

Feb 15, 2014 · 20 Comments

Delicious nutty Linzer cookies are a traditional sandwich cookie with strawberry jam with a tender texture and subtle nutty flavor.

Love is in the air in the month of February, and you can see valentine gifts everywhere in all shops. I usually make sure to bake some cookies and cakes for Valentine; this month too I planned a few recipes, and d as always I was not able to finish in time. I choose Linzer cookies for this month Baking Partners Challenge. I was not intending to select recipe for this month.

However the person I asked to share the recipe was not able to share one with step by step pictures as I wanted. So in the last minute I tried this Linzer cookies and Heart shaped crunchy seed cookies.

These Linzer Cookies are actually a modification of the famous Linzer Torte, which is named for the city of Linz, Austria and is the oldest-known torte in the world. The recipe was found in 1653 in the archive of the Admont Abbey in Austria. The Linzer Torte has a lattice design on top of the pastry and the dough is made with ground nuts, usually hazelnuts, sometimes almonds or walnuts and is filled with black or red currant preserves.

Linzer cookies use the same recipe as the Linzertorte for the dough, which is then cut into cookies. In the Linzer cookies, two cookies sandwich the preserves.  Also the top of the cookie has a small cutout in its center (known as Linzer eyes), thus exposing the underlying jam and adding to the visual appeal.  While the traditional cutout is circular, all sorts of shapes, such as hearts, are also popular. Since it is Valentine month I used heart shaped cut out to make Linzer eyes.

I didn’t have hazelnuts in my hand so used blanched almonds.  This recipe is a modified from Adapted from Alice Medrich, Chewy, Gooey, Crispy, Crunchy. I changed it slightly as I am skeptical about pulsing the all nuts, flour and spices together. I first made almond meal and then incorporated with flour, butter, spices. Best thing is it has both lemon/lime zest and orange zest, it imparts huge flavor along with almond extract. I made the cookies first day and refrigerate the dough overnight and then made cookies next day. As Alice said, I sandwiched cookies only when I was ready to serve. I bought Wilton Linzer cookie cutter for this bought from bed and bath beyond.

Only thing you need to make sure while cutting is that lightly flour the surface to prevent from sticking. This recipe is eggless you can also make it gluten and vegan free.  Here comes the recipe.

Next cut out the cookies from the dough . 


After baking sandwich them with  jam. 

Print Recipe
5 from 7 votes

Linzer Cookies for Baking partners challenge

Delicious nutty Linzer cookies, sandwiched with strawberry jam.
Prep Time8 hours hrs 5 minutes mins
Cook Time25 minutes mins
Total Time8 hours hrs 30 minutes mins
Course: Dessert
Cuisine: Austrian
Keyword: Christmas recipes, cookie recipes, Linzer cookies
Servings: 40 cookies
Calories: 33kcal
Author: Swathi (Ambujom Saraswathy)

Ingredients

  • 1 cups+ 2 tablespoon 5.06 ounces/145g unbleached all-purpose flour
  • ½ cup 2.5 ounces 63g ground almonds and/or hazelnuts
  • ¼ cup 1.75 ounces/50g granulated sugar
  • ⅛ teaspoon salt
  • 1 ¼ teaspoons ground cinnamon
  • ⅛ teaspoon ground cloves
  • 8 tablespoon of unsalted butter
  • ⅛ teaspoon almond extract
  • 1 teaspoon grated lemon zest or ¼ teaspoon lemon extract
  • 1 teaspoon grated orange zest or ¼ teaspoon orange extract
  • Strained or pureed good quality preserves or fruit spread
  • 1 teaspoon + extra Powdered sugar for dusting

Instructions

  • Blanch almond and make powder with 1 teaspoon of powdered sugar like this.
  • In a bowl of kitchen aid stand mixer combine the flour, ground nuts, granulated sugar, salt, cinnamon, cloves , almond extract and the lemon and orange zests or extracts . Then add the butter (cut into several pieces if firm) mix well until mixture looks damp and crumbly. Continue mixing until all the dough comes together. Remove the dough, press it into a ball, and knead it a few times to be sure all of the dry ingredients are blended into the dough.
  • Form the dough into 1 flat patty. Wrap and refrigerate the dough for at least 2 hours and preferably overnight or up to 3 days. The dough may be frozen for up to 3 months.
  • Preheat the oven to 325°F. Position racks in the upper and lower thirds of the oven.
  • To Roll and Cut Cookies:
  • Remove dough from the refrigerator and let it sit at room temperature until supple enough to roll but still quite firm. It will continue to soften as you work. Roll the dough to a thickness of ⅛ inch between sheets of wax paper or between heavy plastic sheets cut from a plastic bag. Turn the dough over once or twice while you are rolling it out to check for deep wrinkles; if necessary, peel off and smooth the paper or plastic over the dough before continuing to roll it. When the dough is thin enough, peel off the top sheet of paper or plastic and keep it in front of you. Invert the dough onto that sheet and peel off the second sheet. Cut as many large shapes as possible. Dip the edges of the cookie cutters in flour as necessary to prevent sticking. Cut a smaller shape from the center of half of the large shapes. Use the point of a paring knife to lift and remove scraps as you transfer the cookies to the lined or ungreased pans. Place large cookies at least 1 ½ inches apart on the cookie sheets. If the dough gets too soft at any time-while rolling, cutting, removing scraps between cookies, or transferring cookies-slide a cookie sheet underneath the paper or plastic and refrigerate the dough for a few minutes, until firm. Repeat with the second piece of dough. Gently press all of the dough scraps together (don't overwork them with too much kneading) and reroll.
  • Bake for 15 to 25 minutes , or until the cookies are just beginning to color at the edges. Rotate the pans from top to bottom and from front to back halfway through the baking time to ensure even baking. (The small shapes may be baked for 8 to 10 minutes on a separate cookie sheet to make miniature cookies, or the dough may be combined with other dough scraps to be rerolled and cut.)
  • Let the cookies firm up on the pan for 1 to 2 minutes. For lined pans, set the pans or just the liners on racks to cool; for unlined pans, use a metal spatula to transfer the cookies to racks. Cool the cookies completely before stacking or storing. The cookies are delicious fresh but even better the next day. May be kept in an airtight container for a month or more.
  • To assemble, shortly before serving, spread each solid cookie with a thin layer of preserves. Sift powdered sugar over the cookies with cutouts. Place a sugared cutout cookie on top of each preserve-covered cookie. Leftover cookies can be stored in an airtight container, but the moisture from the preserves will soften them

Notes

This Recipe is adapted from Chewy, Gooey, Crispy, Crunchy
 

Nutrition

Calories: 33kcal | Carbohydrates: 2g | Protein: 1g | Fat: 3g | Saturated Fat: 1g | Sodium: 34mg | Potassium: 1mg | Fiber: 1g | Sugar: 1g | Vitamin A: 100IU | Vitamin C: 1mg | Calcium: 4mg | Iron: 1mg
Tried this recipe?Mention @nidhinikhil or tag #zestysouthindiankitchenrecipes!


');

Bakes, Cookies, Featured

Five Green Juice From Hong Kong

Feb 3, 2014 · 10 Comments

Delicious, cleansing, detoxifying, diabetic friendly vegetable and fruit Five green Juice from Hong Kong full of nutrients.

Hong Kong is one of the most crowded and densely populated areas in the World. I been there as transit stop while travelling to India on Cathay Pacific.  We took flight from Los Angles and travel to Hong Kong and then to Mumbai from there. I have seen Hong Kong’s street market’s only in Jacky Chan’s movies. However never got a chance to visit, but when I saw this recipe of Five Green Juice from Hong Kong, I felt I need to try it. As you know I am a juice and smoothie person I immediately dive to try it.

I first saw this recipe here , where author says he tasted this juice in streets of Mong kok in Hong Kong. I read that Mong Kok  street is one of busiest streets in Hong Kong, it a place good for tourists as full of markets and food stalls. You want to take a peek of the street then here it is . I always dreams about travelling those places and enjoy various kinds of foods. Never got a chance to do that may be in future.

This vegetables juice is even sold in bottled drink, it really healthy, with all green color veggies and fruits. It has detoxifying as well as sugar reducing power. Yes in India we use Indian bitter gourd/ bitter melon juice for diabetics saying that it will reduce the blood sugar. I was a fan of bitter gourd usually makes curries and stir fry with them.  I was afraid to try it in juice until I saw this recipe.  You need bitter melon, green bell pepper, cucumber, celery and green apple with touch of salt and pepper to make this juice.

Bitter melon/ Bitter gourd, contains at least three active substances with anti-diabetic properties, like Charantin, Vicine, and Lectin.  Charantin, which has been confirmed to have a blood glucose-lowering effect, vicine and an insulin-like compound known as polypeptide-p. Which either work individually or together to help reduce blood sugar levels. Lectin act on peripheral tissues and suppressing appetite - similar to the effects of insulin in the brain. This lectin is thought to be a major factor behind the hypoglycemic effect that develops after eating bitter melon. Bitter melon is used in traditional medicine for Colic. Fever, burns, chronic cough, painful menstruation, and certain skin conditions, read more from here .

1-cup serving of green bell peppers contains 2.5 grams of fiber toward the daily recommendation of 21 to 25 grams for women and the 30 to 38 grams for men.  It also very rich in Vitamin C, 1 cup of green bell pepper contains 119.8 g, which far more than our daily requirements of 75 and 90 milligrams of vitamin C per day. If diet is rich in vitamin C, less likely to develop infections, and skin, teeth, gums and blood vessels are healthier and work more efficiently. The same serving of chopped green bell peppers contains 0.55 milligrams of vitamin E toward the 15 milligrams you should take in every day. Vitamin E helps protect cells from damage and supports a strong immune system read more from here .

An excellent source of Vitamin K, celery is also a low calorie food that is great for people who are trying to lose weight. It’s also packed with antioxidants.

I already mentioned about the health benefits of Cucumber and Green apple here in my immune juice post and this post.

This is delicious healthy juice, diabetic friendly, however you need to get acquired taste of bitter melon. I used Indian bitter melon than Chinese bitter melon mentioned in the recipe I saw. I also added touch of salt and pepper. Try this if you want a unique tasting experience. You can find Indian bitter melon or Chinese bitter melon in Asian stores as well as few stores that cater Hispanic American population like Fiesta, HEB etc.

Here comes the recipe


Print Recipe
5 from 5 votes

Five Green Juice From Hong Kong

Delicious, cleansing, detoxifying, diabetic friendly juice.
Prep Time2 minutes mins
Cook Time5 minutes mins
Total Time7 minutes mins
Course: Breakfast
Cuisine: Hong Kong Recipes
Keyword: Green Juice
Servings: 2 serving
Calories: 68kcal

Ingredients

  • 1 green bell pepper/ capsicum
  • 1 Indian bitter melon/ karela/Pavakka
  • 1 green apple
  • 3 celery sticks
  • ¼ teaspoon salt
  • ⅛ th teaspoon pepper
  • 2 cups of water

Instructions

  • Peel and de-seed cucumber and cut it into chunks. De-seed bell pepper and Indian bitter melon/karela and cut it into chunks. Cut green apple and celery into big chunks. Add everything into a blender along with salt, pepper and water and blend well for 5 minutes. Strain and enjoy.

Nutrition

Calories: 68kcal | Carbohydrates: 17g | Protein: 1g | Fat: 1g | Saturated Fat: 1g | Sodium: 313mg | Potassium: 339mg | Fiber: 4g | Sugar: 11g | Vitamin A: 515IU | Vitamin C: 91mg | Calcium: 28mg | Iron: 1mg
Tried this recipe?Mention @nidhinikhil or tag #zestysouthindiankitchenrecipes!


Detox Juice, Detox., Diabetic Friendly, Featured, juice, Juices

Shiner Bock Beer bread

Jan 27, 2014 · 21 Comments

I am wine and beer person, and love all kinds of beers; my favorites are Heineken, Asahi, Kirin, Shiner Bock and Dos Equis.  And I also love various kinds of bread, and thus was planning for making beer bread for long time. While doing an after Christmas shopping, I noticed an Amber Harvest Mills Beer Bread Mix Gift Set with mix and loaf pan and I bought it. And I have also come across Shiner Bock buns recipe. So decided to make this shiner bock beer bread.

I have seen Shiner Bock beer bread and yeast rolls in the menu of a  Dagar’s wedding catering service in the Lake Travis, Texas. I wanted try it immediately however I did not have Shiner Bock in hand. So I waited and finally when I got this beer bread mix I used Shiner Bock beer to make this bread. Added 2 tablespoon of melted butter for baking this bread, which is not mentioned in package, I was skeptical about the result in the mind I was thinking are I am wasting one bottle of beer. When the bread comes out the oven it was really nice smell. And when I tasted it is delicious. May be the Shiner Bock and butter did wonders here. I have seen a review where same mix used with another beer doesn’t taste good.


Shiner bock is brewed at  Spoetzl  brewery one of the oldest brewery  in Texas,

I used one bottle 16 oz of shiner bock beer to make this bread instead of 12 oz mentioned in the package.

 This bread is really delicious when it is comes of the oven; upon storing they will lose their taste. It is unique taste. If you are a beer lover you will love it.

Here comes the recipe


Print Recipe
No ratings yet

Shiner Bock Beer bread

This is delicious beer bread, goes well with any soup.It is also excellent toast.
Prep Time2 minutes mins
Cook Time1 hour hr
Total Time1 hour hr 2 minutes mins
Course: Breakfast
Cuisine: American
Keyword: Beer Recipes, Quick bread
Servings: 1 loaf
Calories: 274kcal
Author: Swathi (Ambujom Saraswathy)

Ingredients

  • 16 ounce Amber harvest milks beer bread mix:
  • 6 ounce Shiner bock Beer: 1 bottle for non-alcoholic version use Ginger ale
  • 2 tablespoon Unsalted butter melted: Increase up to ¼ cup if your prefer

Instructions

  • Preheat oven to 375F.
  • In a bowl add bread mix and add beer (or ginger ale). Mix with a wooden spoon until moist (*Do not over-mix). Make sure not to see any flour particles. Batter will clumpy don't worry. Pour the batter into a greased and floured 9” x 5” loaf pan with 1 tablespoon of melted butter in the bottom.
  • Then add the batter and on the top of batter add rest of melted butter. Bake in a preheated 375° oven for 60 minutes, or until done.
  • Let cool the bread in the pan for about 10 minutes.
  • Then slice and enjoy.

Nutrition

Calories: 274kcal | Carbohydrates: 6g | Protein: 1g | Fat: 23g | Saturated Fat: 14g | Cholesterol: 60mg | Sodium: 10mg | Potassium: 46mg | Sugar: 1g | Vitamin A: 700IU
Tried this recipe?Mention @nidhinikhil or tag #zestysouthindiankitchenrecipes!

Pin it for later

Quick Bread

Mocha Banana Dates Smoothie

Jan 21, 2014 · 29 Comments

Delicious smoothie made of banana, coffee and cocoa powder, it has protein from almonds, make it skinny with addition of dates.

Mocha Banana Dates Smoothie


 Mocha bannaa dates smoothie is simple to put together with ingredients in the pantry. Mocha banana dates smoothie in the Red book Magazine. The recipe looked interesting; and also was termed as skinny version in the book hence I decided to try it.

How to make Mocha Banana Dates Smoothie?

You need these ingredients  to make this smoothie.

I realized that my kids most likely would not drink it as it would most likely be slightly bitter from cocoa powder.

So I changed recipe  slightly by adding dates to the smoothie, and also used instant coffee powder for left over coffee and instead of  almond butter(which I did not have  in my hand),  I substituted with 6 almonds which correspond to 1 tablespoon of almond butter according to this site. It is great one to start your breakfast or as evening snack. You can skip the dates if you don’t want additional sugar in your smoothie.

Frozen bannaa adds creaminess to smoothie . It adds light sweentess also. Act as a thickenner too in smoothie recipes. 

Make sure to soak dates for few hours in water, so that it won’t hurt the blender blade. Add frozen banana, instant coffee powder, water, milk, 6 almonds, 5 soaked dates and 1 tablespoon of cocoa powder and blend well, enjoy you will love it. I am 100% sure about that.

Mocha Banana Dates Smoothie


Here comes the recipe

. Mocha Banana Dates Smoothie making steps

Other Mocha recipes you may love is 

Mocha Frappe 

Print Recipe
5 from 2 votes

Mocha Banana Date Smoothie

Delicious Mocha banana date smoothie full of of chocolate flaovr with touch sweetness with dates.
Prep Time5 minutes mins
Total Time5 minutes mins
Course: Breakfast
Cuisine: American
Keyword: Healthy Smoothie, Mocha Banana Date Smoothie, Smoothie recipes
Servings: 1
Calories: 205kcal

Ingredients

  • 1 large frozen banana cut into chunks
  • ½ cup water
  • ½ teaspoon instant coffee powder*
  • ½ cup 2% milk/ diary free milk for vegan options
  • 1 tablespoon cocoa powder plus more for dusting
  • 6 almonds or 1 tablespoon almond butter
  • Chocolate-covered espresso beans for garnish (optional)

Instructions

  • Place banana, ½ teaspoon instant coffee powder, water, milk, soaked dates, cocoa powder, and almonds in a blender and blend until smooth, about 1 minute.
  • Pour smoothie into a glass. Dust with cocoa powder and top with a few crushed chocolate-covered espresso beans, if desired.

Notes

This Recipe is adapted from Redbook Magazine

Nutrition

Serving: 1g | Calories: 205kcal | Carbohydrates: 37g | Protein: 8g | Fat: 6g | Saturated Fat: 2g | Polyunsaturated Fat: 1g | Monounsaturated Fat: 3g | Cholesterol: 6mg | Sodium: 61mg | Potassium: 738mg | Fiber: 5g | Sugar: 21g | Vitamin A: 307IU | Vitamin C: 10mg | Calcium: 185mg | Iron: 1mg
Tried this recipe?Mention @nidhinikhil or tag #zestysouthindiankitchenrecipes!


Smoothie

Koffiebroodjes/ Dutch coffee buns for Baking Partners Challenge#19

Jan 16, 2014 · 32 Comments

For this month’ Baking Partners Challenge, we are going Netherlands, the country I known only through as transit for my long travel to India. This koffiebroodjes/ Dutch coffee buns and Dutch apple pie are suggested by Kaveri of Palakad chamyal.  These buns are usually served with coffee, so it is called coffee buns.  Do you know Dutch are the second largest coffee drinkers in the world, first one goes to Scandinavia? I know when I was working in Stockholm, Sweden. Fika/coffee break is really important for Swedes. They used to take two coffee break one in the morning and other in the evening.

If you are in Japan, you will be greeted with cup of green tea/ ocha, in Dutch you will be greeted with coffee. During the coffee break / Koffiepauze as in Dutch they indulge these delicious coffee buns. However these buns don’t have characteristic Dutch spices /speculaas spices. It is more like brioche dough filled with cream, pudding or jam of your choice along with raisins and currants.

I love to deal with yeast, so choose the coffee buns. Even though recipe given for the challenge is eggless, I have gone with original recipe which has egg in it. I love to know the taste of original koffiebroodjes available in Netherlands. However my pudding and sour cream mixture turned out to be too runny and gave me a hard time while cutting rolled dough into small piece. Next time I will keep that in mind and make filling similar to pie filling rather than pudding.

I had only 2 ¼ cup all purpose flour in my hand, so made with that. I was able to get 16 pieces. I first made dough with flour, yeast, sugar, salt, butter, egg and milk then set aside for doubling for about 90 minutes. As my kitchen is cold, it took that much time. Then spread dough into 12x12 inch square and filled with vanilla sour cream pudding mixture as well as currants and raisins. Rolled it into cylinder and cut them into small pieces and after resting for 30 minutes baked at 350 ⁰F for 30 minutes. When they were out of the oven brushed them with glaze made of jam.

They are delicious and good with coffee or tea. Give it try. They are at prime when it is warm and freshly comes out the oven.

Make sure to take a look at other baking partner’s creations. If you like to join us next month, shoot an e-mail.

Print
Koffiebroodjes/ Dutch coffee buns for Baking Partners Challenge#19

Rating: 51

Prep Time: 100 minutes

Cook Time: 30 minutes

Total Time: 130 minutes

Yield: 16

Dutch coffee buns great with not only coffee but also with tea. Enjoy your break with these delicious treat.

Ingredients

    Koffiebroodjes
  • 2 ¼ cup All purpose flour/Maida
  • 11/4 /5.25g teaspoon instant yeast
  • ⅓ cup/81g of milk
  • 3 tablespoon /40g of butter
  • ¼ teaspoon salt
  • 2.5 tablespoon/37.5g sugar
  • ½ teaspoon vanilla extract
  • Filling
  • ⅓ cup/53g of raisins
  • 2 tablespoon/19g of currants
  • + Cream
  • For the cream
  • 1 package of French vanilla pudding
  • ⅓ cup of sour cream
  • For the glaze
  • 2 tablespoons of strawberry jam
  • 1 tablespoon of warm water

Instructions

  1. In a microwave safe bowl heat milk and butter for 30 seconds and set aside. In a bowl of kitchen aid stand mixer add flour, salt, yeast, sugar, egg, vanilla, and milk and butter mixture to knead for about 8 minutes to form sticky but tacky dough. Transfer the dough to well greased bowl for doubling it will take about 90 minutes.
  2. In the meantime, mix the pudding with half the required amount of liquid on the package. Stir in the sour cream.
  3. In microwave safe bowl heat raisins and currants in 1 cup water for about 30 seconds so that it will swells up little bit. Drain and dry them using a kitchen towel.
  4. When the dough is doubled, transfer to slightly floured area. Roll the dough out into a square, 12 x 12 inches with ¼ inch thickness. Spread the vanilla pudding on the dough, leaving all sides uncovered. Sprinkle the raisins over the pudding. Now take the furthest end of the dough and roll it up towards you. Place it seam down and divide the roll into equal slices, of about an inch to an inch and a half wide.
  5. Place the slices, cut side down on a silicone mat or parchment paper on a baking sheet. Cover and proof for thirty minutes or until the dough is puffy. Heat the oven to 350F and bake the rolls golden brown in 30 minutes or until done.
  6. Mix the apricot jam with the warm water and brush the rolls when they come out of the oven. Brush them again when they've slightly cooled. Serve warm if possible.

Notes

This Recipe is adapted from here Dutchtable

Copyright ©2014 Zesty South Indian Kitchen by Swathi( Ambujom Saraswathy) All Rights Reserved

3.1
Copyright ©2013 Zesty South Indian Kitchen by Swathi( Ambujom Saraswathy) All Rights Reserved

BakingPartnersLogo

Bakes, Breakfast, Breakfast Dishes, Buns, Yeast

Best Dark Chocolate Cupcakes with Chocolate Ganache Frosting

Jan 13, 2014 · 11 Comments

Best dark chocolate cupcakes with chocolate ganache frosting with touch of sea salt is ulitmate of chcocolate lovers dream. Best Dark Chocolate Cupcakes with Chocolate Ganache Frosting


My kids are chocolate lovers; daughter always asks for chocolate chips cookies, and my son also wants cookies with chocolate. I tried and tested vanilla cupcakes, so decide to try chocolate cupcakes. This recipe turned to be my best dark chocolate cupcakes. I tried chocolate Ganche frosting to go with it.

This dark chocolate cupcake is adapted from this recipe, and when I checked my pantry I have only Hershey’s special dark cocoa powder  in my hand, so decided to modified the recipe a little bit.  I changed oil to butter, instead of ½ cup cocoa, I used ⅓ cup special dark cocoa, ¼ cup sour cream and ½ cup coffee made with ½ teaspoon instant coffee and ½ cup water. I was able to get 12 cupcakes with this recipe. They are delicious my kids started to eating as soon coming out the oven.

I made the chocolate ganache frosting to go with these dark chocolate cupcakes. It is easy to make I made with semi sweet chocolate bars and heavy cream.

Best Dark Chocolate Cupcakes with Chocolate Ganache Frosting

You can use any dark chocolate  cooca powder . Only thing is  cupcake color will be less dark. Taste wise I don't  it is going to be any difference. 

If  you don't have sourcream in hand use greek yougrut that will also make moist cupcakes. 

Butter adds richness to the cupcakes you can substitute with oil if you don't want butter and sour cream together. 

Adding coffee helps to bring out the chocolate flavor more in this cupcake. 


You need to mix flour, salt, baking soda and cooca powder. 

Then cream butter and sugar and add egg, vanilla extract and then add flour and coffee. 


Best Dark Chocolate Cupcakes with Chocolate Ganache Frosting

Do you like more chocolate cupcakes recipes? 

Halloween cupcakes 

Print Recipe
5 from 4 votes

Best Dark Chocolate Cupcakes with Chocolate Ganache Frosting

Delicious dark chocolate cupcakes with chocoalte ganache frosting.
Prep Time10 minutes mins
Cook Time15 minutes mins
Total Time25 minutes mins
Course: Dessert
Cuisine: American
Keyword: Chocolate cupcakes, cupcake recipes
Servings: 12 servings
Calories: 315kcal

Equipment

  • Muffin tin
  • Silicone Baking Cups

Ingredients

Chocolate cupcakes

  • 1 cup all-purpose flour
  • 1 cup granulated sugar
  • ⅓ cup Hershey’s special dark cocoa
  • 1 teaspoon baking powder
  • ½ teaspoon baking soda
  • ½ teaspoon salt
  • ½ teaspoon espresso powder
  • ¼ cup Sour cream
  • ¼ cup butter soft at room temperature
  • 1 egg
  • ½ teaspoon vanilla
  • ½ cup boiling water

Chocolate Ganache frosting

  • 9 ounce 1 ¾ cup semi sweet baking chocolate
  • ¾ cup heavy cream

Instructions

Chocolate Cupcakes

  • Preheat oven to 350 F/ 176 C
  • Place silicone baking cups in muffin tin.
  • Mix ½ teaspoon of instant coffee powder in ½ cup boiling water and set aside.
  • Add flour, sugar, cocoa, baking powder, baking soda, and salt to a large bowl or the bowl of a stand mixer. Whisk through to combine or, using your paddle attachment, stir through flour mixture until combined well.
  • Add sour cream, butter, egg, sugar and vanilla cream well then add flour mixture and mix together on medium speed until well combined. Reduce speed and carefully add coffee to the cake batter. Beat on high speed for about 1 minute to add air to the batter.
  • Evenly distribute cake batter. Each cupcake liner should be about ⅔ths full.
  • Place in the oven and bake 15-18 minutes or until a toothpick inserted in the center comes out clean.
  • Remove from the oven and allow the cupcakes to cool completely.

For the Chocolate Ganache Frosting:

  • Place 9 ounce of chocolate and heavy cream into microwave safe bowl and heat for about 30 seconds high, and mix very well. Refrigerate for about 15 minutes to thicken the chocolate a little bit so that it will easy for piping.
  • Transfer the entire content in the piping bag and pipe according your wish on the top of chocolate cupcakes.

Nutrition

Calories: 315kcal | Carbohydrates: 33g | Protein: 5g | Fat: 22g | Saturated Fat: 14g | Polyunsaturated Fat: 1g | Monounsaturated Fat: 7g | Trans Fat: 1g | Cholesterol: 47mg | Sodium: 198mg | Potassium: 284mg | Fiber: 5g | Sugar: 17g | Vitamin A: 387IU | Vitamin C: 1mg | Calcium: 59mg | Iron: 5mg
Tried this recipe?Mention @nidhinikhil or tag #zestysouthindiankitchenrecipes!

Bakes, Cake, Chocolate

  • « Go to Previous Page
  • Page 1
  • Interim pages omitted …
  • Page 18
  • Page 19
  • Page 20
  • Page 21
  • Page 22
  • Interim pages omitted …
  • Page 33
  • Go to Next Page »

Primary Sidebar

Hi, I'm Swathi! .All the recipes you see here are created by me and approved after taste-test by my family.

More about me →Here

Popular

  • Easy Sourdough Cherry Tomato Focaccia
  • Pumpkin Apple Sourdough Loaf
  • Rose Petal Pistachio Cardamom Sourdough
  • Soft Sourdough Breadsticks (Fluffy, Chewy & Naturally Fermented)

About Swathi

SwathiWelcome to Zesty South Indian Kitchen, I am Swathi ( Dr. Ambujom Saraswathy Ph.D) who loves to explore cuisines from all over the world. Whenever possible I try to to give an Indian touch to several of the world cuisine, and has weakness for freshly baked bread. I am mom to twowonderful young kids, and has a wonderful loving husband who gives a up or down vote to the food .All the recipes you see here are created by me and approved after taste-test by my family.
  • Facebook
  • Instagram
  • Pinterest
  • Twitter
  • YouTube

Subscribe

Get Delicious Recipes in Your Inbox

Privacy Policy

Archives

Grow

Footer

Featured on

Subscribe

Get Delicious Recipes in Your Inbox

Privacy Policy

Footer

↑ back to top

About

  • Privacy Policy
  • Disclaimer

Newsletter

  • Sign Up! for emails and updates

Contact

  • Contact

Rate This Recipe

Your vote:


Let us know what you thought of this recipe: Please write your Name if possible ,

This worked exactly as written, thanks!
My family loved this!
Thank you for sharing this recipe

Or write in your own words:

A rating is required
A name is required
An email is required